標籤: 新北清潔

  • mybatis緩存之一級緩存(二)

    mybatis緩存之一級緩存(二)

    這篇文章介紹下mybatis的一級緩存的生命周期

    一級緩存的產生

    一級緩存的產生,並不是看mappper的xml文件的select方法,看下面的例子

    mapper.xml

        <select id="getById" resultType="entity.TempEntity">
           select * from  temp where id = #{id}
        </select>
    

    test

        @Test
        public  void testSelectAsUpdate() throws IOException {
            InputStream inputStream = Resources.getResourceAsStream("mybatis.xml");
            SqlSessionFactory build = new SqlSessionFactoryBuilder().build(inputStream);
            SqlSession sqlSession = build.openSession();
            sqlSession.update("dao.Temp03Dao.getById", 1);
            sqlSession.update("dao.Temp03Dao.getById", 1);
        }


    執行結果

    2020-06-26 17:33:27,899 DEBUG [dao.Temp03Dao.getById] - ==>  Preparing: select * from temp where id = ? 
    2020-06-26 17:33:27,922 DEBUG [dao.Temp03Dao.getById] - ==> Parameters: 1(Integer)
    2020-06-26 17:33:27,923 DEBUG [dao.Temp03Dao.getById] - ==>  Preparing: select * from temp where id = ? 
    2020-06-26 17:33:27,923 DEBUG [dao.Temp03Dao.getById] - ==> Parameters: 1(Integer)
    

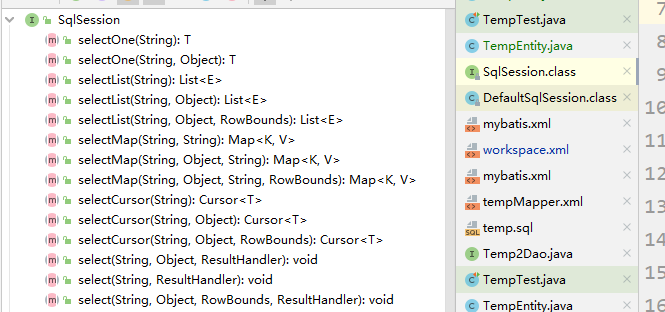
    我們可以看到執行了2次查詢。說明並沒有產生緩存。說明和sqlsession調用的方法是有關係的

    只有調用上圖中的方法才會產生一級緩存

    一級緩存的銷毀

    1.關閉session

    這個是根據debug看到的一級緩存的最終結構。下面是整個依賴的類圖

    test

     @Test
        public  void test() throws IOException, NoSuchFieldException, IllegalAccessException {
            InputStream inputStream = Resources.getResourceAsStream("mybatis.xml");
            SqlSessionFactory build = new SqlSessionFactoryBuilder().build(inputStream);
            SqlSession sqlSession = build.openSession();
            TempEntity tempEntity1 = sqlSession.selectOne("dao.Temp03Dao.getById", 1);
            logger.info(tempEntity1);
    
            Field executorField = sqlSession.getClass().getDeclaredField("executor");
            executorField.setAccessible(true);
            CachingExecutor  cachingExecutor = (CachingExecutor) executorField.get(sqlSession);
    
            Field declaredField = cachingExecutor.getClass().getDeclaredField("delegate");
            declaredField.setAccessible(true);
            SimpleExecutor simpleExecutor  = (SimpleExecutor) declaredField.get(cachingExecutor);
    
            Field localCacheField = simpleExecutor.getClass().getSuperclass().getDeclaredField("localCache");
            localCacheField.setAccessible(true);
            PerpetualCache perpetualCache = (PerpetualCache) localCacheField.get(simpleExecutor);
    
            Field cacheField = perpetualCache.getClass().getDeclaredField("cache");
            cacheField.setAccessible(true);
            Map<Object,Object> map= (Map<Object, Object>) cacheField.get(perpetualCache);
            logger.info("緩存關閉前");
            for (Map.Entry<Object,Object> objectObjectEntry:map.entrySet()){
                logger.info(objectObjectEntry.getKey() + "===" + objectObjectEntry.getValue());
            }
            sqlSession.close();
            logger.info("緩存關閉后");
    
            for (Map.Entry<Object,Object> objectObjectEntry:map.entrySet()){
                logger.info(objectObjectEntry.getKey() + "=" + objectObjectEntry.getValue());
            }
        }
    

    運行結果

    2020-06-26 17:38:52,777 DEBUG [dao.Temp03Dao.getById] - ==>  Preparing: select * from temp where id = ? 
    2020-06-26 17:38:52,801 DEBUG [dao.Temp03Dao.getById] - ==> Parameters: 1(Integer)
    2020-06-26 17:38:52,824 DEBUG [dao.Temp03Dao.getById] - <==      Total: 1
    2020-06-26 17:38:52,824 INFO [TempTest] - TempEntity{id=1, value1='11111', value2='aaaaa'}
    2020-06-26 17:38:52,825 INFO [TempTest] - 緩存關閉前
    2020-06-26 17:38:52,826 INFO [TempTest] - -1654591322:461730790:dao.Temp03Dao.getById:0:2147483647:select * from  temp where id = ?:1:dev===[TempEntity{id=1, value1='11111', value2='aaaaa'}]
    2020-06-26 17:38:52,827 INFO [TempTest] - 緩存關閉后
    

    可以看到session關閉后,緩存就不存在了

    2.Commit提交

    test

        @Test
        public  void testCommit() throws IOException {
            InputStream inputStream = Resources.getResourceAsStream("mybatis.xml");
            SqlSessionFactory build = new SqlSessionFactoryBuilder().build(inputStream);
            SqlSession sqlSession = build.openSession();
            TempEntity tempEntity1 = sqlSession.selectOne("dao.Temp03Dao.getById", 1);
            logger.info(tempEntity1);
            sqlSession.commit();
            TempEntity tempEntity2 = sqlSession.selectOne("dao.Temp03Dao.getById", 1);
            logger.info(tempEntity2);
            logger.info(tempEntity1 == tempEntity2);
    
        }
    

    運行結果

    2020-06-26 17:40:40,821 DEBUG [dao.Temp03Dao.getById] - ==>  Preparing: select * from temp where id = ? 
    2020-06-26 17:40:40,846 DEBUG [dao.Temp03Dao.getById] - ==> Parameters: 1(Integer)
    2020-06-26 17:40:40,862 DEBUG [dao.Temp03Dao.getById] - <==      Total: 1
    2020-06-26 17:40:40,862 INFO [TempTest] - TempEntity{id=1, value1='11111', value2='aaaaa'}
    2020-06-26 17:40:40,863 DEBUG [dao.Temp03Dao.getById] - ==>  Preparing: select * from temp where id = ? 
    2020-06-26 17:40:40,863 DEBUG [dao.Temp03Dao.getById] - ==> Parameters: 1(Integer)
    2020-06-26 17:40:40,864 DEBUG [dao.Temp03Dao.getById] - <==      Total: 1
    2020-06-26 17:40:40,864 INFO [TempTest] - TempEntity{id=1, value1='11111', value2='aaaaa'}
    2020-06-26 17:40:40,864 INFO [TempTest] - false
    

    說明sqlSession.commit時會清空緩存

    3.Rollback

    test

        @Test
        public  void testRollback() throws IOException {
            InputStream inputStream = Resources.getResourceAsStream("mybatis.xml");
            SqlSessionFactory build = new SqlSessionFactoryBuilder().build(inputStream);
            SqlSession sqlSession = build.openSession();
            TempEntity tempEntity1 = sqlSession.selectOne("dao.Temp03Dao.getById", 1);
            logger.info(tempEntity1);
            sqlSession.rollback();
            TempEntity tempEntity2 = sqlSession.selectOne("dao.Temp03Dao.getById", 1);
            logger.info(tempEntity2);
            logger.info(tempEntity1 == tempEntity2);
    
        }
    

    執行結果

    2020-06-26 17:42:23,793 DEBUG [dao.Temp03Dao.getById] - ==>  Preparing: select * from temp where id = ? 
    2020-06-26 17:42:23,833 DEBUG [dao.Temp03Dao.getById] - ==> Parameters: 1(Integer)
    2020-06-26 17:42:23,843 DEBUG [dao.Temp03Dao.getById] - <==      Total: 1
    2020-06-26 17:42:23,843 INFO [TempTest] - TempEntity{id=1, value1='11111', value2='aaaaa'}
    2020-06-26 17:42:23,844 DEBUG [dao.Temp03Dao.getById] - ==>  Preparing: select * from temp where id = ? 
    2020-06-26 17:42:23,844 DEBUG [dao.Temp03Dao.getById] - ==> Parameters: 1(Integer)
    2020-06-26 17:42:23,845 DEBUG [dao.Temp03Dao.getById] - <==      Total: 1
    2020-06-26 17:42:23,845 INFO [TempTest] - TempEntity{id=1, value1='11111', value2='aaaaa'}
    2020-06-26 17:42:23,845 INFO [TempTest] - false
    

    sqlSession.rollback()也會清空緩存

    4.update更新

    這裡是在第一次查詢后,緊接着進行update操作。這裏與表無關。就是操作其它表,也會清空緩存。

    test

        @Test
        public  void testForUpdate() throws IOException {
            InputStream inputStream = Resources.getResourceAsStream("mybatis.xml");
            SqlSessionFactory build = new SqlSessionFactoryBuilder().build(inputStream);
            SqlSession sqlSession = build.openSession();
            TempEntity tempEntity1 = sqlSession.selectOne("dao.Temp03Dao.getById", 1);
            logger.info(tempEntity1);
            sqlSession.update("dao.Temp03Dao.updateById", 1);
            TempEntity tempEntity2 = sqlSession.selectOne("dao.Temp03Dao.getById", 1);
            logger.info(tempEntity2);
            logger.info(tempEntity1 == tempEntity2);
    
        }
    

    運行結果

    2020-06-26 17:45:43,997 DEBUG [dao.Temp03Dao.getById] - ==>  Preparing: select * from temp where id = ? 
    2020-06-26 17:45:44,034 DEBUG [dao.Temp03Dao.getById] - ==> Parameters: 1(Integer)
    2020-06-26 17:45:44,048 DEBUG [dao.Temp03Dao.getById] - <==      Total: 1
    2020-06-26 17:45:44,049 INFO [TempTest] - TempEntity{id=1, value1='11111', value2='aaaaa'}
    2020-06-26 17:45:44,049 DEBUG [dao.Temp03Dao.updateById] - ==>  Preparing: update temp set value1 = 'ffffff' where id = ? 
    2020-06-26 17:45:44,049 DEBUG [dao.Temp03Dao.updateById] - ==> Parameters: 1(Integer)
    2020-06-26 17:45:44,050 DEBUG [dao.Temp03Dao.updateById] - <==    Updates: 1
    2020-06-26 17:45:44,051 DEBUG [dao.Temp03Dao.getById] - ==>  Preparing: select * from temp where id = ? 
    2020-06-26 17:45:44,051 DEBUG [dao.Temp03Dao.getById] - ==> Parameters: 1(Integer)
    2020-06-26 17:45:44,052 DEBUG [dao.Temp03Dao.getById] - <==      Total: 1
    2020-06-26 17:45:44,053 INFO [TempTest] - TempEntity{id=1, value1='ffffff', value2='aaaaa'}
    2020-06-26 17:45:44,053 INFO [TempTest] - false
    

    這裏還是在一個session會話中。記得之前有人給我說只要在一個session會話中,執行update不會清空緩存。這裏的代碼就證明了

    5.clearCache 主動清除

    test

        @Test
        public  void testClearCatch() throws IOException {
            InputStream inputStream = Resources.getResourceAsStream("mybatis.xml");
            SqlSessionFactory build = new SqlSessionFactoryBuilder().build(inputStream);
            SqlSession sqlSession = build.openSession();
            TempEntity tempEntity1 = sqlSession.selectOne("dao.Temp03Dao.getById", 1);
            logger.info(tempEntity1);
            sqlSession.clearCache();
            TempEntity tempEntity2 = sqlSession.selectOne("dao.Temp03Dao.getById", 1);
            logger.info(tempEntity2);
            logger.info(tempEntity1 == tempEntity2);
    
        }
    

    運行結果

    2020-06-26 17:48:42,085 DEBUG [dao.Temp03Dao.getById] - ==>  Preparing: select * from temp where id = ? 
    2020-06-26 17:48:42,110 DEBUG [dao.Temp03Dao.getById] - ==> Parameters: 1(Integer)
    2020-06-26 17:48:42,124 DEBUG [dao.Temp03Dao.getById] - <==      Total: 1
    2020-06-26 17:48:42,124 INFO [TempTest] - TempEntity{id=1, value1='11111', value2='aaaaa'}
    2020-06-26 17:48:42,125 DEBUG [dao.Temp03Dao.getById] - ==>  Preparing: select * from temp where id = ? 
    2020-06-26 17:48:42,125 DEBUG [dao.Temp03Dao.getById] - ==> Parameters: 1(Integer)
    2020-06-26 17:48:42,126 DEBUG [dao.Temp03Dao.getById] - <==      Total: 1
    2020-06-26 17:48:42,126 INFO [TempTest] - TempEntity{id=1, value1='11111', value2='aaaaa'}
    2020-06-26 17:48:42,126 INFO [TempTest] - false
    

    一級緩存 臟讀問題

    本站聲明:網站內容來源於博客園,如有侵權,請聯繫我們,我們將及時處理

    【其他文章推薦】

    ※自行創業缺乏曝光? 網頁設計幫您第一時間規劃公司的形象門面

    網頁設計一頭霧水該從何著手呢? 台北網頁設計公司幫您輕鬆架站!

    ※想知道最厲害的網頁設計公司"嚨底家"!

    ※幫你省時又省力,新北清潔一流服務好口碑

    ※別再煩惱如何寫文案,掌握八大原則!

  • 十、深度優先 && 廣度優先

    十、深度優先 && 廣度優先

    原文地址

    一、什麼是“搜索”算法?

    • 算法是作用於具體數據結構之上的,深度優先搜索算法和廣度優先搜索算法都是基於“圖”這種數據結構的。
    • 因為圖這種數據結構的表達能力很強,大部分涉及搜索的場景都可以抽象成“圖”。
    • 圖上的搜索算法,最直接的理解就是,在圖中找出從一個頂點出發,到另一個頂點的路徑。
    • 具體方法有很多,兩種最簡單、最“暴力”的方法為深度優先、廣度優先搜索,還有A、 IDA等啟髮式搜索算法。
    • 圖有兩種主要存儲方法,鄰接表和鄰接矩陣。
    • 以無向圖,採用鄰接表存儲為例:
    public class Graph {
        // 頂點的個數
        private int v;
        // 每個頂點後面有個鏈表
        private LinkedList<Integer>[] adj;
    
        public Graph(int v) {
            this.v = v;
            adj = new LinkedList[v];
            for (int i = 0; i < v; i++) {
                adj[i] = new LinkedList<>();
            }
        }
    
        /**
         * 添加邊
         * @param s 頂點
         * @param t 頂點
         */
        public void addEdge(int s,int t){
            // 無向圖一條邊存兩次(聯想微信好友)
            adj[s].add(t);
            adj[t].add(s);
        }
    }
    

    二、廣度優先搜索(BFS)

    • 廣度優先搜索(Breadth-First-Search),簡稱為 BFS。
    • 它是一種“地毯式”層層推進的搜索策略,即先查找離起始頂點最近的,然後是次近的,依次往外搜索

    2.1、實現過程

    /**
     * 圖的廣度優先搜索,搜索一條從 s 到 t 的路徑。
     * 這樣求得的路徑就是從 s 到 t 的最短路徑。
     *
     * @param s 起始頂點
     * @param t 終止頂點
     */
    public void bfs(int s, int t) {
        if (s == t) {
            return;
        }
        // visited 記錄已經被訪問的頂點,避免頂點被重複訪問。如果頂點 q 被訪問,那相應的visited[q]會被設置為true。
        boolean[] visited = new boolean[v];
        visited[s] = true;
        // queue 是一個隊列,用來存儲已經被訪問、但相連的頂點還沒有被訪問的頂點。因為廣度優先搜索是逐層訪問的,只有把第k層的頂點都訪問完成之後,才能訪問第k+1層的頂點。
        // 當訪問到第k層的頂點的時候,需要把第k層的頂點記錄下來,稍後才能通過第k層的頂點來找第k+1層的頂點。
        // 所以,用這個隊列來實現記錄的功能。
        Queue<Integer> queue = new LinkedList<>();
        queue.add(s);
        // prev 用來記錄搜索路徑。當從頂點s開始,廣度優先搜索到頂點t后,prev數組中存儲的就是搜索的路徑。
        // 不過,這個路徑是反向存儲的。prev[w]存儲的是,頂點w是從哪個前驅頂點遍歷過來的。
        // 比如,通過頂點2的鄰接表訪問到頂點3,那prev[3]就等於2。為了正向打印出路徑,需要遞歸地來打印,就是print()函數的實現方式。
        int[] prev = Arrays.stream(new int[v]).map(f -> -1).toArray();
    
        while (queue.size() != 0) {
            int w = queue.poll();
            LinkedList<Integer> wLinked = adj[w]; // 表示:鄰接表存儲時頂點為w,所對應的鏈表
            for (int i = 0; i < wLinked.size(); ++i) {
                int q = wLinked.get(i);
                // 判斷頂點 q 是否被訪問
                if (!visited[q]) {
                    // 未被訪問
                    prev[q] = w;
                    if (q == t) {
                        print(prev, s, t);
                        return;
                    }
                    visited[q] = true;
                    queue.add(q);
                }
            }
        }
    }
    
    // 遞歸打印s->t的路徑
    private void print(int[] prev, int s, int t) {
        if (prev[t] != -1 && t != s) {
            print(prev, s, prev[t]);
        }
        System.out.print(t + " ");
    }
    

    原理如下:

    2.2、複雜度分析

    • 最壞情況下,終止頂點 t 離起始頂點 s 很遠,需要遍歷完整個圖才能找到。
    • 這個時候,每個頂點都要進出一遍隊列,每個邊也都會被訪問一次,所以,廣度優先搜索的時間複雜度是 O(V+E)
    • 其中,V 表示頂點的個數,E 表示邊的個數。
    • 對於一個連通圖來說,也就是說一個圖中的所有頂點都是連通的,E肯定要大於等於 V-1,所以,廣度優先搜索的時間複雜度也可以簡寫為 O(E)。
    • 廣度優先搜索的空間消耗主要在幾個輔助變量 visited 數組、queue 隊列、prev 數組上。
    • 這三個存儲空間的大小都不會超過頂點的個數,所以空間複雜度是 O(V)

    三、深度優先搜索(DFS)

    • 深度優先搜索(Depth-First-Search),簡稱DFS。
    • 最直觀的例子就是“走迷宮,假設站在迷宮的某個岔路口,然後想找到出口。
    • 隨意選擇一個岔路口來走,走着走着發現走不通的時候,就回退到上一個岔路口,重新選擇一條路繼續走,直到最終找到出口。這種走法就是一種深度優先搜索策略。
    • 如下圖所示,在圖中應用深度優先搜索,來找某個頂點到另一個頂點的路徑。
    • 搜索的起始頂點是 s,終止頂點是 t,在圖中尋找一條從頂點 s 到頂點 t 的路徑。
    • 用深度遞歸算法,把整個搜索的路徑標記出來了。實線箭頭表示遍歷,虛線箭頭表示回退。
    • 從圖中可以看出,深度優先搜索找出來的路徑,並不是頂點 s 到頂點 t 的最短路徑。

    3.1、實現過程

    // 全局變量或者類成員變量,標記是否找到終點 t
    boolean found = false;
    
    /**
     * 深度優先搜索
     *
     * @param s 起始頂點
     * @param t 終止頂點
     */
    public void dfs(int s, int t) {
        found = false;
        // 標記頂點是否被訪問
        boolean[] visited = new boolean[v];
        // prev 用來記錄搜索路徑,prev[w] = a 表示 w 頂點的上一級節點為 a
        int[] prev = Arrays.stream(new int[v])
                .map(f -> -1).toArray();
    
        recurDfs(s, t, visited, prev);
        print(prev, s, t);
    }
    
    private void recurDfs(int w, int t, boolean[] visited, int[] prev) {
        if (found == true) {
            return;
        }
        visited[w] = true;
        if (w == t) {
            found = true;
            return;
        }
        LinkedList<Integer> wLinked = adj[w];
        for (int i = 0; i < wLinked.size(); ++i) {
            int q = wLinked.get(i);
            if (!visited[q]) {
                prev[q] = w;
                recurDfs(q, t, visited, prev);
            }
        }
    }
    

    3.2、複雜度分析

    • 深度搜索中每條邊最多會被訪問兩次,一次是遍歷,一次是回退。
    • 所以,深度優先搜索算法的時間複雜度是 O(E), E 表示邊的個數。
    • 深度優先搜索算法的消耗內存主要是 visited、 prev 數組和遞歸調用棧。
    • visited、 prev 數組的大小跟頂點的個數V成正比,遞歸調用棧的最大深度不會超過頂點的個數,所以總的空間複雜度就是 O(V)

    四,兩者對比

    • 廣度優先搜索和深度優先搜索是圖上的兩種最常用、最基本的搜索算法,比起其他高級的搜索算法,比如A、 IDA等,要簡單粗暴,沒有什麼優化,所以,也被
      叫作暴力搜索算法。
    • 所以,這兩種搜索算法僅適用於狀態空間不大,也就是說圖不大的搜索。
    • 廣度優先搜索,通俗的理解就是,地毯式層層推進,從起始頂點開始,依次往外遍歷。
    • 廣度優先搜索需要藉助隊列來實現,遍歷得到的路徑就是,起始頂點到終止頂點的最短路徑。
    • 深度優先搜索用的是回溯思想,非常適合用遞歸實現。換種說法,深度優先搜索是藉助棧來實現的。
    • 在執行效率方面,深度優先和廣度優先搜索的時間複雜度都是 O(E),空間複雜度是 O(V)。

    本站聲明:網站內容來源於博客園,如有侵權,請聯繫我們,我們將及時處理

    【其他文章推薦】

    ※廣告預算用在刀口上,台北網頁設計公司幫您達到更多曝光效益

    新北清潔公司,居家、辦公、裝潢細清專業服務

    ※別再煩惱如何寫文案,掌握八大原則!

    ※教你寫出一流的銷售文案?

    ※超省錢租車方案

  • springboot的jar為何能獨立運行

    springboot的jar為何能獨立運行

    歡迎訪問我的GitHub

    https://github.com/zq2599/blog_demos
    內容:所有原創文章分類匯總及配套源碼,涉及Java、Docker、Kubernetes、DevOPS等;

    能獨立運行的jar文件

    在開發springboot應用時,通過java -jar命令啟動應用是常用的方式,今天就來一起了解這個簡單操作背後的技術;

    開發demo

    開發一個springboot應用作為本次研究的對象,對應的版本信息如下:

    • JDK:1.8.0_211
    • springboot:2.3.1.RELEASE
    • maven:3.6.0

    接下來開發springboot應用,這個應用異常簡單:

    1. springboot應用名為springbootstarterdemo,pom.xml文件內容:
    <?xml version="1.0" encoding="UTF-8"?>
    <project xmlns="http://maven.apache.org/POM/4.0.0" xmlns:xsi="http://www.w3.org/2001/XMLSchema-instance"
             xsi:schemaLocation="http://maven.apache.org/POM/4.0.0 https://maven.apache.org/xsd/maven-4.0.0.xsd">
        <modelVersion>4.0.0</modelVersion>
        <parent>
            <groupId>org.springframework.boot</groupId>
            <artifactId>spring-boot-starter-parent</artifactId>
            <version>2.3.1.RELEASE</version>
            <relativePath/> <!-- lookup parent from repository -->
        </parent>
        <groupId>com.bolingcavalry</groupId>
        <artifactId>springbootstarterdemo</artifactId>
        <version>0.0.1-SNAPSHOT</version>
        <name>springbootstarterdemo</name>
        <description>Demo project for Spring Boot</description>
        <properties>
            <java.version>1.8</java.version>
        </properties>
        <dependencies>
            <dependency>
                <groupId>org.springframework.boot</groupId>
                <artifactId>spring-boot-starter-web</artifactId>
            </dependency>
        </dependencies>
        <build>
            <plugins>
                <plugin>
                    <groupId>org.springframework.boot</groupId>
                    <artifactId>spring-boot-maven-plugin</artifactId>
                </plugin>
            </plugins>
        </build>
    </project>
    
    1. 只有一個java類,裏面有個http接口:
    package com.bolingcavalry.springbootstarterdemo;
    
    import org.springframework.boot.SpringApplication;
    import org.springframework.boot.autoconfigure.SpringBootApplication;
    import org.springframework.web.bind.annotation.RequestMapping;
    import org.springframework.web.bind.annotation.RestController;
    
    import java.util.Date;
    
    @SpringBootApplication
    @RestController
    public class SpringbootstarterdemoApplication {
    
        public static void main(String[] args) {
            SpringApplication.run(SpringbootstarterdemoApplication.class, args);
        }
        @RequestMapping(value = "/hello")
        public String hello(){
            return "hello " + new Date();
        }
    }
    
    1. 編碼完成,在pom.xml所在目錄執行命令
    mvn clean package -U -DskipTests
    
    1. 構建成功后,在target目錄下得到文件springbootstarterdemo-0.0.1-SNAPSHOT.jar
    2. 就是這個springbootstarterdemo-0.0.1-SNAPSHOT.jar,此時執行java -jar springbootstarterdemo-0.0.1-SNAPSHOT.jar就能啟動應用,如下圖:

    接下來就用這個springbootstarterdemo-0.0.1-SNAPSHOT.jar來分析jar文件能夠獨立啟動的原因;

    java -jar做了什麼

    • 先要弄清楚java -jar命令做了什麼,在oracle官網找到了該命令的描述:

      If the -jar option is specified, its argument is the name of the JAR file containing class and resource files for the application. The startup class must be indicated by the Main-Class manifest header in its source code.

    • 再次秀出我蹩腳的英文翻譯:

    1. 使用-jar參數時,後面的參數是的jar文件名(本例中是springbootstarterdemo-0.0.1-SNAPSHOT.jar);
    2. 該jar文件中包含的是class和資源文件;
    3. 在manifest文件中有Main-Class的定義;
    4. Main-Class的源碼中指定了整個應用的啟動類;(in its source code)
    • 小結一下:
      java -jar會去找jar中的manifest文件,在那裡面找到真正的啟動類;

    探查springbootstarterdemo-0.0.1-SNAPSHOT.jar

    1. springbootstarterdemo-0.0.1-SNAPSHOT.jar是前面的springboot工程的構建結果,是個壓縮包,用常見的壓縮工具就能解壓,我這裏的環境是MacBook Pro,用unzip即可解壓;

    2. 解壓後有很多內容,我們先關注manifest相關的,下圖紅框中就是manifest文件:

    3. 打開上圖紅框中的文件,內容如下:

    Spring-Boot-Classpath-Index: BOOT-INF/classpath.idx
    Implementation-Title: springbootstarterdemo
    Implementation-Version: 0.0.1-SNAPSHOT
    Start-Class: com.bolingcavalry.springbootstarterdemo.Springbootstarter
     demoApplication
    Spring-Boot-Classes: BOOT-INF/classes/
    Spring-Boot-Lib: BOOT-INF/lib/
    Build-Jdk-Spec: 1.8
    Spring-Boot-Version: 2.3.1.RELEASE
    Created-By: Maven Jar Plugin 3.2.0
    Implementation-Vendor: Pivotal Software, Inc.
    Main-Class: org.springframework.boot.loader.JarLauncher
    
    1. 在上述內容可見Main-Class的值org.springframework.boot.loader.JarLauncher,這個和前面的java官方文檔對應上了,正是這個JarLauncher類的代碼中指定了真正的啟動類;

    疑惑出現

    1. 在MANIFEST.MF文件中有這麼一行內容:
    Start-Class: com.bolingcavalry.springbootstarterdemo.Springbootstarter
     demoApplication
    
    1. 前面的java官方文檔中,只提到過Main-Class ,並沒有提到Start-Class
    2. Start-Class的值是SpringbootstarterdemoApplication,這是我們的java代碼中的唯一類,也只真正的應用啟動類;
    3. 所以問題就來了:理論上看,執行java -jar命令時JarLauncher類會被執行,但實際上是SpringbootstarterdemoApplication被執行了,這其中發生了什麼呢?

    猜測

    動手之前先猜一下,個人覺得原因應該如下:

    1. java -jar命令會啟動JarLauncher;
    2. Start-Class是給JarLauncher用的;
    3. JarLauncher根據Start-Class找到了SpringbootstarterdemoApplication,然後執行它;

    分析JarLauncher

    1. 先下載SpringBoot源碼,我下載的是2.3.1版本,地址:https://github.com/spring-projects/spring-boot/releases/tag/v2.3.1.RELEASE

    2. JarLauncher所在的工程是spring-boot-loader,先弄明白JarLauncher的繼承關係,如下圖,可見JarLauncher繼承自ExecutableArchiveLauncher,而ExecutableArchiveLauncher的父類Launcher位於最頂層,是個抽象類:

    3. java -jar執行的是JarLauncher的main方法,如下,會實例化一個JarLauncher對象,然後執行其launch方法,並且將所有入參都帶入:

    public static void main(String[] args) throws Exception {
    	new JarLauncher().launch(args);
    }
    
    1. 上面的launch方法在父類Launcher中:
    protected void launch(String[] args) throws Exception {
        // 將jar解壓后運行的方式叫做exploded mode
        // 如果是exploded mode,就不能支持通過URL加載jar
        // 如果不是exploded mode,就可以通過URL加載jar
    	if (!isExploded()) {
    	    // 如果允許通過URL加載jar,就在此註冊對應的處理類
    		JarFile.registerUrlProtocolHandler();
    	}
    	// 創建classLoader
    	ClassLoader classLoader = createClassLoader(getClassPathArchivesIterator());
    	// jarmode是創建docker鏡像時用到的參數,使用該參數是為了生成帶有多個layer信息的鏡像
    	// 這裏暫時不關注jarmode
    	String jarMode = System.getProperty("jarmode");
    	//如果沒有jarmode參數,launchClass的值就來自getMainClass()返回
    	String launchClass = (jarMode != null && !jarMode.isEmpty()) ? JAR_MODE_LAUNCHER : getMainClass();
    	launch(args, launchClass, classLoader);
    }
    
    1. 可見要重點關注的是getMainClass()方法,在看這個方法之前,我們先去關注一個重要的成員變量archive,是JarLauncher的父類ExecutableArchiveLauncher的archive,如下可見,該變量又來自方法createArchive:
    public ExecutableArchiveLauncher() {
    		try {
    			this.archive = createArchive();
    			this.classPathIndex = getClassPathIndex(this.archive);
    		}
    		catch (Exception ex) {
    			throw new IllegalStateException(ex);
    		}
    	}
    
    1. 方法來自Launcher.createArchive,如下所示,可見成員變量archive實際上是個JarFileArchive對象:
    protected final Archive createArchive() throws Exception {
    		ProtectionDomain protectionDomain = getClass().getProtectionDomain();
    		CodeSource codeSource = protectionDomain.getCodeSource();
    		URI location = (codeSource != null) ? codeSource.getLocation().toURI() : null;
    		String path = (location != null) ? location.getSchemeSpecificPart() : null;
    		if (path == null) {
    			throw new IllegalStateException("Unable to determine code source archive");
    		}
    		File root = new File(path);
    		if (!root.exists()) {
    			throw new IllegalStateException("Unable to determine code source archive from " + root);
    		}
    		return (root.isDirectory() ? new ExplodedArchive(root) : new JarFileArchive(root));
    	}
    
    1. 現在回到getMainClass()方法,可見his.archive.getManifest方法返回的是META-INF/MANIFEST.MF文件的內容,然後getValue(START_CLASS_ATTRIBUTE)方法實際上就是從META-INF/MANIFEST.MF中取得了Start-Class的屬性:
    @Override
    	protected String getMainClass() throws Exception {
    	    // 對應的是JarFileArchive.getManifest方法,
    	    // 進去后發現對應的就是JarFile.getManifest方法,
    	    // JarFile.getManifest對應的就是META-INF/MANIFEST.MF文件的內容
    		Manifest manifest = this.archive.getManifest();
    		String mainClass = null;
    		if (manifest != null) {
    		    // 對應的是META-INF/MANIFEST.MF文件中的Start-Class的屬性
    			mainClass = manifest.getMainAttributes().getValue(START_CLASS_ATTRIBUTE);
    		}
    		if (mainClass == null) {
    			throw new IllegalStateException("No 'Start-Class' manifest entry specified in " + this);
    		}
    		return mainClass;
    	}
    
    1. 從上述分析可知:getMainClass()方法返回的是META-INF/MANIFEST.MF中取得了Start-Class的屬性com.bolingcavalry.springbootstarterdemo.SpringbootstarterdemoApplication,再次回到launch方法中,可見最終運行的代碼是launch(args, launchClass, classLoader),它的launchClass參數就是com.bolingcavalry.springbootstarterdemo.SpringbootstarterdemoApplication:
    protected void launch(String[] args) throws Exception {
    		if (!isExploded()) {
    			JarFile.registerUrlProtocolHandler();
    		}
    		ClassLoader classLoader = createClassLoader(getClassPathArchivesIterator());
    		String jarMode = System.getProperty("jarmode");
    		// 這裏的launchClass等於"com.bolingcavalry.springbootstarterdemo.SpringbootstarterdemoApplication"
    		String launchClass = (jarMode != null && !jarMode.isEmpty()) ? JAR_MODE_LAUNCHER : getMainClass();
    		// 這裏就是啟動SpringbootstarterdemoApplication的地方
    		launch(args, launchClass, classLoader);
    	}
    
    1. 展開launch(args, launchClass, classLoader),最終查到了MainMethodRunner類:
    public class MainMethodRunner {
    
    	private final String mainClassName;
    
    	private final String[] args;
    
    	/**
    	 * Create a new {@link MainMethodRunner} instance.
    	 * @param mainClass the main class
    	 * @param args incoming arguments
    	 */
    	public MainMethodRunner(String mainClass, String[] args) {
    	    // mainClassName被賦值為"com.bolingcavalry.springbootstarterdemo.SpringbootstarterdemoApplication"
    		this.mainClassName = mainClass;
    		this.args = (args != null) ? args.clone() : null;
    	}
    
    	public void run() throws Exception {
    	    // 得到SpringbootstarterdemoApplication的Class對象
    		Class<?> mainClass = Class.forName(this.mainClassName, false, Thread.currentThread().getContextClassLoader());
    		// 得到SpringbootstarterdemoApplication的main方法對象
    		Method mainMethod = mainClass.getDeclaredMethod("main", String[].class);
    		mainMethod.setAccessible(true);
    		// 通過反射執行main方法
    		mainMethod.invoke(null, new Object[] { this.args });
    	}
    }
    

    終於,真相大白了;

    小結

    最後盡可能簡短做個小結,先看jar是如何產生的,如下圖,maven插件生成的jar文件中,有常見的class、jar,也有符合java規範的MANIFEST.MF文件,並且,還在MANIFEST.MF文件中額外生成了名為Start-Class的配置,這裏面是我們編寫的應用啟動類SpringbootstarterdemoApplication

    啟動類是JarLauncher,它是如何與MANIFEST.MF文件關聯的呢?從下圖可以看出,最終是通過JarFile類的成員變量manifestSupplier關聯上的:

    再來看看關鍵代碼的執行情況,如下圖:

    至此,SpringBoot的jar獨立運行的基本原理已經清楚,探究的過程中,除了熟悉關鍵代碼流程,還對jar中的文件有了更多了解,如果您正在學習SpringBoot,希望本文能給您一些參考;

    官方文檔

    1. 最後附上SpringBoot官方文檔,可以看到Start-Class描述信息:

    2. 上述文檔明確提到:Start-Class定義的是實際的啟動類,此時的您應該對一切都瞭然於胸,產生本該如此的感慨;

    本站聲明:網站內容來源於博客園,如有侵權,請聯繫我們,我們將及時處理

    【其他文章推薦】

    新北清潔公司,居家、辦公、裝潢細清專業服務

    ※別再煩惱如何寫文案,掌握八大原則!

    網頁設計一頭霧水該從何著手呢? 台北網頁設計公司幫您輕鬆架站!

    ※超省錢租車方案

  • 中興攜手國家電網組合資公司 建成都無線汽車充電站

    中興子公司中興新能源汽車與國家電網四川省電力公司達成協議,將在成都組建合資公司。此合資公司在傳統集中式充電模式的基礎上分佈式建設無線汽車充電站,第一批支援無線充電的社區巴士同日會在成都正式投入運營。   除社區巴士外,中興還將逐步推廣支持無線充電的大型公車專案,而房車的無線充電技術亦已成熟,用戶如有條件和需要,可對房車和停車廠進行改造,即可享有無線充電功能。

    本站聲明:網站內容來源於EnergyTrend https://www.energytrend.com.tw/ev/,如有侵權,請聯繫我們,我們將及時處理

    【其他文章推薦】

    ※為什麼 USB CONNECTOR 是電子產業重要的元件?

    網頁設計一頭霧水該從何著手呢? 台北網頁設計公司幫您輕鬆架站!

    ※台北網頁設計公司全省服務真心推薦

    ※想知道最厲害的網頁設計公司"嚨底家"!

    新北清潔公司,居家、辦公、裝潢細清專業服務

    ※推薦評價好的iphone維修中心

  • 新能源汽車入北京 改為備案制

    在中國的全球新能源汽車大會上,北京市科委新能源與新材料處處長許心超透露,北京市新能源汽車準入方式有所調整,由先前的新能源汽車目錄方式改為備案方式,車型只要備案即可在北京銷售、上牌。   先前規定,按照《北京市示範應用新能源小客車生企業及品目錄》,北京市共有 7 款新能源汽車可在備案之後直接銷售、上牌。而這次許心超表示,按照中央的要求,準入方式也在改變,主要採取備案制,只要備案了就可銷售,政府則加強事後監管。
    這意味著所有中國純電動汽車都可以進京銷售、上牌,享受財政補貼,而不再像以前必須要先進入嚴格的北京市新能源汽車目錄。   另一方面,為了讓純電動汽車的使用者迅速找到充電樁,相關部門也在進行改進,一是和百度合作,標注所有充電樁的電子地圖將很快上線;二是印製北京充電樁地圖;三是辦充電體驗周活動,在 2 月 2 日至 6 日,將分 2 次聯合所有北京的汽車企業,做充電實際體驗。

    本站聲明:網站內容來源於EnergyTrend https://www.energytrend.com.tw/ev/,如有侵權,請聯繫我們,我們將及時處理
    【其他文章推薦】

    USB CONNECTOR掌控什麼技術要點? 帶您認識其相關發展及效能

    台北網頁設計公司這麼多該如何選擇?

    ※智慧手機時代的來臨,RWD網頁設計為架站首選

    ※評比南投搬家公司費用收費行情懶人包大公開

    ※幫你省時又省力,新北清潔一流服務好口碑

    ※回頭車貨運收費標準

  • 巴西浮油事件3個月 污染擴至座頭鯨保育區

    巴西浮油事件3個月 污染擴至座頭鯨保育區

    摘錄自2019年11月3日中央通訊社巴西報導

    巴西東北巴伊亞州(Bahia)外海阿布羅略斯(Abrolhos)群島四周,有著巴西最豐富的海洋多樣性。群島中一座國家公園有著罕見珊瑚群、海鳥以及座頭鯨繁殖地。巴西海軍3日通報,困擾巴西海岸3個月的浮油污染已飄到座頭鯨保育區,嚴重污染生物多樣性豐富的群島地區,背後的環境及經濟破壞目前還無法量化。海軍在聲明中表示,海軍船艦清理的油污有部分在海洋中,有部分則在海灘上。

    這些油污3個月前開始出現在巴西東北部外海,巴西著名2000公里海岸線上的200多個海灘都遭油漬污染。船員及志工已在海灘上清出數噸重的原油。巴西官員說,目前還無法量化油漬造成的環境及經濟破壞。

    巴西政府2日點名一艘掛有希臘旗幟的油輪布普林納號(Bouboulina)是主要嫌疑犯,說這艘油輪當時從委內瑞拉載石油前往新加坡。巴西國家太空署(Inpe)2日表示,海中仍可能有油污在洋流推動下,南下至巴西東南的聖靈州(Espiritu Santo)及里約熱內盧州(Rio De Janeiro)。

    清理污染的志工。照片來源: Kleber from Burgos / WWF-Brasil

    本站聲明:網站內容來源環境資訊中心https://e-info.org.tw/,如有侵權,請聯繫我們,我們將及時處理

    【其他文章推薦】

    ※為什麼 USB CONNECTOR 是電子產業重要的元件?

    網頁設計一頭霧水該從何著手呢? 台北網頁設計公司幫您輕鬆架站!

    ※台北網頁設計公司全省服務真心推薦

    ※想知道最厲害的網頁設計公司"嚨底家"!

    新北清潔公司,居家、辦公、裝潢細清專業服務

    ※推薦評價好的iphone維修中心

  • 「寂靜的春天」預言實現了 研究發現新菸鹼類影響水生物和魚群

    環境資訊中心綜合外電;姜唯 編譯;林大利 審校

    本站聲明:網站內容來源環境資訊中心https://e-info.org.tw/,如有侵權,請聯繫我們,我們將及時處理

    【其他文章推薦】

    USB CONNECTOR掌控什麼技術要點? 帶您認識其相關發展及效能

    台北網頁設計公司這麼多該如何選擇?

    ※智慧手機時代的來臨,RWD網頁設計為架站首選

    ※評比南投搬家公司費用收費行情懶人包大公開

    ※幫你省時又省力,新北清潔一流服務好口碑

    ※回頭車貨運收費標準

  • 福斯邁入新紀元 新一代電動車量產

    摘錄自2019年11月5日中央社報導

    德國汽車大廠福斯新一代的純電動車ID.3,5日開始量產,象徵福斯正式邁入電動車時代。福斯還打算在未來10年推出70款純電動車,有機會超越特斯拉成為全球主要的電動車製造商。

    福斯執行長迪斯(Herbert Diess)表示,業界已經沒有人懷疑電動車能不能成功,問題是多快能實現,以及先在世界上哪個地區實現,他相信德國汽車工業在電動車時代依然能保住領先地位。

    ID.3是福斯進入電動車時代的象徵,在集團歷史上的地位相當於金龜車和Golf車款,被福斯寄與厚望。ID.3續航力300公里上下的入門款,最低售價3萬歐元(約新台幣100萬元),在德國因此有「國民電動車」之稱,預計明年夏天開始交貨,

    本站聲明:網站內容來源環境資訊中心https://e-info.org.tw/,如有侵權,請聯繫我們,我們將及時處理

    【其他文章推薦】

    網頁設計公司推薦不同的風格,搶佔消費者視覺第一線

    ※廣告預算用在刀口上,台北網頁設計公司幫您達到更多曝光效益

    ※自行創業缺乏曝光? 網頁設計幫您第一時間規劃公司的形象門面

    南投搬家公司費用需注意的眉眉角角,別等搬了再說!

    新北清潔公司,居家、辦公、裝潢細清專業服務

  • 巴西東北油污危機擴大 希臘油輪被指元凶

    摘錄自2019年11月5日中央社報導

    自8月底以來,巴西東北部海灘被不名油污浸染危機擴大,巴西聯警調查指出,希臘油輪布普林納號(Bouboulina)是在7月28日至29日之間、距離北大河(Rio Grande do Norte)和巴萊巴(Paraiba)兩州海岸約700公里處最先記錄到油污時,唯一駛經該地區的船隻,漏油嫌疑最大。

    根據衛星圖像在7月29日的記錄,洩漏的油污帶約長200公里。之後,受到陸岸阻擋的南赤道海流分開成往南及往北流的分支,幫助擴散油污至整個東北部9州逾2000公里長的海岸線。

    巴西國防部、海軍和聯警表示正在調查,但還不清楚漏油事件是意外還是蓄意。

    在油污抵達東北海岸逾60天後,巴西海軍才決定派出2艘最大的巡洋艦協助對抗污染該地區海灘的漏油事件。這2艘巡洋艦5日從里約出發,預定本月10日抵達東北部,約2000人參與任務。

    包括巴伊亞州(Bahia)南海岸的阿布羅略斯(Abrolhos)海洋國家公在內,巴西至今已有至少314處地點受污染,工作人員和志工已清除約4000公噸的油污。

    本站聲明:網站內容來源環境資訊中心https://e-info.org.tw/,如有侵權,請聯繫我們,我們將及時處理

    【其他文章推薦】

    ※自行創業缺乏曝光? 網頁設計幫您第一時間規劃公司的形象門面

    網頁設計一頭霧水該從何著手呢? 台北網頁設計公司幫您輕鬆架站!

    ※想知道最厲害的網頁設計公司"嚨底家"!

    ※幫你省時又省力,新北清潔一流服務好口碑

    ※別再煩惱如何寫文案,掌握八大原則!

  • 民主剛果抗伊波拉鬥士家中遇害 凶手動機不明

    摘錄自2019年11月4日中央社報導

    法新社報導,剛果民主共和國軍方4日表示說,一名協助傳遞對抗伊波拉(Ebola)疫情資訊的電台主持人,35歲的馬罕巴(Papy Mumbere Mahamba),他的妻子受傷,住家被縱火燒毀他的家。

    這起在動盪的伊圖里省(Ituri)魯汶巴鎮(Lwemba)發生的謀殺案,凶手犯案動機不明。

    本站聲明:網站內容來源環境資訊中心https://e-info.org.tw/,如有侵權,請聯繫我們,我們將及時處理

    【其他文章推薦】

    ※廣告預算用在刀口上,台北網頁設計公司幫您達到更多曝光效益

    新北清潔公司,居家、辦公、裝潢細清專業服務

    ※別再煩惱如何寫文案,掌握八大原則!

    ※教你寫出一流的銷售文案?

    ※超省錢租車方案