準備
我的環境是python3.6,sc2包0.11.1
機器學習包下載鏈接:
地圖下載鏈接
pysc2是DeepMind開發的星際爭霸Ⅱ學習環境。 它是封裝星際爭霸Ⅱ機器學習API,同時也提供Python增強學習環境。
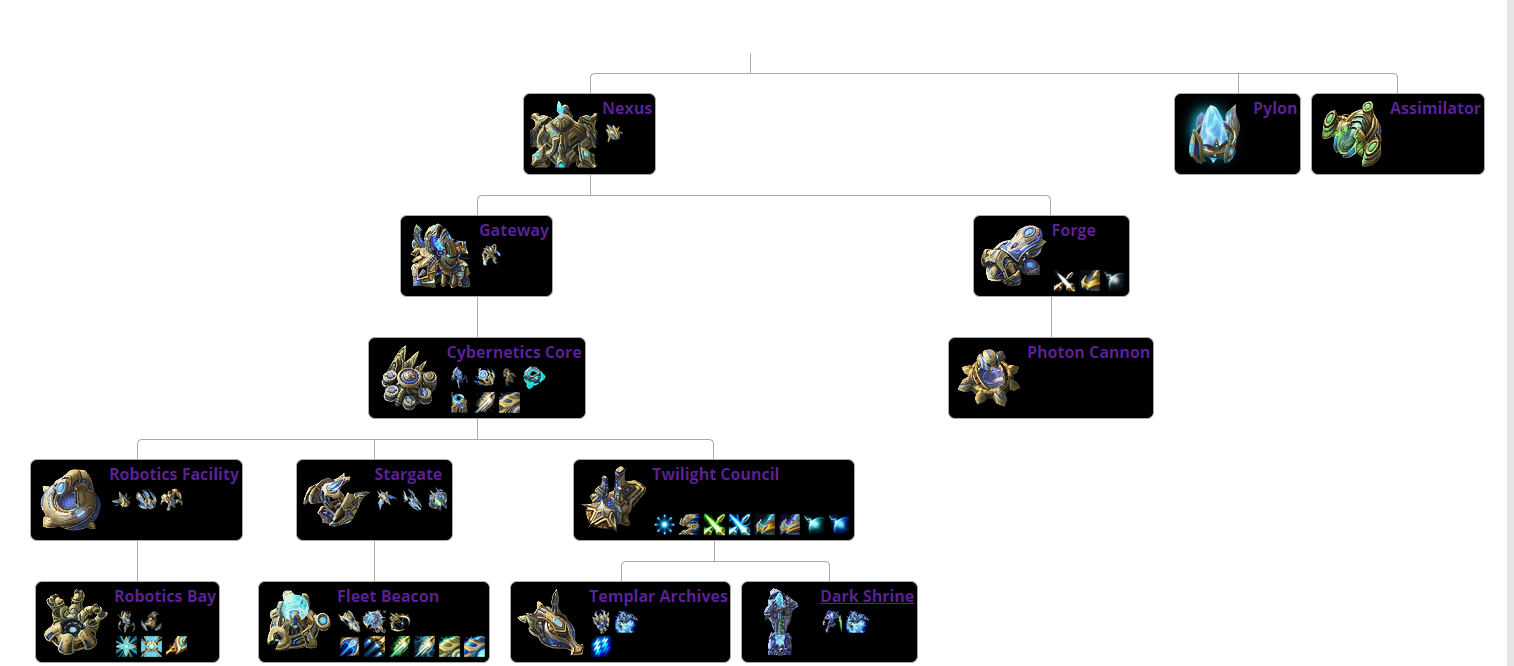
以神族為例編寫代碼,神族建築科技圖如下:
採礦
# -*- encoding: utf-8 -*-
'''
@File    :   __init__.py.py
@Modify Time      @Author       @Desciption
------------      -------       -----------
2019/11/3 12:32   Jonas           None
'''

import sc2
from sc2 import run_game, maps, Race, Difficulty
from sc2.player import Bot, Computer


class SentdeBot(sc2.BotAI):
    async def on_step(self, iteration: int):
        await self.distribute_workers()


run_game(maps.get("AcidPlantLE"), [
    Bot(Race.Protoss, SentdeBot()), Computer(Race.Terran, Difficulty.Easy)
],realtime = True)
注意
game_data.py的assert self.id != 0註釋掉
pixel_map.py的assert self.bits_per_pixel % 8 == 0, "Unsupported pixel density"註釋掉
否則會報錯
運行結果如下,农民開始採礦
可以正常採礦
建造农民和水晶塔
import sc2
from sc2 import run_game, maps, Race, Difficulty
from sc2.player import Bot, Computer
from sc2.constants import *


class SentdeBot(sc2.BotAI):
    async def on_step(self, iteration: int):
        await self.distribute_workers()
        await self.build_workers()
        await self.build_pylons()

    # 建造农民
    async def build_workers(self):
        # 星靈樞紐(NEXUS)無隊列建造,可以提高晶體礦的利用率,不至於佔用資源
        for nexus in self.units(UnitTypeId.NEXUS).ready.noqueue:
            # 是否有50晶體礦
            if self.can_afford(UnitTypeId.PROBE):
                await self.do(nexus.train(UnitTypeId.PROBE))

    ## 建造水晶
    async def build_pylons(self):
        ## 供應人口和現有人口之差小於5且水晶不是正在建造
        if self.supply_left<5 and not self.already_pending(UnitTypeId.PYLON):
            nexuses = self.units(UnitTypeId.NEXUS).ready
            if nexuses.exists:
                if self.can_afford(UnitTypeId.PYLON):
                    await self.build(UnitTypeId.PYLON,near=nexuses.first)

## 啟動遊戲
run_game(maps.get("AcidPlantLE"), [
    Bot(Race.Protoss, SentdeBot()), Computer(Race.Terran, Difficulty.Easy)
],realtime = True)
運行結果如下,基地造农民,农民造水晶
收集氣體和開礦
代碼如下
import sc2
from sc2 import run_game, maps, Race, Difficulty
from sc2.player import Bot, Computer
from sc2.constants import *


class SentdeBot(sc2.BotAI):
    async def on_step(self, iteration: int):
        await self.distribute_workers()
        await self.build_workers()
        await self.build_pylons()
        await self.build_assimilators()
        await self.expand()

    # 建造农民
    async def build_workers(self):
        # 星靈樞紐(NEXUS)無隊列建造,可以提高晶體礦的利用率,不至於佔用資源
        for nexus in self.units(UnitTypeId.NEXUS).ready.noqueue:
            # 是否有50晶體礦
            if self.can_afford(UnitTypeId.PROBE):
                await self.do(nexus.train(UnitTypeId.PROBE))

    ## 建造水晶
    async def build_pylons(self):
        ## 供應人口和現有人口之差小於5且建築不是正在建造
        if self.supply_left < 5 and not self.already_pending(UnitTypeId.PYLON):
            nexuses = self.units(UnitTypeId.NEXUS).ready
            if nexuses.exists:
                if self.can_afford(UnitTypeId.PYLON):
                    await self.build(UnitTypeId.PYLON, near=nexuses.first)

    ## 建造吸收廠
    async def build_assimilators(self):
        for nexus in self.units(UnitTypeId.NEXUS).ready:
            # 在瓦斯泉上建造吸收廠
            vaspenes = self.state.vespene_geyser.closer_than(15.0,nexus)
            for vaspene in vaspenes:
                if not self.can_afford(UnitTypeId.ASSIMILATOR):
                    break
                worker = self.select_build_worker(vaspene.position)
                if worker is None:
                    break
                if not self.units(UnitTypeId.ASSIMILATOR).closer_than(1.0,vaspene).exists:
                    await self.do(worker.build(UnitTypeId.ASSIMILATOR,vaspene))

    ## 開礦
    async def expand(self):
        if self.units(UnitTypeId.NEXUS).amount<3 and self.can_afford(UnitTypeId.NEXUS):
            await self.expand_now()

## 啟動遊戲
run_game(maps.get("AcidPlantLE"), [
    Bot(Race.Protoss, SentdeBot()), Computer(Race.Terran, Difficulty.Easy)
], realtime=False)
run_game的realtime設置成False,可以在加速模式下運行遊戲。
運行效果如下:
可以建造吸收廠和開礦
建造軍隊
import sc2
from sc2 import run_game, maps, Race, Difficulty
from sc2.player import Bot, Computer
from sc2.constants import *


class SentdeBot(sc2.BotAI):
    async def on_step(self, iteration: int):
        await self.distribute_workers()
        await self.build_workers()
        await self.build_pylons()
        await self.build_assimilators()
        await self.expand()
        await self.offensive_force_buildings()
        await self.build_offensive_force()

    # 建造农民
    async def build_workers(self):
        # 星靈樞紐(NEXUS)無隊列建造,可以提高晶體礦的利用率,不至於佔用資源
        for nexus in self.units(UnitTypeId.NEXUS).ready.noqueue:
            # 是否有50晶體礦
            if self.can_afford(UnitTypeId.PROBE):
                await self.do(nexus.train(UnitTypeId.PROBE))

    ## 建造水晶
    async def build_pylons(self):
        ## 供應人口和現有人口之差小於5且建築不是正在建造
        if self.supply_left < 5 and not self.already_pending(UnitTypeId.PYLON):
            nexuses = self.units(UnitTypeId.NEXUS).ready
            if nexuses.exists:
                if self.can_afford(UnitTypeId.PYLON):
                    await self.build(UnitTypeId.PYLON, near=nexuses.first)

    ## 建造吸收廠
    async def build_assimilators(self):
        for nexus in self.units(UnitTypeId.NEXUS).ready:
            # 在瓦斯泉上建造吸收廠
            vaspenes = self.state.vespene_geyser.closer_than(15.0,nexus)
            for vaspene in vaspenes:
                if not self.can_afford(UnitTypeId.ASSIMILATOR):
                    break
                worker = self.select_build_worker(vaspene.position)
                if worker is None:
                    break
                if not self.units(UnitTypeId.ASSIMILATOR).closer_than(1.0,vaspene).exists:
                    await self.do(worker.build(UnitTypeId.ASSIMILATOR,vaspene))

    ## 開礦
    async def expand(self):
        if self.units(UnitTypeId.NEXUS).amount<2 and self.can_afford(UnitTypeId.NEXUS):
            await self.expand_now()

    ## 建造進攻性建築
    async def offensive_force_buildings(self):
        if self.units(UnitTypeId.PYLON).ready.exists:
            pylon = self.units(UnitTypeId.PYLON).ready.random
            if self.units(UnitTypeId.PYLON).ready.exists:
                # 根據神族建築科技圖,折躍門建造過後才可以建造控制核心
                if self.units(UnitTypeId.GATEWAY).ready.exists:
                    if not self.units(UnitTypeId.CYBERNETICSCORE):
                        if self.can_afford(UnitTypeId.CYBERNETICSCORE) and not self.already_pending(UnitTypeId.CYBERNETICSCORE):
                            await self.build(UnitTypeId.CYBERNETICSCORE,near = pylon)
                # 否則建造折躍門
                else:
                    if self.can_afford(UnitTypeId.GATEWAY) and not self.already_pending(UnitTypeId.GATEWAY):
                        await self.build(UnitTypeId.GATEWAY,near=pylon)

    # 造兵
    async def build_offensive_force(self):
        # 無隊列化建造
        for gw in self.units(UnitTypeId.GATEWAY).ready.noqueue:
            if self.can_afford(UnitTypeId.STALKER) and self.supply_left>0:
                await self.do(gw.train(UnitTypeId.STALKER))


## 啟動遊戲
run_game(maps.get("AcidPlantLE"), [
    Bot(Race.Protoss, SentdeBot()), Computer(Race.Terran, Difficulty.Easy)
], realtime=False)
運行結果如下:
可以看到,我們建造了折躍門和控制核心並訓練了追獵者
控制部隊進攻
代碼如下
import sc2
from sc2 import run_game, maps, Race, Difficulty
from sc2.player import Bot, Computer
from sc2.constants import *
import random

class SentdeBot(sc2.BotAI):
    async def on_step(self, iteration: int):
        await self.distribute_workers()
        await self.build_workers()
        await self.build_pylons()
        await self.build_assimilators()
        await self.expand()
        await self.offensive_force_buildings()
        await self.build_offensive_force()
        await self.attack()

    # 建造农民
    async def build_workers(self):
        # 星靈樞紐(NEXUS)無隊列建造,可以提高晶體礦的利用率,不至於佔用資源
        for nexus in self.units(UnitTypeId.NEXUS).ready.noqueue:
            # 是否有50晶體礦
            if self.can_afford(UnitTypeId.PROBE):
                await self.do(nexus.train(UnitTypeId.PROBE))

    ## 建造水晶
    async def build_pylons(self):
        ## 供應人口和現有人口之差小於5且建築不是正在建造
        if self.supply_left < 5 and not self.already_pending(UnitTypeId.PYLON):
            nexuses = self.units(UnitTypeId.NEXUS).ready
            if nexuses.exists:
                if self.can_afford(UnitTypeId.PYLON):
                    await self.build(UnitTypeId.PYLON, near=nexuses.first)

    ## 建造吸收廠
    async def build_assimilators(self):
        for nexus in self.units(UnitTypeId.NEXUS).ready:
            # 在瓦斯泉上建造吸收廠
            vaspenes = self.state.vespene_geyser.closer_than(15.0,nexus)
            for vaspene in vaspenes:
                if not self.can_afford(UnitTypeId.ASSIMILATOR):
                    break
                worker = self.select_build_worker(vaspene.position)
                if worker is None:
                    break
                if not self.units(UnitTypeId.ASSIMILATOR).closer_than(1.0,vaspene).exists:
                    await self.do(worker.build(UnitTypeId.ASSIMILATOR,vaspene))

    ## 開礦
    async def expand(self):
        if self.units(UnitTypeId.NEXUS).amount<3 and self.can_afford(UnitTypeId.NEXUS):
            await self.expand_now()

    ## 建造進攻性建築
    async def offensive_force_buildings(self):
        if self.units(UnitTypeId.PYLON).ready.exists:
            pylon = self.units(UnitTypeId.PYLON).ready.random
            # 根據神族建築科技圖,折躍門建造過後才可以建造控制核心
            if self.units(UnitTypeId.GATEWAY).ready.exists and not self.units(UnitTypeId.CYBERNETICSCORE):
                if self.can_afford(UnitTypeId.CYBERNETICSCORE) and not self.already_pending(UnitTypeId.CYBERNETICSCORE):
                    await self.build(UnitTypeId.CYBERNETICSCORE,near = pylon)
            # 否則建造折躍門
            elif len(self.units(UnitTypeId.GATEWAY))<=3:
                if self.can_afford(UnitTypeId.GATEWAY) and not self.already_pending(UnitTypeId.GATEWAY):
                    await self.build(UnitTypeId.GATEWAY,near=pylon)

    ## 造兵
    async def build_offensive_force(self):
        # 無隊列化建造
        for gw in self.units(UnitTypeId.GATEWAY).ready.noqueue:
            if self.can_afford(UnitTypeId.STALKER) and self.supply_left>0:
                await self.do(gw.train(UnitTypeId.STALKER))

    ## 尋找目標
    def find_target(self,state):
        if len(self.known_enemy_units)>0:
            # 隨機選取敵方單位
            return random.choice(self.known_enemy_units)
        elif len(self.known_enemy_units)>0:
            # 隨機選取敵方建築
            return random.choice(self.known_enemy_structures)
        else:
            # 返回敵方出生點位
            return self.enemy_start_locations[0]

    ## 進攻
    async def attack(self):
        # 追獵者數量超過15個開始進攻
        if self.units(UnitTypeId.STALKER).amount>15:
            for s in self.units(UnitTypeId.STALKER).idle:
                await self.do(s.attack(self.find_target(self.state)))

        # 防衛模式:視野範圍內存在敵人,開始攻擊
        if self.units(UnitTypeId.STALKER).amount>5:
            if len(self.known_enemy_units)>0:
                for s in self.units(UnitTypeId.STALKER).idle:
                    await self.do(s.attack(random.choice(self.known_enemy_units)))

## 啟動遊戲
run_game(maps.get("AcidPlantLE"), [
    Bot(Race.Protoss, SentdeBot()), Computer(Race.Terran, Difficulty.Medium)
], realtime=False)
運行結果如下
可以看到,4個折躍門訓練追獵者並發動進攻。
擊敗困難電腦
我們目前的代碼只能擊敗中等和簡單電腦,那麼如何擊敗困難電腦呢?
代碼如下
import sc2
from sc2 import run_game, maps, Race, Difficulty
from sc2.player import Bot, Computer
from sc2.constants import *
import random


class SentdeBot(sc2.BotAI):
    def __init__(self):
        # 經過計算,每分鐘大約165迭代次數
        self.ITERATIONS_PER_MINUTE = 165
        # 最大农民數量
        self.MAX_WORKERS = 65

    async def on_step(self, iteration: int):
        self.iteration = iteration
        await self.distribute_workers()
        await self.build_workers()
        await self.build_pylons()
        await self.build_assimilators()
        await self.expand()
        await self.offensive_force_buildings()
        await self.build_offensive_force()
        await self.attack()

    # 建造农民
    async def build_workers(self):
        # 星靈樞鈕*16(一個基地配備16個农民)大於農民數量並且現有农民數量小於MAX_WORKERS
        if len(self.units(UnitTypeId.NEXUS))*16>len(self.units(UnitTypeId.PROBE)) and len(self.units(UnitTypeId.PROBE))<self.MAX_WORKERS:
                # 星靈樞紐(NEXUS)無隊列建造,可以提高晶體礦的利用率,不至於佔用資源
                for nexus in self.units(UnitTypeId.NEXUS).ready.noqueue:
                    # 是否有50晶體礦建造农民
                    if self.can_afford(UnitTypeId.PROBE):
                        await self.do(nexus.train(UnitTypeId.PROBE))

    ## 建造水晶
    async def build_pylons(self):
        ## 供應人口和現有人口之差小於5且建築不是正在建造
        if self.supply_left < 5 and not self.already_pending(UnitTypeId.PYLON):
            nexuses = self.units(UnitTypeId.NEXUS).ready
            if nexuses.exists:
                if self.can_afford(UnitTypeId.PYLON):
                    await self.build(UnitTypeId.PYLON, near=nexuses.first)

    ## 建造吸收廠
    async def build_assimilators(self):
        for nexus in self.units(UnitTypeId.NEXUS).ready:
            # 在瓦斯泉上建造吸收廠
            vaspenes = self.state.vespene_geyser.closer_than(15.0,nexus)
            for vaspene in vaspenes:
                if not self.can_afford(UnitTypeId.ASSIMILATOR):
                    break
                worker = self.select_build_worker(vaspene.position)
                if worker is None:
                    break
                if not self.units(UnitTypeId.ASSIMILATOR).closer_than(1.0,vaspene).exists:
                    await self.do(worker.build(UnitTypeId.ASSIMILATOR,vaspene))

    ## 開礦
    async def expand(self):
        # (self.iteration / self.ITERATIONS_PER_MINUTE)是一個緩慢遞增的值,動態開礦
        if self.units(UnitTypeId.NEXUS).amount<self.iteration / self.ITERATIONS_PER_MINUTE and self.can_afford(UnitTypeId.NEXUS):
            await self.expand_now()

    ## 建造進攻性建築
    async def offensive_force_buildings(self):
        print(self.iteration / self.ITERATIONS_PER_MINUTE)
        if self.units(UnitTypeId.PYLON).ready.exists:
            pylon = self.units(UnitTypeId.PYLON).ready.random
            # 根據神族建築科技圖,折躍門建造過後才可以建造控制核心
            if self.units(UnitTypeId.GATEWAY).ready.exists and not self.units(UnitTypeId.CYBERNETICSCORE):
                if self.can_afford(UnitTypeId.CYBERNETICSCORE) and not self.already_pending(UnitTypeId.CYBERNETICSCORE):
                    await self.build(UnitTypeId.CYBERNETICSCORE, near=pylon)
            # 否則建造折躍門
            # (self.iteration / self.ITERATIONS_PER_MINUTE)/2 是一個緩慢遞增的值
            elif len(self.units(UnitTypeId.GATEWAY)) < ((self.iteration / self.ITERATIONS_PER_MINUTE) / 2):
                if self.can_afford(UnitTypeId.GATEWAY) and not self.already_pending(UnitTypeId.GATEWAY):
                    await self.build(UnitTypeId.GATEWAY, near=pylon)
            # 控制核心存在的情況下建造星門
            if self.units(UnitTypeId.CYBERNETICSCORE).ready.exists:
                if len(self.units(UnitTypeId.STARGATE)) < ((self.iteration / self.ITERATIONS_PER_MINUTE) / 2):
                    if self.can_afford(UnitTypeId.STARGATE) and not self.already_pending(UnitTypeId.STARGATE):
                        await self.build(UnitTypeId.STARGATE, near=pylon)

    ## 造兵
    async def build_offensive_force(self):
        # 無隊列化建造
        for gw in self.units(UnitTypeId.GATEWAY).ready.noqueue:
            if not self.units(UnitTypeId.STALKER).amount > self.units(UnitTypeId.VOIDRAY).amount:

                if self.can_afford(UnitTypeId.STALKER) and self.supply_left > 0:
                    await self.do(gw.train(UnitTypeId.STALKER))

        for sg in self.units(UnitTypeId.STARGATE).ready.noqueue:
            if self.can_afford(UnitTypeId.VOIDRAY) and self.supply_left > 0:
                await self.do(sg.train(UnitTypeId.VOIDRAY))

    ## 尋找目標
    def find_target(self,state):
        if len(self.known_enemy_units)>0:
            # 隨機選取敵方單位
            return random.choice(self.known_enemy_units)
        elif len(self.known_enemy_units)>0:
            # 隨機選取敵方建築
            return random.choice(self.known_enemy_structures)
        else:
            # 返回敵方出生點位
            return self.enemy_start_locations[0]

    ## 進攻
    async def attack(self):
        # {UNIT: [n to fight, n to defend]}
        aggressive_units = {UnitTypeId.STALKER: [15, 5],
                            UnitTypeId.VOIDRAY: [8, 3]}

        for UNIT in aggressive_units:
            # 攻擊模式
            if self.units(UNIT).amount > aggressive_units[UNIT][0] and self.units(UNIT).amount > aggressive_units[UNIT][
                1]:
                for s in self.units(UNIT).idle:
                    await self.do(s.attack(self.find_target(self.state)))
            # 防衛模式
            elif self.units(UNIT).amount > aggressive_units[UNIT][1]:
                if len(self.known_enemy_units) > 0:
                    for s in self.units(UNIT).idle:
                        await self.do(s.attack(random.choice(self.known_enemy_units)))
## 啟動遊戲
run_game(maps.get("AcidPlantLE"), [
    Bot(Race.Protoss, SentdeBot()), Computer(Race.Terran, Difficulty.Hard)
], realtime=False)
運行結果如下
可以看到,擊敗了困難人族電腦,但是電腦選擇了rush戰術,我們寫得AI腳本會輸掉遊戲。顯然,這不是最佳方案。
“只有AI才能拯救我的勝率”,請看下文。
採集地圖數據
這次我們只造一個折躍門,全力通過星門造虛空光輝艦
修改offensive_force_buildings(self)方法的判斷
elif len(self.units(GATEWAY)) < 1:
                if self.can_afford(GATEWAY) and not self.already_pending(GATEWAY):
                    await self.build(GATEWAY, near=pylon)
註釋或者刪除build_offensive_force(self)的建造追獵者的代碼
        ## 造兵
    async def build_offensive_force(self):
        # 無隊列化建造
        # for gw in self.units(UnitTypeId.GATEWAY).ready.noqueue:
        #     if not self.units(UnitTypeId.STALKER).amount > self.units(UnitTypeId.VOIDRAY).amount:
        #
        #         if self.can_afford(UnitTypeId.STALKER) and self.supply_left > 0:
        #             await self.do(gw.train(UnitTypeId.STALKER))

        for sg in self.units(UnitTypeId.STARGATE).ready.noqueue:
            if self.can_afford(UnitTypeId.VOIDRAY) and self.supply_left > 0:
                await self.do(sg.train(UnitTypeId.VOIDRAY))
attack(self)中的aggressive_units註釋掉Stalker
導入numpy和cv2庫
game_data = np.zeros((self.game_info.map_size[1], self.game_info.map_size[0], 3), np.uint8)
建立以地圖Heigt為行,Width為列的三維矩陣
for nexus in self.units(NEXUS):
            nex_pos = nexus.position
            print(nex_pos)
            cv2.circle(game_data, (int(nex_pos[0]), int(nex_pos[1])), 10, (0, 255, 0), -1)  # BGR
遍歷星靈樞紐,獲取下一個位置,畫圓,circle(承載圓的img, 圓心, 半徑, 顏色, thickness=-1表示填充)
接下來我們要垂直翻轉三維矩陣,因為我們建立的矩陣左上角是原點(0,0),縱坐標向下延申,橫坐標向右延申。翻轉之後就成了正常的坐標系。
flipped = cv2.flip(game_data, 0)
圖像縮放,達到可視化最佳。
        resized = cv2.resize(flipped, dsize=None, fx=2, fy=2)
        cv2.imshow('Intel', resized)
        cv2.waitKey(1)
至此,完整代碼如下
import sc2
from sc2 import run_game, maps, Race, Difficulty
from sc2.player import Bot, Computer
from sc2.constants import *
import random
import numpy as np
import cv2


class SentdeBot(sc2.BotAI):
    def __init__(self):
        # 經過計算,每分鐘大約165迭代次數
        self.ITERATIONS_PER_MINUTE = 165
        # 最大农民數量
        self.MAX_WORKERS = 65

    async def on_step(self, iteration: int):
        self.iteration = iteration
        await self.distribute_workers()
        await self.build_workers()
        await self.build_pylons()
        await self.build_assimilators()
        await self.expand()
        await self.offensive_force_buildings()
        await self.build_offensive_force()
        await self.intel()
        await self.attack()

    async def intel(self):
        # 根據地圖建立的三維矩陣
        game_data = np.zeros((self.game_info.map_size[1], self.game_info.map_size[0], 3), np.uint8)
        for nexus in self.units(UnitTypeId.NEXUS):
            nex_pos = nexus.position
            # circle(承載圓的img, 圓心, 半徑, 顏色, thickness=-1表示填充)
            # 記錄星靈樞紐的位置
            cv2.circle(game_data, (int(nex_pos[0]), int(nex_pos[1])), 10, (0, 255, 0), -1)
        # 圖像翻轉垂直鏡像
        flipped = cv2.flip(game_data, 0)
        # 圖像縮放
        # cv2.resize(原圖像,輸出圖像的大小,width方向的縮放比例,height方向縮放的比例)
        resized = cv2.resize(flipped, dsize=None, fx=2, fy=2)
        cv2.imshow('Intel', resized)

        # cv2.waitKey(每Xms刷新圖像)
        cv2.waitKey(1)

    # 建造农民
    async def build_workers(self):
        # 星靈樞鈕*16(一個基地配備16個农民)大於農民數量並且現有农民數量小於MAX_WORKERS
        if len(self.units(UnitTypeId.NEXUS)) * 16 > len(self.units(UnitTypeId.PROBE)) and len(
                self.units(UnitTypeId.PROBE)) < self.MAX_WORKERS:
            # 星靈樞紐(NEXUS)無隊列建造,可以提高晶體礦的利用率,不至於佔用資源
            for nexus in self.units(UnitTypeId.NEXUS).ready.noqueue:
                # 是否有50晶體礦建造农民
                if self.can_afford(UnitTypeId.PROBE):
                    await self.do(nexus.train(UnitTypeId.PROBE))

    ## 建造水晶
    async def build_pylons(self):
        ## 供應人口和現有人口之差小於5且建築不是正在建造
        if self.supply_left < 5 and not self.already_pending(UnitTypeId.PYLON):
            nexuses = self.units(UnitTypeId.NEXUS).ready
            if nexuses.exists:
                if self.can_afford(UnitTypeId.PYLON):
                    await self.build(UnitTypeId.PYLON, near=nexuses.first)

    ## 建造吸收廠
    async def build_assimilators(self):
        for nexus in self.units(UnitTypeId.NEXUS).ready:
            # 在瓦斯泉上建造吸收廠
            vaspenes = self.state.vespene_geyser.closer_than(15.0, nexus)
            for vaspene in vaspenes:
                if not self.can_afford(UnitTypeId.ASSIMILATOR):
                    break
                worker = self.select_build_worker(vaspene.position)
                if worker is None:
                    break
                if not self.units(UnitTypeId.ASSIMILATOR).closer_than(1.0, vaspene).exists:
                    await self.do(worker.build(UnitTypeId.ASSIMILATOR, vaspene))

    ## 開礦
    async def expand(self):
        # (self.iteration / self.ITERATIONS_PER_MINUTE)是一個緩慢遞增的值,動態開礦
        if self.units(UnitTypeId.NEXUS).amount < self.iteration / self.ITERATIONS_PER_MINUTE and self.can_afford(
                UnitTypeId.NEXUS):
            await self.expand_now()

    ## 建造進攻性建築
    async def offensive_force_buildings(self):
        print(self.iteration / self.ITERATIONS_PER_MINUTE)
        if self.units(UnitTypeId.PYLON).ready.exists:
            pylon = self.units(UnitTypeId.PYLON).ready.random
            # 根據神族建築科技圖,折躍門建造過後才可以建造控制核心
            if self.units(UnitTypeId.GATEWAY).ready.exists and not self.units(UnitTypeId.CYBERNETICSCORE):
                if self.can_afford(UnitTypeId.CYBERNETICSCORE) and not self.already_pending(UnitTypeId.CYBERNETICSCORE):
                    await self.build(UnitTypeId.CYBERNETICSCORE, near=pylon)
            # 否則建造折躍門
            # (self.iteration / self.ITERATIONS_PER_MINUTE)/2 是一個緩慢遞增的值
            # elif len(self.units(UnitTypeId.GATEWAY)) < ((self.iteration / self.ITERATIONS_PER_MINUTE) / 2):
            elif len(self.units(UnitTypeId.GATEWAY)) < 1:
                if self.can_afford(UnitTypeId.GATEWAY) and not self.already_pending(UnitTypeId.GATEWAY):
                    await self.build(UnitTypeId.GATEWAY, near=pylon)
            # 控制核心存在的情況下建造星門
            if self.units(UnitTypeId.CYBERNETICSCORE).ready.exists:
                if len(self.units(UnitTypeId.STARGATE)) < ((self.iteration / self.ITERATIONS_PER_MINUTE) / 2):
                    if self.can_afford(UnitTypeId.STARGATE) and not self.already_pending(UnitTypeId.STARGATE):
                        await self.build(UnitTypeId.STARGATE, near=pylon)

    ## 造兵
    async def build_offensive_force(self):
        # 無隊列化建造
        for sg in self.units(UnitTypeId.STARGATE).ready.noqueue:
            if self.can_afford(UnitTypeId.VOIDRAY) and self.supply_left > 0:
                await self.do(sg.train(UnitTypeId.VOIDRAY))

    ## 尋找目標
    def find_target(self, state):
        if len(self.known_enemy_units) > 0:
            # 隨機選取敵方單位
            return random.choice(self.known_enemy_units)
        elif len(self.known_enemy_units) > 0:
            # 隨機選取敵方建築
            return random.choice(self.known_enemy_structures)
        else:
            # 返回敵方出生點位
            return self.enemy_start_locations[0]

    ## 進攻
    async def attack(self):
        # {UNIT: [n to fight, n to defend]}
        aggressive_units = {UnitTypeId.VOIDRAY: [8, 3]}

        for UNIT in aggressive_units:
            # 攻擊模式
            if self.units(UNIT).amount > aggressive_units[UNIT][0] and self.units(UNIT).amount > aggressive_units[UNIT][1]:
                for s in self.units(UNIT).idle:
                    await self.do(s.attack(self.find_target(self.state)))
            # 防衛模式
            elif self.units(UNIT).amount > aggressive_units[UNIT][1]:
                if len(self.known_enemy_units) > 0:
                    for s in self.units(UNIT).idle:
                        await self.do(s.attack(random.choice(self.known_enemy_units)))


## 啟動遊戲
run_game(maps.get("AcidPlantLE"), [
    Bot(Race.Protoss, SentdeBot()), Computer(Race.Terran, Difficulty.Hard)
], realtime=False)
運行結果如下
採集到了地圖位置。
偵察
在intel(self)里創建一個字典draw_dict,UnitTypeId作為key,半徑和顏色是value
        draw_dict = {
            UnitTypeId.NEXUS: [15, (0, 255, 0)],
            UnitTypeId.PYLON: [3, (20, 235, 0)],
            UnitTypeId.PROBE: [1, (55, 200, 0)],
            UnitTypeId.ASSIMILATOR: [2, (55, 200, 0)],
            UnitTypeId.GATEWAY: [3, (200, 100, 0)],
            UnitTypeId.CYBERNETICSCORE: [3, (150, 150, 0)],
            UnitTypeId.STARGATE: [5, (255, 0, 0)],
            UnitTypeId.ROBOTICSFACILITY: [5, (215, 155, 0)],

            UnitTypeId.VOIDRAY: [3, (255, 100, 0)]
        }
迭代同上
for unit_type in draw_dict:
            for unit in self.units(unit_type).ready:
                pos = unit.position
                cv2.circle(game_data, (int(pos[0]), int(pos[1])), draw_dict[unit_type][0], draw_dict[unit_type][1], -1)
存儲三族的主基地名稱(星靈樞紐,指揮中心,孵化場),刻畫敵方建築。
# 主基地名稱
        main_base_names = ["nexus", "supplydepot", "hatchery"]
        # 記錄敵方基地位置
        for enemy_building in self.known_enemy_structures:
            pos = enemy_building.position
            if enemy_building.name.lower() not in main_base_names:
                cv2.circle(game_data, (int(pos[0]), int(pos[1])), 5, (200, 50, 212), -1)
        for enemy_building in self.known_enemy_structures:
            pos = enemy_building.position
            if enemy_building.name.lower() in main_base_names:
                cv2.circle(game_data, (int(pos[0]), int(pos[1])), 15, (0, 0, 255), -1)
刻畫敵方單位,如果是农民畫得小些,其他單位則畫大些。
        for enemy_unit in self.known_enemy_units:

            if not enemy_unit.is_structure:
                worker_names = ["probe", "scv", "drone"]
                # if that unit is a PROBE, SCV, or DRONE... it's a worker
                pos = enemy_unit.position
                if enemy_unit.name.lower() in worker_names:
                    cv2.circle(game_data, (int(pos[0]), int(pos[1])), 1, (55, 0, 155), -1)
                else:
                    cv2.circle(game_data, (int(pos[0]), int(pos[1])), 3, (50, 0, 215), -1)
在offensive_force_buildings(self)方法中添加建造机械台
            if self.units(CYBERNETICSCORE).ready.exists:
                if len(self.units(ROBOTICSFACILITY)) < 1:
                    if self.can_afford(ROBOTICSFACILITY) and not self.already_pending(ROBOTICSFACILITY):
                        await self.build(ROBOTICSFACILITY, near=pylon)
創建scout(),訓練Observer
async def scout(self):
        if len(self.units(OBSERVER)) > 0:
            scout = self.units(OBSERVER)[0]
            if scout.is_idle:
                enemy_location = self.enemy_start_locations[0]
                move_to = self.random_location_variance(enemy_location)
                print(move_to)
                await self.do(scout.move(move_to))

        else:
            for rf in self.units(ROBOTICSFACILITY).ready.noqueue:
                if self.can_afford(OBSERVER) and self.supply_left > 0:
                    await self.do(rf.train(OBSERVER))
生成隨機位置,很簡單。意思是橫坐標累計遞增-0.2和0.2倍的橫坐標,限制條件為如果x超過橫坐標,那麼就是橫坐標最大值。
縱坐標同理。
    def random_location_variance(self, enemy_start_location):
        x = enemy_start_location[0]
        y = enemy_start_location[1]

        x += ((random.randrange(-20, 20))/100) * enemy_start_location[0]
        y += ((random.randrange(-20, 20))/100) * enemy_start_location[1]

        if x < 0:
            x = 0
        if y < 0:
            y = 0
        if x > self.game_info.map_size[0]:
            x = self.game_info.map_size[0]
        if y > self.game_info.map_size[1]:
            y = self.game_info.map_size[1]

        go_to = position.Point2(position.Pointlike((x,y)))
        return go_to
完整代碼如下
# -*- encoding: utf-8 -*-
'''
@File    :   demo.py
@Modify Time      @Author       @Desciption
------------      -------       -----------
2019/11/3 12:32   Jonas           None
'''

import sc2
from sc2 import run_game, maps, Race, Difficulty, position
from sc2.player import Bot, Computer
from sc2.constants import *
import random
import numpy as np
import cv2


class SentdeBot(sc2.BotAI):
    def __init__(self):
        # 經過計算,每分鐘大約165迭代次數
        self.ITERATIONS_PER_MINUTE = 165
        # 最大农民數量
        self.MAX_WORKERS = 50

    async def on_step(self, iteration: int):
        self.iteration = iteration
        await self.scout()
        await self.distribute_workers()
        await self.build_workers()
        await self.build_pylons()
        await self.build_assimilators()
        await self.expand()
        await self.offensive_force_buildings()
        await self.build_offensive_force()
        await self.intel()
        await self.attack()

    ## 偵察
    async def scout(self):
        if len(self.units(UnitTypeId.OBSERVER)) > 0:
            scout = self.units(UnitTypeId.OBSERVER)[0]
            if scout.is_idle:
                enemy_location = self.enemy_start_locations[0]
                move_to = self.random_location_variance(enemy_location)
                print(move_to)
                await self.do(scout.move(move_to))

        else:
            for rf in self.units(UnitTypeId.ROBOTICSFACILITY).ready.noqueue:
                if self.can_afford(UnitTypeId.OBSERVER) and self.supply_left > 0:
                    await self.do(rf.train(UnitTypeId.OBSERVER))

    async def intel(self):
        game_data = np.zeros((self.game_info.map_size[1], self.game_info.map_size[0], 3), np.uint8)

        # UnitTypeId作為key,半徑和顏色是value
        draw_dict = {
            UnitTypeId.NEXUS: [15, (0, 255, 0)],
            UnitTypeId.PYLON: [3, (20, 235, 0)],
            UnitTypeId.PROBE: [1, (55, 200, 0)],
            UnitTypeId.ASSIMILATOR: [2, (55, 200, 0)],
            UnitTypeId.GATEWAY: [3, (200, 100, 0)],
            UnitTypeId.CYBERNETICSCORE: [3, (150, 150, 0)],
            UnitTypeId.STARGATE: [5, (255, 0, 0)],
            UnitTypeId.ROBOTICSFACILITY: [5, (215, 155, 0)],

            UnitTypeId.VOIDRAY: [3, (255, 100, 0)],
            # OBSERVER: [3, (255, 255, 255)],
        }

        for unit_type in draw_dict:
            for unit in self.units(unit_type).ready:
                pos = unit.position
                cv2.circle(game_data, (int(pos[0]), int(pos[1])), draw_dict[unit_type][0], draw_dict[unit_type][1], -1)

        # 主基地名稱
        main_base_names = ["nexus", "supplydepot", "hatchery"]
        # 記錄敵方基地位置
        for enemy_building in self.known_enemy_structures:
            pos = enemy_building.position
            # 不是主基地建築,畫小一些
            if enemy_building.name.lower() not in main_base_names:
                cv2.circle(game_data, (int(pos[0]), int(pos[1])), 5, (200, 50, 212), -1)
        for enemy_building in self.known_enemy_structures:
            pos = enemy_building.position
            if enemy_building.name.lower() in main_base_names:
                cv2.circle(game_data, (int(pos[0]), int(pos[1])), 15, (0, 0, 255), -1)

        for enemy_unit in self.known_enemy_units:

            if not enemy_unit.is_structure:
                worker_names = ["probe", "scv", "drone"]
                # if that unit is a PROBE, SCV, or DRONE... it's a worker
                pos = enemy_unit.position
                if enemy_unit.name.lower() in worker_names:
                    cv2.circle(game_data, (int(pos[0]), int(pos[1])), 1, (55, 0, 155), -1)
                else:
                    cv2.circle(game_data, (int(pos[0]), int(pos[1])), 3, (50, 0, 215), -1)

        for obs in self.units(UnitTypeId.OBSERVER).ready:
            pos = obs.position
            cv2.circle(game_data, (int(pos[0]), int(pos[1])), 1, (255, 255, 255), -1)

        # flip horizontally to make our final fix in visual representation:
        flipped = cv2.flip(game_data, 0)
        resized = cv2.resize(flipped, dsize=None, fx=2, fy=2)

        cv2.imshow('Intel', resized)
        cv2.waitKey(1)

    def random_location_variance(self, enemy_start_location):
        x = enemy_start_location[0]
        y = enemy_start_location[1]

        x += ((random.randrange(-20, 20)) / 100) * enemy_start_location[0]
        y += ((random.randrange(-20, 20)) / 100) * enemy_start_location[1]

        if x < 0:
            x = 0
        if y < 0:
            y = 0
        if x > self.game_info.map_size[0]:
            x = self.game_info.map_size[0]
        if y > self.game_info.map_size[1]:
            y = self.game_info.map_size[1]

        go_to = position.Point2(position.Pointlike((x, y)))
        return go_to

    # 建造农民
    async def build_workers(self):
        # 星靈樞鈕*16(一個基地配備16個农民)大於農民數量並且現有农民數量小於MAX_WORKERS
        if len(self.units(UnitTypeId.NEXUS)) * 16 > len(self.units(UnitTypeId.PROBE)) and len(
                self.units(UnitTypeId.PROBE)) < self.MAX_WORKERS:
            # 星靈樞紐(NEXUS)無隊列建造,可以提高晶體礦的利用率,不至於佔用資源
            for nexus in self.units(UnitTypeId.NEXUS).ready.noqueue:
                # 是否有50晶體礦建造农民
                if self.can_afford(UnitTypeId.PROBE):
                    await self.do(nexus.train(UnitTypeId.PROBE))

    ## 建造水晶
    async def build_pylons(self):
        ## 供應人口和現有人口之差小於5且建築不是正在建造
        if self.supply_left < 5 and not self.already_pending(UnitTypeId.PYLON):
            nexuses = self.units(UnitTypeId.NEXUS).ready
            if nexuses.exists:
                if self.can_afford(UnitTypeId.PYLON):
                    await self.build(UnitTypeId.PYLON, near=nexuses.first)

    ## 建造吸收廠
    async def build_assimilators(self):
        for nexus in self.units(UnitTypeId.NEXUS).ready:
            # 在瓦斯泉上建造吸收廠
            vaspenes = self.state.vespene_geyser.closer_than(15.0, nexus)
            for vaspene in vaspenes:
                if not self.can_afford(UnitTypeId.ASSIMILATOR):
                    break
                worker = self.select_build_worker(vaspene.position)
                if worker is None:
                    break
                if not self.units(UnitTypeId.ASSIMILATOR).closer_than(1.0, vaspene).exists:
                    await self.do(worker.build(UnitTypeId.ASSIMILATOR, vaspene))

    ## 開礦
    async def expand(self):
        # (self.iteration / self.ITERATIONS_PER_MINUTE)是一個緩慢遞增的值,動態開礦
        if self.units(UnitTypeId.NEXUS).amount < self.iteration / self.ITERATIONS_PER_MINUTE and self.can_afford(
                UnitTypeId.NEXUS):
            await self.expand_now()

    ## 建造進攻性建築
    async def offensive_force_buildings(self):
        print(self.iteration / self.ITERATIONS_PER_MINUTE)
        if self.units(UnitTypeId.PYLON).ready.exists:
            pylon = self.units(UnitTypeId.PYLON).ready.random
            # 根據神族建築科技圖,折躍門建造過後才可以建造控制核心
            if self.units(UnitTypeId.GATEWAY).ready.exists and not self.units(UnitTypeId.CYBERNETICSCORE):
                if self.can_afford(UnitTypeId.CYBERNETICSCORE) and not self.already_pending(UnitTypeId.CYBERNETICSCORE):
                    await self.build(UnitTypeId.CYBERNETICSCORE, near=pylon)
            # 否則建造折躍門
            # (self.iteration / self.ITERATIONS_PER_MINUTE)/2 是一個緩慢遞增的值
            # elif len(self.units(UnitTypeId.GATEWAY)) < ((self.iteration / self.ITERATIONS_PER_MINUTE) / 2):
            elif len(self.units(UnitTypeId.GATEWAY)) < 1:
                if self.can_afford(UnitTypeId.GATEWAY) and not self.already_pending(UnitTypeId.GATEWAY):
                    await self.build(UnitTypeId.GATEWAY, near=pylon)
            # 控制核心存在的情況下建造机械台
            if self.units(UnitTypeId.CYBERNETICSCORE).ready.exists:
                if len(self.units(UnitTypeId.ROBOTICSFACILITY)) < 1:
                    if self.can_afford(UnitTypeId.ROBOTICSFACILITY) and not self.already_pending(
                            UnitTypeId.ROBOTICSFACILITY):
                        await self.build(UnitTypeId.ROBOTICSFACILITY, near=pylon)

            # 控制核心存在的情況下建造星門
            if self.units(UnitTypeId.CYBERNETICSCORE).ready.exists:
                if len(self.units(UnitTypeId.STARGATE)) < ((self.iteration / self.ITERATIONS_PER_MINUTE) / 2):
                    if self.can_afford(UnitTypeId.STARGATE) and not self.already_pending(UnitTypeId.STARGATE):
                        await self.build(UnitTypeId.STARGATE, near=pylon)

    ## 造兵
    async def build_offensive_force(self):
        # 無隊列化建造
        # for gw in self.units(UnitTypeId.GATEWAY).ready.noqueue:
        #     if not self.units(UnitTypeId.STALKER).amount > self.units(UnitTypeId.VOIDRAY).amount:
        #
        #         if self.can_afford(UnitTypeId.STALKER) and self.supply_left > 0:
        #             await self.do(gw.train(UnitTypeId.STALKER))

        for sg in self.units(UnitTypeId.STARGATE).ready.noqueue:
            if self.can_afford(UnitTypeId.VOIDRAY) and self.supply_left > 0:
                await self.do(sg.train(UnitTypeId.VOIDRAY))

    ## 尋找目標
    def find_target(self, state):
        if len(self.known_enemy_units) > 0:
            # 隨機選取敵方單位
            return random.choice(self.known_enemy_units)
        elif len(self.known_enemy_units) > 0:
            # 隨機選取敵方建築
            return random.choice(self.known_enemy_structures)
        else:
            # 返回敵方出生點位
            return self.enemy_start_locations[0]

    ## 進攻
    async def attack(self):
        # {UNIT: [n to fight, n to defend]}
        aggressive_units = {UnitTypeId.VOIDRAY: [8, 3]}

        for UNIT in aggressive_units:
            # 攻擊模式
            if self.units(UNIT).amount > aggressive_units[UNIT][0] and self.units(UNIT).amount > aggressive_units[UNIT][
                1]:
                for s in self.units(UNIT).idle:
                    await self.do(s.attack(self.find_target(self.state)))
            # 防衛模式
            elif self.units(UNIT).amount > aggressive_units[UNIT][1]:
                if len(self.known_enemy_units) > 0:
                    for s in self.units(UNIT).idle:
                        await self.do(s.attack(random.choice(self.known_enemy_units)))


## 啟動遊戲
run_game(maps.get("AcidPlantLE"), [
    Bot(Race.Protoss, SentdeBot()), Computer(Race.Terran, Difficulty.Hard)
], realtime=False)
運行結果如下,紅色和粉紅色是敵方單位。
創建訓練數據
統計資源、人口和軍隊人口比,在intel方法添加如下代碼
        # 追蹤資源、人口和軍隊人口比
        line_max = 50
        mineral_ratio = self.minerals / 1500
        if mineral_ratio > 1.0:
            mineral_ratio = 1.0

        vespene_ratio = self.vespene / 1500
        if vespene_ratio > 1.0:
            vespene_ratio = 1.0

        population_ratio = self.supply_left / self.supply_cap
        if population_ratio > 1.0:
            population_ratio = 1.0

        plausible_supply = self.supply_cap / 200.0

        military_weight = len(self.units(UnitTypeId.VOIDRAY)) / (self.supply_cap - self.supply_left)
        if military_weight > 1.0:
            military_weight = 1.0

        # 农民/人口      worker/supply ratio
        cv2.line(game_data, (0, 19), (int(line_max * military_weight), 19), (250, 250, 200), 3)
        # 人口/200    plausible supply (supply/200.0)
        cv2.line(game_data, (0, 15), (int(line_max * plausible_supply), 15), (220, 200, 200), 3)
        # (人口-現有人口)/人口  population ratio (supply_left/supply)
        cv2.line(game_data, (0, 11), (int(line_max * population_ratio), 11), (150, 150, 150), 3)
        # 氣體/1500   gas/1500
        cv2.line(game_data, (0, 7), (int(line_max * vespene_ratio), 7), (210, 200, 0), 3)
        # 晶體礦/1500  minerals minerals/1500
        cv2.line(game_data, (0, 3), (int(line_max * mineral_ratio), 3), (0, 255, 25), 3)
運行結果如下,左下角自上而下依次是“农民/人口”,“人口/200”,“(人口-現有人口)/人口”,“氣體/1500”,“晶體礦/1500”
採集進攻行為數據,在attack方法中加入如下代碼
        if len(self.units(UnitTypeId.VOIDRAY).idle) > 0:
            choice = random.randrange(0, 4)
            target = False
            if self.iteration > self.do_something_after:
                if choice == 0:
                    # 什麼都不做
                    wait = random.randrange(20, 165)
                    self.do_something_after = self.iteration + wait

                elif choice == 1:
                    # 攻擊離星靈樞紐最近的單位
                    if len(self.known_enemy_units) > 0:
                        target = self.known_enemy_units.closest_to(random.choice(self.units(UnitTypeId.NEXUS)))

                elif choice == 2:
                    # 攻擊敵方建築
                    if len(self.known_enemy_structures) > 0:
                        target = random.choice(self.known_enemy_structures)

                elif choice == 3:
                    # 攻擊敵方出生位置
                    target = self.enemy_start_locations[0]

                if target:
                    for vr in self.units(UnitTypeId.VOIDRAY).idle:
                        await self.do(vr.attack(target))
                y = np.zeros(4)
                y[choice] = 1
                print(y)
                self.train_data.append([y, self.flipped])
輸出如下結果
···
[1. 0. 0. 0.]
[0. 0. 1. 0.]
[0. 0. 0. 1.]
[0. 0. 1. 0.]
[1. 0. 0. 0.]
···
為了使用self.flipped = cv2.flip(game_data, 0),修改
        flipped = cv2.flip(game_data, 0)
        resized = cv2.resize(flipped, dsize=None, fx=2, fy=2)
為
        self.flipped = cv2.flip(game_data, 0)
        resized = cv2.resize(self.flipped, dsize=None, fx=2, fy=2)
init 方法添加do_something_after和train_data
    def __init__(self):
        self.ITERATIONS_PER_MINUTE = 165
        self.MAX_WORKERS = 50
        self.do_something_after = 0
        self.train_data = []
採集攻擊數據的時候不需要畫圖,我們在類前加HEADLESS = False,intel方法代碼修改如下
        self.flipped = cv2.flip(game_data, 0)

        if not HEADLESS:
            resized = cv2.resize(self.flipped, dsize=None, fx=2, fy=2)
            cv2.imshow('Intel', resized)
            cv2.waitKey(1)
加入on_end方法,只存儲勝利的數據,在和代碼同級目錄新建train_data文件夾
    def on_end(self, game_result):
        print('--- on_end called ---')
        print(game_result)

        if game_result == Result.Victory:
            np.save("train_data/{}.npy".format(str(int(time.time()))), np.array(self.train_data))
完整代碼如下
import os
import time

import sc2
from sc2 import run_game, maps, Race, Difficulty, position, Result
from sc2.player import Bot, Computer
from sc2.constants import *
import random
import numpy as np
import cv2

HEADLESS = True
# os.environ["SC2PATH"] = 'F:\StarCraft II'

class SentdeBot(sc2.BotAI):
    def __init__(self):
        # 經過計算,每分鐘大約165迭代次數
        self.ITERATIONS_PER_MINUTE = 165
        # 最大农民數量
        self.MAX_WORKERS = 50
        self.do_something_after = 0
        self.train_data = []

    def on_end(self, game_result):
        print('--- on_end called ---')
        print(game_result)

        if game_result == Result.Victory:
            np.save("train_data/{}.npy".format(str(int(time.time()))), np.array(self.train_data))

    async def on_step(self, iteration: int):
        self.iteration = iteration
        await self.scout()
        await self.distribute_workers()
        await self.build_workers()
        await self.build_pylons()
        await self.build_assimilators()
        await self.expand()
        await self.offensive_force_buildings()
        await self.build_offensive_force()
        await self.intel()
        await self.attack()

    ## 偵察
    async def scout(self):
        if len(self.units(UnitTypeId.OBSERVER)) > 0:
            scout = self.units(UnitTypeId.OBSERVER)[0]
            if scout.is_idle:
                enemy_location = self.enemy_start_locations[0]
                move_to = self.random_location_variance(enemy_location)
                print(move_to)
                await self.do(scout.move(move_to))

        else:
            for rf in self.units(UnitTypeId.ROBOTICSFACILITY).ready.noqueue:
                if self.can_afford(UnitTypeId.OBSERVER) and self.supply_left > 0:
                    await self.do(rf.train(UnitTypeId.OBSERVER))

    async def intel(self):
        game_data = np.zeros((self.game_info.map_size[1], self.game_info.map_size[0], 3), np.uint8)

        # UnitTypeId作為key,半徑和顏色是value
        draw_dict = {
            UnitTypeId.NEXUS: [15, (0, 255, 0)],
            UnitTypeId.PYLON: [3, (20, 235, 0)],
            UnitTypeId.PROBE: [1, (55, 200, 0)],
            UnitTypeId.ASSIMILATOR: [2, (55, 200, 0)],
            UnitTypeId.GATEWAY: [3, (200, 100, 0)],
            UnitTypeId.CYBERNETICSCORE: [3, (150, 150, 0)],
            UnitTypeId.STARGATE: [5, (255, 0, 0)],
            UnitTypeId.ROBOTICSFACILITY: [5, (215, 155, 0)],

            UnitTypeId.VOIDRAY: [3, (255, 100, 0)],
            # OBSERVER: [3, (255, 255, 255)],
        }

        for unit_type in draw_dict:
            for unit in self.units(unit_type).ready:
                pos = unit.position
                cv2.circle(game_data, (int(pos[0]), int(pos[1])), draw_dict[unit_type][0], draw_dict[unit_type][1], -1)

        # 主基地名稱
        main_base_names = ["nexus", "supplydepot", "hatchery"]
        # 記錄敵方基地位置
        for enemy_building in self.known_enemy_structures:
            pos = enemy_building.position
            # 不是主基地建築,畫小一些
            if enemy_building.name.lower() not in main_base_names:
                cv2.circle(game_data, (int(pos[0]), int(pos[1])), 5, (200, 50, 212), -1)
        for enemy_building in self.known_enemy_structures:
            pos = enemy_building.position
            if enemy_building.name.lower() in main_base_names:
                cv2.circle(game_data, (int(pos[0]), int(pos[1])), 15, (0, 0, 255), -1)

        for enemy_unit in self.known_enemy_units:

            if not enemy_unit.is_structure:
                worker_names = ["probe", "scv", "drone"]
                # if that unit is a PROBE, SCV, or DRONE... it's a worker
                pos = enemy_unit.position
                if enemy_unit.name.lower() in worker_names:
                    cv2.circle(game_data, (int(pos[0]), int(pos[1])), 1, (55, 0, 155), -1)
                else:
                    cv2.circle(game_data, (int(pos[0]), int(pos[1])), 3, (50, 0, 215), -1)

        for obs in self.units(UnitTypeId.OBSERVER).ready:
            pos = obs.position
            cv2.circle(game_data, (int(pos[0]), int(pos[1])), 1, (255, 255, 255), -1)


        # 追蹤資源、人口和軍隊人口比
        line_max = 50
        mineral_ratio = self.minerals / 1500
        if mineral_ratio > 1.0:
            mineral_ratio = 1.0

        vespene_ratio = self.vespene / 1500
        if vespene_ratio > 1.0:
            vespene_ratio = 1.0

        population_ratio = self.supply_left / self.supply_cap
        if population_ratio > 1.0:
            population_ratio = 1.0

        plausible_supply = self.supply_cap / 200.0

        military_weight = len(self.units(UnitTypeId.VOIDRAY)) / (self.supply_cap - self.supply_left)
        if military_weight > 1.0:
            military_weight = 1.0

        # 农民/人口      worker/supply ratio
        cv2.line(game_data, (0, 19), (int(line_max * military_weight), 19), (250, 250, 200), 3)
        # 人口/200    plausible supply (supply/200.0)
        cv2.line(game_data, (0, 15), (int(line_max * plausible_supply), 15), (220, 200, 200), 3)
        # (人口-現有人口)/人口  population ratio (supply_left/supply)
        cv2.line(game_data, (0, 11), (int(line_max * population_ratio), 11), (150, 150, 150), 3)
        # 氣體/1500   gas/1500
        cv2.line(game_data, (0, 7), (int(line_max * vespene_ratio), 7), (210, 200, 0), 3)
        # 晶體礦/1500  minerals minerals/1500
        cv2.line(game_data, (0, 3), (int(line_max * mineral_ratio), 3), (0, 255, 25), 3)


        # flip horizontally to make our final fix in visual representation:
        self.flipped = cv2.flip(game_data, 0)

        if HEADLESS:
            resized = cv2.resize(self.flipped, dsize=None, fx=2, fy=2)

            cv2.imshow('Intel', resized)
            cv2.waitKey(1)

    def random_location_variance(self, enemy_start_location):
        x = enemy_start_location[0]
        y = enemy_start_location[1]

        x += ((random.randrange(-20, 20)) / 100) * enemy_start_location[0]
        y += ((random.randrange(-20, 20)) / 100) * enemy_start_location[1]

        if x < 0:
            x = 0
        if y < 0:
            y = 0
        if x > self.game_info.map_size[0]:
            x = self.game_info.map_size[0]
        if y > self.game_info.map_size[1]:
            y = self.game_info.map_size[1]

        go_to = position.Point2(position.Pointlike((x, y)))
        return go_to

    # 建造农民
    async def build_workers(self):
        # 星靈樞鈕*16(一個基地配備16個农民)大於農民數量並且現有农民數量小於MAX_WORKERS
        if len(self.units(UnitTypeId.NEXUS)) * 16 > len(self.units(UnitTypeId.PROBE)) and len(
                self.units(UnitTypeId.PROBE)) < self.MAX_WORKERS:
            # 星靈樞紐(NEXUS)無隊列建造,可以提高晶體礦的利用率,不至於佔用資源
            for nexus in self.units(UnitTypeId.NEXUS).ready.noqueue:
                # 是否有50晶體礦建造农民
                if self.can_afford(UnitTypeId.PROBE):
                    await self.do(nexus.train(UnitTypeId.PROBE))

    ## 建造水晶
    async def build_pylons(self):
        ## 供應人口和現有人口之差小於5且建築不是正在建造
        if self.supply_left < 5 and not self.already_pending(UnitTypeId.PYLON):
            nexuses = self.units(UnitTypeId.NEXUS).ready
            if nexuses.exists:
                if self.can_afford(UnitTypeId.PYLON):
                    await self.build(UnitTypeId.PYLON, near=nexuses.first)

    ## 建造吸收廠
    async def build_assimilators(self):
        for nexus in self.units(UnitTypeId.NEXUS).ready:
            # 在瓦斯泉上建造吸收廠
            vaspenes = self.state.vespene_geyser.closer_than(15.0, nexus)
            for vaspene in vaspenes:
                if not self.can_afford(UnitTypeId.ASSIMILATOR):
                    break
                worker = self.select_build_worker(vaspene.position)
                if worker is None:
                    break
                if not self.units(UnitTypeId.ASSIMILATOR).closer_than(1.0, vaspene).exists:
                    await self.do(worker.build(UnitTypeId.ASSIMILATOR, vaspene))

    ## 開礦
    async def expand(self):
        # (self.iteration / self.ITERATIONS_PER_MINUTE)是一個緩慢遞增的值,動態開礦
        if self.units(UnitTypeId.NEXUS).amount < self.iteration / self.ITERATIONS_PER_MINUTE and self.can_afford(
                UnitTypeId.NEXUS):
            await self.expand_now()

    ## 建造進攻性建築
    async def offensive_force_buildings(self):
        # print(self.iteration / self.ITERATIONS_PER_MINUTE)
        if self.units(UnitTypeId.PYLON).ready.exists:
            pylon = self.units(UnitTypeId.PYLON).ready.random
            # 根據神族建築科技圖,折躍門建造過後才可以建造控制核心
            if self.units(UnitTypeId.GATEWAY).ready.exists and not self.units(UnitTypeId.CYBERNETICSCORE):
                if self.can_afford(UnitTypeId.CYBERNETICSCORE) and not self.already_pending(UnitTypeId.CYBERNETICSCORE):
                    await self.build(UnitTypeId.CYBERNETICSCORE, near=pylon)
            # 否則建造折躍門
            # (self.iteration / self.ITERATIONS_PER_MINUTE)/2 是一個緩慢遞增的值
            # elif len(self.units(UnitTypeId.GATEWAY)) < ((self.iteration / self.ITERATIONS_PER_MINUTE) / 2):
            elif len(self.units(UnitTypeId.GATEWAY)) < 1:
                if self.can_afford(UnitTypeId.GATEWAY) and not self.already_pending(UnitTypeId.GATEWAY):
                    await self.build(UnitTypeId.GATEWAY, near=pylon)
            # 控制核心存在的情況下建造机械台
            if self.units(UnitTypeId.CYBERNETICSCORE).ready.exists:
                if len(self.units(UnitTypeId.ROBOTICSFACILITY)) < 1:
                    if self.can_afford(UnitTypeId.ROBOTICSFACILITY) and not self.already_pending(
                            UnitTypeId.ROBOTICSFACILITY):
                        await self.build(UnitTypeId.ROBOTICSFACILITY, near=pylon)

            # 控制核心存在的情況下建造星門
            if self.units(UnitTypeId.CYBERNETICSCORE).ready.exists:
                if len(self.units(UnitTypeId.STARGATE)) < ((self.iteration / self.ITERATIONS_PER_MINUTE) / 2):
                    if self.can_afford(UnitTypeId.STARGATE) and not self.already_pending(UnitTypeId.STARGATE):
                        await self.build(UnitTypeId.STARGATE, near=pylon)

    ## 造兵
    async def build_offensive_force(self):
        # 無隊列化建造
        # for gw in self.units(UnitTypeId.GATEWAY).ready.noqueue:
        #     if not self.units(UnitTypeId.STALKER).amount > self.units(UnitTypeId.VOIDRAY).amount:
        #
        #         if self.can_afford(UnitTypeId.STALKER) and self.supply_left > 0:
        #             await self.do(gw.train(UnitTypeId.STALKER))

        for sg in self.units(UnitTypeId.STARGATE).ready.noqueue:
            if self.can_afford(UnitTypeId.VOIDRAY) and self.supply_left > 0:
                await self.do(sg.train(UnitTypeId.VOIDRAY))

    ## 尋找目標
    def find_target(self, state):
        if len(self.known_enemy_units) > 0:
            # 隨機選取敵方單位
            return random.choice(self.known_enemy_units)
        elif len(self.known_enemy_units) > 0:
            # 隨機選取敵方建築
            return random.choice(self.known_enemy_structures)
        else:
            # 返回敵方出生點位
            return self.enemy_start_locations[0]

    ## 進攻
    async def attack(self):
        if len(self.units(UnitTypeId.VOIDRAY).idle) > 0:
            choice = random.randrange(0, 4)
            target = False
            if self.iteration > self.do_something_after:
                if choice == 0:
                    # 什麼都不做
                    wait = random.randrange(20, 165)
                    self.do_something_after = self.iteration + wait

                elif choice == 1:
                    # 攻擊離星靈樞紐最近的單位
                    if len(self.known_enemy_units) > 0:
                        target = self.known_enemy_units.closest_to(random.choice(self.units(UnitTypeId.NEXUS)))

                elif choice == 2:
                    # 攻擊敵方建築
                    if len(self.known_enemy_structures) > 0:
                        target = random.choice(self.known_enemy_structures)

                elif choice == 3:
                    # 攻擊敵方出生位置
                    target = self.enemy_start_locations[0]

                if target:
                    for vr in self.units(UnitTypeId.VOIDRAY).idle:
                        await self.do(vr.attack(target))
                y = np.zeros(4)
                y[choice] = 1
                print(y)
                self.train_data.append([y, self.flipped])


## 啟動遊戲
run_game(maps.get("AcidPlantLE"), [
    Bot(Race.Protoss, SentdeBot()), Computer(Race.Terran, Difficulty.Medium)
], realtime=False)
可以看到train_data文件夾下存儲了勝利數據
本站聲明:網站內容來源於博客園,如有侵權,請聯繫我們,我們將及時處理【其他文章推薦】
※台北網頁設計公司這麼多,該如何挑選?? 網頁設計報價省錢懶人包"嚨底家"
※網頁設計公司推薦更多不同的設計風格,搶佔消費者視覺第一線
※想知道購買電動車哪裡補助最多?台中電動車補助資訊懶人包彙整

 停車場充電設施建設協調會由中國國家發改委基礎產業司副司長鄭劍主持,就2016年第二批城市停車場項目配建充電基礎設施問題,與安徽、江蘇、江西、陝西、浙江、湖北、上海、大連、廈門等地方發展改革委、充電基礎設施服務企業和國家電網公司進行交流座談。 據國家能源局電力司初步統計,截至今年6月底,中國全國已建成公共充電樁8.1萬個,比去年底增長65%;隨車建成私人充電樁超過5萬個,比去年底增長約12%。1-6月全國新能源汽車充電量超過6億kWh,替代燃油約20萬噸,電動汽車的發展對能源結構調整和城市環境提升貢獻明顯。 為新能源汽車的推廣和應用創造良好的環境,國家能源局相關部門加快了推動充電樁政策規劃的落實,組織起草加快居民區充電基礎設施建設的檔。該文件有望7月份出臺,將有效推進居民區和工作場所建樁工作,合理優化公共充電樁佈局,提高公共充電樁利用率。 文章來源:中國發展網
 據稱,奧迪未來的超級跑車即是一款核動力汽車,代號Mesarthim F-Tron Quattro,由俄羅斯工程師操刀設計。外型前衛十足,頗有蝙蝠車的味道。 核動力主要部件核反應爐與離子發射器位於前後軸之間,旁邊是發熱裝置,產生的蒸汽進而驅動電機發電,動力電池安裝在前艙,使用四個輪轂電機驅動車輪前進,同時還有電機驅動離子發射器、冷凝器等,除了核燃料供給,其它整個系統構成一個閉環生態。
  由於動力系統是個獨立部分,導致其它部件的安裝位置是個問題,為解決這個問題,工程師設計了一套叫做“Solid Cage”的獨立底盤,這個底盤是聚合物材料,可以3D列印出來,而且可以獨立拆卸。 除此以外,底盤上還有一個平底罐,裡面裝有磁流體,在有磁性的路面上行駛時,車子就會產生下壓力,過彎的時候能抵制側傾力,直行的時候抑制抬頭點頭。 雖然奧迪暫時沒有給出這款車具體推出時間表,總體來說還是值得稱讚的。 文章來源:蓋世汽車
 中國汽車技術研究中心新能源汽車積分政策負責人時間表示,相比真金白銀的財政補貼,新能源積分交易制度靈活性更高,是當下國家推動新能源產業發展的一種可行方式。 新能源積分交易制度,即政府將企業年度“零排放”車型的銷售情況記錄成積分,以積分為依據來考核企業在節能減排方面是否達標。若企業積分不達標,可以購買同行業其餘公司的積分,或者向政府繳納高額罰款。 中國若要實施積分交易制度 政府部門職責需合理分配。 為此,積分政策負責人時間給出幾點建議:作為政策的制定者政府,需要部門間進行合理的職責分配,物質保障方面,中國新能源基礎設施建設尚需進一步完善。意識形態方面,當前,消費者對新能源車的認識還不充足,對制度實施造成一定阻礙。企業方面,不同規模的企業須在政策上區別對待,為中小企業的發展提供空間;當企業規模有所變更時,應當提供相應的扶持政策。 文章來源:人民網
 相關自由貿易試驗區涉及上海市、天津市、廣東省、福建省四區域。國務院決定,在自由貿易試驗區暫時調整《中華人民共和國外資企業法實施細則》等18部行政法規、《國務院關於投資體制改革的決定》等4件國務院檔、《外商投資產業指導目錄(2015年修訂)》等4件經國務院批准的部門規章的有關規定。 據分析,此次重大調整專案涉及51項。其中放開合資門檻,允許外商以獨資形式從事生產經營活動的項目多達12項。在新能源汽車關鍵零部件及整車領域,涉及3項,具體如下: 1、允許外商以獨資形式從事能量型動力電池(能量密度≥110Wh,迴圈壽命≥2000次)的製造; 2、允許外商以獨資形式從事汽車電子匯流排網路技術、電動助力轉向系統電子控制器的製造與研發; 3、允許外商以獨資形式從事摩托車生產; 由此可見,在新能源汽車重要零部件動力電池領域,國外一線大廠終於擺脫了合資電池廠的固定模式,三星SDI、松下、LG化學等電池大頭將獲益。 文章來源:上海蓋世