今天項目不忙,想搞一下shardingJDBC分庫分表看看,主要想實現以下幾點:
- 捨棄xml配置,使用.yml或者.properties文件+java的方式配置spring。
- 使用 Druid 作為數據庫連接池,同時開啟監控界面,並支持監控多數據源。
- 不依賴 com.dangdang 的 sharding-jdbc-core 包。此包過於古老,最後一次更新在2016年。目測只是封裝了一層,意義不大。感覺如果不是dangdang公司內部開發,沒必要用這個包。(且本人實測不能和最新的Druid包一起用,insert語句報錯)
折騰了半天,網上找的例子大部分跑不通。直接自己從零開搞,全部組件直接上當前最新版本。
SpringBoot: 2.3.0
mybatis: 2.1.3
druid: 1.1.22
sharding-jdbc: 4.1.1
注意:這裏因為是自己邊看源碼邊配置,(sharding官網的例子可能是版本問題基本沒法用,GitHub 我這裏網絡基本打不開),所以數據源和sharding大部分用java代碼配置。了解配置原理后,也可以簡化到 .yml / .properties 文件中。
Sharding-JDBC簡介
Apache ShardingSphere 是一套開源的分佈式數據庫中間件解決方案組成的生態圈,它由 JDBC、Proxy 和 Sidecar(規劃中)這 3 款相互獨立,卻又能夠混合部署配合使用的產品組成。
Sharding-JDBC定位為輕量級 Java 框架,在 Java 的 JDBC 層提供的額外服務。 它使用客戶端直連數據庫,以 jar 包形式提供服務,無需額外部署和依賴,可理解為增強版的 JDBC 驅動,完全兼容 JDBC 和各種 ORM 框架。
- 適用於任何基於 JDBC 的 ORM 框架,如:JPA, Hibernate, Mybatis, Spring JDBC Template 或直接使用 JDBC。
- 支持任何第三方的數據庫連接池,如:DBCP, C3P0, BoneCP, Druid, HikariCP 等。
- 支持任意實現JDBC規範的數據庫。目前支持 MySQL,Oracle,SQLServer,PostgreSQL 以及任何遵循 SQL92 標準的數據庫。
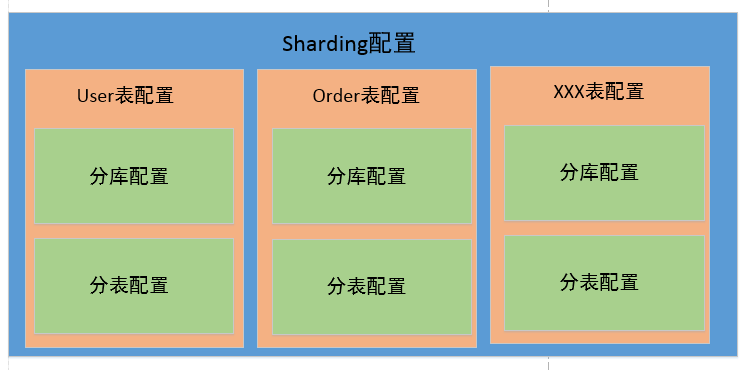
Sharding配置示意圖
簡單的理解如下圖,對sharding-jdbc進行配置,其實就是對所有需要進行分片的表進行配置。對錶的配置,則主要是對分庫的配置和分表的配置。這裏可以只分庫不分表,或者只分表不分庫,或者同時包含分庫和分表邏輯。
先看一下我的項目目錄結構整體如下:
一、POM依賴配置
完整的pom表如下,其中主要是對 mysql-connector-java、mybatis-spring-boot-starter、druid-spring-boot-starter、sharding-jdbc-core 的依賴。
注意:sharding-jdbc-core 我用的4.0+的版本,因為已經晉陞為 apache 基金會的頂級項目,其 groupId 變為了 org.apache.shardingsphere,之前是io.shardingsphere。
<?xml version="1.0" encoding="UTF-8"?>
<project xmlns="http://maven.apache.org/POM/4.0.0" xmlns:xsi="http://www.w3.org/2001/XMLSchema-instance"
         xsi:schemaLocation="http://maven.apache.org/POM/4.0.0 https://maven.apache.org/xsd/maven-4.0.0.xsd">
    <modelVersion>4.0.0</modelVersion>
    <parent>
        <groupId>org.springframework.boot</groupId>
        <artifactId>spring-boot-starter-parent</artifactId>
        <version>2.3.0.RELEASE</version>
        <relativePath/> <!-- lookup parent from repository -->
    </parent>
    <groupId>com.example</groupId>
    <artifactId>shardingjdbc</artifactId>
    <version>0.0.1-SNAPSHOT</version>
    <name>shardingjdbc</name>
    <description>Demo project for Spring Boot</description>

    <properties>
        <!--<sharding.jdbc.version>3.0.0</sharding.jdbc.version>-->
        <java.version>1.8</java.version>
    </properties>

    <dependencies>
        <dependency>
            <groupId>org.springframework.boot</groupId>
            <artifactId>spring-boot-starter-web</artifactId>
        </dependency>
        <dependency>
            <groupId>org.springframework</groupId>
            <artifactId>spring-tx</artifactId>
        </dependency>
        <dependency>
            <groupId>mysql</groupId>
            <artifactId>mysql-connector-java</artifactId>
            <scope>runtime</scope>
        </dependency>
        <dependency>
            <groupId>org.mybatis.spring.boot</groupId>
            <artifactId>mybatis-spring-boot-starter</artifactId>
            <version>2.1.3</version>
        </dependency>
        <dependency>
            <groupId>com.alibaba</groupId>
            <artifactId>druid-spring-boot-starter</artifactId>
            <version>1.1.22</version>
        </dependency>
        <dependency>
            <groupId>org.apache.shardingsphere</groupId>
            <artifactId>sharding-jdbc-core</artifactId>
            <version>4.1.1</version>
        </dependency>
        <dependency>
            <groupId>org.projectlombok</groupId>
            <artifactId>lombok</artifactId>
            <optional>true</optional>
        </dependency>
        <dependency>
            <groupId>org.springframework.boot</groupId>
            <artifactId>spring-boot-starter-test</artifactId>
            <scope>test</scope>
            <exclusions>
                <exclusion>
                    <groupId>org.junit.vintage</groupId>
                    <artifactId>junit-vintage-engine</artifactId>
                </exclusion>
            </exclusions>
        </dependency>
        <dependency>
            <groupId>log4j</groupId>
            <artifactId>log4j</artifactId>
            <version>1.2.16</version>
        </dependency>
        <dependency>
            <groupId>org.slf4j</groupId>
            <artifactId>slf4j-log4j12</artifactId>
            <version>1.7.5</version>
        </dependency>
    </dependencies>

    <build>
        <resources>
            <resource>
                <directory>src/main/java</directory>
                <includes>
                    <include>**/*.xml</include>
                </includes>
            </resource>
        </resources>
        <plugins>
            <plugin>
                <groupId>org.apache.maven.plugins</groupId>
                <artifactId>maven-compiler-plugin</artifactId>
                <configuration>
                    <source>1.8</source>
                    <target>1.8</target>
                    <encoding>UTF-8</encoding>
                </configuration>
            </plugin>
            <plugin>
                <groupId>org.springframework.boot</groupId>
                <artifactId>spring-boot-maven-plugin</artifactId>
            </plugin>
        </plugins>
    </build>

</project>
pom.xml
二、application.properties
這裏配置了兩個數據源,為避免和自動裝配產生衝突,屬性前綴要和自動裝配掃描的前綴區分開,這裏我用 datasource0 和 datasource1。
下面 spring.datasource.druid 開頭的配置,會被 druid 的代碼自動掃描裝配。
#################################### common config : ####################################
spring.application.name=shardingjdbc
# 應用服務web訪問端口
server.port=8080

# mybatis配置
mybatis.mapper-locations=classpath:com/example/shardingjdbc/mapper/*.xml
mybatis.type-aliases-package=com.example.shardingjdbc.**.entity

datasource0.url=jdbc:mysql://localhost:3306/test0?useUnicode=true&characterEncoding=utf-8&useSSL=false&serverTimezone=Asia/Shanghai
datasource0.driver-class-name=com.mysql.cj.jdbc.Driver
datasource0.type=com.alibaba.druid.pool.DruidDataSource
datasource0.username=root
datasource0.password=852278

datasource1.url=jdbc:mysql://localhost:3306/test1?useUnicode=true&characterEncoding=utf-8&useSSL=false&serverTimezone=Asia/Shanghai
datasource1.driver-class-name=com.mysql.cj.jdbc.Driver
datasource1.type=com.alibaba.druid.pool.DruidDataSource
datasource1.username=root
datasource1.password=852278

#
##### 連接池配置 #######
# 過濾器設置(第一個stat很重要,沒有的話會監控不到SQL)
spring.datasource.druid.filters=stat,wall,log4j2

##### WebStatFilter配置 #######
#啟用StatFilter
spring.datasource.druid.web-stat-filter.enabled=true
#添加過濾規則
spring.datasource.druid.web-stat-filter.url-pattern=/*
#排除一些不必要的url
spring.datasource.druid.web-stat-filter.exclusions=*.js,*.gif,*.jpg,*.png,*.css,*.ico,/druid/*
#開啟session統計功能
spring.datasource.druid.web-stat-filter.session-stat-enable=true
#缺省sessionStatMaxCount是1000個
spring.datasource.druid.web-stat-filter.session-stat-max-count=1000
#spring.datasource.druid.web-stat-filter.principal-session-name=
#spring.datasource.druid.web-stat-filter.principal-cookie-name=
#spring.datasource.druid.web-stat-filter.profile-enable=

##### StatViewServlet配置 #######
#啟用內置的監控頁面
spring.datasource.druid.stat-view-servlet.enabled=true
#內置監控頁面的地址
spring.datasource.druid.stat-view-servlet.url-pattern=/druid/*
#關閉 Reset All 功能
spring.datasource.druid.stat-view-servlet.reset-enable=false
#設置登錄用戶名
spring.datasource.druid.stat-view-servlet.login-username=admin
#設置登錄密碼
spring.datasource.druid.stat-view-servlet.login-password=123
#白名單(如果allow沒有配置或者為空,則允許所有訪問)
spring.datasource.druid.stat-view-servlet.allow=127.0.0.1
#黑名單(deny優先於allow,如果在deny列表中,就算在allow列表中,也會被拒絕)
spring.datasource.druid.stat-view-servlet.deny=
三、數據源和分片配置
如下代碼,先從配置文件讀取數據源的所需要的屬性,然後生成 Druid 數據源。注意這裏配置語句中的 setFilters,如果不添加 filters,則 Duird 監控界面無法監控到sql。另外,其他諸如最大連接數之類的屬性這裏沒有配,按需配置即可。數據源創建好后,添加到 dataSourceMap 集合中。
再往下註釋比較清楚,構造 t_user 表的分片規則(包括分庫規則 + 分表規則),然後將所有表的分片規則組裝成 ShardingRuleConfiguration。
最後,將前兩步配好的 dataSourceMap 和 shardingRuleConfiguration 交給 ShardingDataSourceFactory,用來構造數據源。
到這裏,sharding 、druid 的配置代碼就都寫好了。剩下基本都是業務代碼了。
package com.example.shardingjdbc.config;

import com.alibaba.druid.pool.DruidDataSource;
import com.example.shardingjdbc.sharding.UserShardingAlgorithm;
import org.apache.shardingsphere.api.config.sharding.ShardingRuleConfiguration;
import org.apache.shardingsphere.api.config.sharding.TableRuleConfiguration;
import org.apache.shardingsphere.api.config.sharding.strategy.StandardShardingStrategyConfiguration;
import org.apache.shardingsphere.shardingjdbc.api.ShardingDataSourceFactory;
import org.springframework.beans.factory.annotation.Value;
import org.springframework.context.annotation.Bean;
import org.springframework.context.annotation.Configuration;

import javax.sql.DataSource;
import java.util.HashMap;
import java.util.Map;
import java.util.Properties;

@Configuration
public class DataSourceConfig {
    @Value("${datasource0.url}")
    private String url0;
    @Value("${datasource0.username}")
    private String username0;
    @Value("${datasource0.password}")
    private String password0;
    @Value("${datasource0.driver-class-name}")
    private String driverClassName0;

    @Value("${datasource1.url}")
    private String url1;
    @Value("${datasource1.username}")
    private String username1;
    @Value("${datasource1.password}")
    private String password1;
    @Value("${datasource1.driver-class-name}")
    private String driverClassName1;

    @Value(("${spring.datasource.druid.filters}"))
    private String filters;

    @Bean("dataSource")
    public DataSource dataSource() {
        try {
            DruidDataSource dataSource0 = new DruidDataSource();
            dataSource0.setDriverClassName(this.driverClassName0);
            dataSource0.setUrl(this.url0);
            dataSource0.setUsername(this.username0);
            dataSource0.setPassword(this.password0);
            dataSource0.setFilters(this.filters);

            DruidDataSource dataSource1 = new DruidDataSource();
            dataSource1.setDriverClassName(this.driverClassName1);
            dataSource1.setUrl(this.url1);
            dataSource1.setUsername(this.username1);
            dataSource1.setPassword(this.password1);
            dataSource1.setFilters(this.filters);

            //分庫設置
            Map<String, DataSource> dataSourceMap = new HashMap<>(2);
            //添加兩個數據庫database0和database1
            dataSourceMap.put("ds0", dataSource0);
            dataSourceMap.put("ds1", dataSource1);

            // 配置 t_user 表規則
            TableRuleConfiguration userRuleConfiguration = new TableRuleConfiguration("t_user", "ds${0..1}.t_user${0..1}");
            // 配置分表規則
            userRuleConfiguration.setTableShardingStrategyConfig(new StandardShardingStrategyConfiguration("id", UserShardingAlgorithm.tableShardingAlgorithm));
            // 配置分庫規則
            userRuleConfiguration.setDatabaseShardingStrategyConfig(new StandardShardingStrategyConfiguration("id", UserShardingAlgorithm.databaseShardingAlgorithm));
            // Sharding全局配置
            ShardingRuleConfiguration shardingRuleConfiguration = new ShardingRuleConfiguration();
            shardingRuleConfiguration.getTableRuleConfigs().add(userRuleConfiguration);
            // 創建數據源
            DataSource dataSource = ShardingDataSourceFactory.createDataSource(dataSourceMap, shardingRuleConfiguration, new Properties());
            return dataSource;
        } catch (Exception ex) {
            ex.printStackTrace();
            return null;
        }
    }
}
DataSourceConfig.java
上面構造分片規則的時候,我定義了User表的分片算法類 UserShardingAlgorithm,並定義了兩個內部類分別實現了數據庫分片和表分片的邏輯。代碼如下:
package com.example.shardingjdbc.sharding;

import org.apache.shardingsphere.api.sharding.standard.PreciseShardingAlgorithm;
import org.apache.shardingsphere.api.sharding.standard.PreciseShardingValue;

import java.util.Collection;

public class UserShardingAlgorithm {
    public static final DatabaseShardingAlgorithm databaseShardingAlgorithm = new DatabaseShardingAlgorithm();
    public static final TableShardingAlgorithm tableShardingAlgorithm = new TableShardingAlgorithm();

    static class DatabaseShardingAlgorithm implements PreciseShardingAlgorithm<Long> {
        @Override
        public String doSharding(Collection<String> databaseNames, PreciseShardingValue<Long> shardingValue) {
            for (String database : databaseNames) {
                if (database.endsWith(String.valueOf(shardingValue.getValue() % 2))) {
                    return database;
                }
            }

            return "";
        }
    }

    static class TableShardingAlgorithm implements PreciseShardingAlgorithm<Long> {
        @Override
        public String doSharding(Collection<String> tableNames, PreciseShardingValue<Long> shardingValue) {
            for (String table : tableNames) {
                if (table.endsWith(String.valueOf(shardingValue.getValue() % 2))) {
                    return table;
                }
            }

            return "";
        }
    }
}
UserShardingAlgorithm.java
這裏實現分片規則時,實現的接口是 PreciseShardingAlgorithm,即精確分片,將指定的鍵值記錄映射到指定的1張表中(最多1張表)。這個接口基本上能滿足80%的需求了。
其他的還有 Range、ComplexKey、Hint分片規則,這3種都可以將符合條件的鍵值記錄映射到多張表,即可以將記錄 a 同時插入A、B 或 B、C多張表中。
其中,
Range 是範圍篩選分片。我個人理解,比如id尾數1-5插入A表,6-0插入B表,這種情況,使用Range作為篩選條件更方便。也可以根據時間範圍分片。(如有誤請指正)。
ComplexKey 看名字就是組合鍵分片,可以同時根據多個鍵,制定映射規則。
Hint 看名字沒看懂,但看源碼其實也是組合鍵分片,但僅支持對組合鍵進行精確篩選。
而 ComplexKey 支持對組合鍵進行範圍篩選。所以可以理解為 ComplexKey 是 Hint 的高級版本。
不管實現哪種分片算法,都要確保算法覆蓋所有可能的鍵值。
四、使用行表達式配置分片策略(對第三步優化,可略過)
上面第三步,我們通過實現 PreciseShardingValue 接口,來定義分片算法。這樣每有一張表需要分片,都要重新定義一個類,太麻煩。
Sharding 提供了行表達式配置的方式,對簡單的分片邏輯,直接定義一個行表達式即可。(這種方式其實就是直接在 .yml 文件中配置分片策略的解析方式)
和上面的代碼類似,這裏之改動了6、8行,直接 new 一個 InlineShardingStrategyConfiguration,省去了定義分片算法類的繁瑣步驟。
 1              // .....省略其他代碼
 2
 3             // 配置 t_user 表規則
 4             TableRuleConfiguration userRuleConfiguration = new TableRuleConfiguration("t_user", "ds${0..1}.t_user${0..1}");
 5             // 行表達式分表規則
 6             userRuleConfiguration.setTableShardingStrategyConfig(new InlineShardingStrategyConfiguration("id", "t_user${id % 2}"));
 7             // 行表達式分庫規則
 8             userRuleConfiguration.setDatabaseShardingStrategyConfig(new InlineShardingStrategyConfiguration("id", "ds${id % 2}"));
 9
10             // Sharding全局配置
11             ShardingRuleConfiguration shardingRuleConfiguration = new ShardingRuleConfiguration();
12             shardingRuleConfiguration.getTableRuleConfigs().add(userRuleConfiguration);
13             // 創建數據源
14             DataSource dataSource = ShardingDataSourceFactory.createDataSource(dataSourceMap, shardingRuleConfiguration, new Properties());
15             return dataSource;
五、分佈式主鍵(雪花算法)
分庫后,不能再使用 mysql 的自增主鍵,否則會產生重複主鍵。自定義主鍵,主要需要解決兩個問題:
- 主鍵唯一(必須)
- 主鍵單調遞增(可選)(提升索引效率,減少索引重排產生的空間碎片)
Sharding 內部提供了2個主鍵生成器,一個使用雪花算法 SnowflakeShardingKeyGenerator,一個使用 UUID(考慮上面第2條,因此不使用 UUID)。
雪花算法的主要原理:用一個 64 bit 的 long 型数字做主鍵。其中,
第 1 位,1 bit 作為符號位永遠為 0,表示是正數。
第 2 – 42 位, 41 個 bit 填充時間戳。
第 43 – 52 位,10 個 bit 填充機器唯一id。舉個例子,可以用前4位標識機房號,后6位標識機器號。
第 53 – 64 位,12 個 bit 填充id序號。範圍 0 – 4095,即每台機器每 1 毫秒最多生成 4096 個不同的主鍵id。
雪花算法的主要實現代碼如下:
- 先判斷時鐘是否回調。這裏默認容忍回調時間為0,如有回調則會產生異常。可以通過配置 max.tolerate.time.difference.milliseconds 屬性,讓其自旋等待時鐘回到上一次執行時間。
- 按當前毫秒數,遞增生成id序號。如果時鐘進入了下一毫秒,則從0開始重新生成id序號,範圍 0 – 4095。
- 將 時間戳 + 機器序號 + id序號 拼裝成 主鍵id。這裏機器序號默認為0,可以通過 worker.id 屬性進行配置。不同的服務器需要配置成不同的数字,範圍 0 – 1023。
其中 EPOCH 是時鐘起點,sharding中設置的是2016年11月1日,那麼41位的時間戳差不多可以用70年,一直到2086年。
    public synchronized Comparable<?> generateKey() {
        long currentMilliseconds = timeService.getCurrentMillis();
        if (this.waitTolerateTimeDifferenceIfNeed(currentMilliseconds)) {
            currentMilliseconds = timeService.getCurrentMillis();
        }

        if (this.lastMilliseconds == currentMilliseconds) {
            if (0L == (this.sequence = this.sequence + 1L & 4095L)) {
                currentMilliseconds = this.waitUntilNextTime(currentMilliseconds);
            }
        } else {
            this.vibrateSequenceOffset();
            this.sequence = (long)this.sequenceOffset;
        }

        this.lastMilliseconds = currentMilliseconds;
        return currentMilliseconds - EPOCH << 22 | this.getWorkerId() << 12 | this.sequence;
    }
六、業務代碼
使用分佈式的主鍵ID生成器,需要給不同的表注入不同的ID生成器,在config包下加一個KeyIdConfig類,如下:
(為了保持時鐘的統一,可以專門找一台機器作為時鐘服務,然後給所有主鍵生成器配置統一的時鐘服務。下圖中未配置,如需配置,直接調用setTimeService方法即可)
@Configuration
public class KeyIdConfig {
    @Bean("userKeyGenerator")
    public SnowflakeShardingKeyGenerator userKeyGenerator() {
        return new SnowflakeShardingKeyGenerator();
    }

    @Bean("orderKeyGenerator")
    public SnowflakeShardingKeyGenerator orderKeyGenerator() {
        return new SnowflakeShardingKeyGenerator();
    }
}
其他業務代碼,整體如下:
package com.example.shardingjdbc.entity;

import lombok.Data;

import java.io.Serializable;
import java.util.Date;

@Data
public class User implements Serializable {
    private Long id;
    private String name;
    private String phone;
    private String email;
    private String password;
    private Integer cityId;
    private Date createTime;
    private Integer sex;
}
User.java
package com.example.shardingjdbc.mapper;

import com.example.shardingjdbc.entity.User;
import org.apache.ibatis.annotations.Mapper;

import java.util.List;

public interface UserMapper {
    /**
     * 保存
     */
    void save(User user);

    /**
     * 查詢
     * @param id
     * @return
     */
    User get(Long id);
}
UserMapper.java
<?xml version="1.0" encoding="UTF-8" ?>
<!DOCTYPE mapper PUBLIC "-//mybatis.org//DTD Mapper 3.0//EN" "http://mybatis.org/dtd/mybatis-3-mapper.dtd">
<mapper namespace="com.example.shardingjdbc.mapper.UserMapper">
    <resultMap id="resultMap" type="com.example.shardingjdbc.entity.User">
        <id column="id" property="id" />
        <result column="name" property="name" />
        <result column="phone" property="phone"  />
        <result column="email" property="email"  />
        <result column="password" property="password"  />
        <result column="city_id" property="cityId"  />
        <result column="create_time" property="createTime"  />
        <result column="sex" property="sex"  />
    </resultMap>

    <insert id="save">
        insert into t_user (id, name, phone, email, password, city_id, create_time, sex)
        values (#{id}, #{name}, #{phone}, #{email}, #{password}, #{cityId}, #{createTime}, #{sex})
    </insert>

    <select id="get" resultMap="resultMap">
        select *
        from t_user
        where id = #{id}
    </select>
</mapper>
UserMapper.xml
 1 package com.example.shardingjdbc.controller;
 2
 3 import com.example.shardingjdbc.entity.User;
 4 import com.example.shardingjdbc.mapper.UserMapper;
 5 import org.apache.shardingsphere.core.strategy.keygen.SnowflakeShardingKeyGenerator;
 6 import org.springframework.beans.factory.annotation.Autowired;
 7 import org.springframework.stereotype.Controller;
 8 import org.springframework.web.bind.annotation.PathVariable;
 9 import org.springframework.web.bind.annotation.RequestMapping;
10 import org.springframework.web.bind.annotation.ResponseBody;
11
12 import javax.annotation.Resource;
13 import java.util.Date;
14
15 @Controller
16 public class UserController {
17     @Autowired
18     private UserMapper userMapper;
19
20     @Resource
21     SnowflakeShardingKeyGenerator userKeyGenerator;
22
23     @RequestMapping("/user/save")
24     @ResponseBody
25     public String save() {
26         for (int i = 0; i < 50; i++) {
27             Long id = (Long)userKeyGenerator.generateKey();
28             User user = new User();
29             user.setId(id);
30             user.setName("test" + i);
31             user.setCityId(i);
32             user.setCreateTime(new Date());
33             user.setSex(i % 2 == 0 ? 1 : 2);
34             user.setPhone("11111111" + i);
35             user.setEmail("xxxxx");
36             user.setCreateTime(new Date());
37             user.setPassword("eeeeeeeeeeee");
38             userMapper.save(user);
39         }
40
41         return "success";
42     }
43
44     @RequestMapping("/user/get/{id}")
45     @ResponseBody
46     public User get(@PathVariable Long id) {
47         User user = userMapper.get(id);
48         return user;
49     }
50 }
UserController.java
 1 CREATE TABLE `t_user` (
 2   `id` bigint(20) NOT NULL,
 3   `name` varchar(64) DEFAULT NULL COMMENT '名稱',
 4   `city_id` int(12) DEFAULT NULL COMMENT '城市',
 5   `sex` tinyint(1) DEFAULT NULL COMMENT '性別',
 6   `phone` varchar(32) DEFAULT NULL COMMENT '電話',
 7   `email` varchar(32) DEFAULT NULL COMMENT '郵箱',
 8   `create_time` timestamp NOT NULL DEFAULT CURRENT_TIMESTAMP ON UPDATE CURRENT_TIMESTAMP COMMENT '創建時間',
 9   `password` varchar(32) DEFAULT NULL COMMENT '密碼',
10   PRIMARY KEY (`id`)
11 ) ENGINE=InnoDB DEFAULT CHARSET=utf8;
t_user.sql
啟動類如下:
 1 package com.example.shardingjdbc;
 2
 3 import org.mybatis.spring.annotation.MapperScan;
 4 import org.springframework.boot.SpringApplication;
 5 import org.springframework.boot.autoconfigure.SpringBootApplication;
 6
 7 @MapperScan("com.example.shardingjdbc.mapper")
 8 @SpringBootApplication
 9 public class ShardingjdbcApplication {
10     public static void main(String[] args) {
11         SpringApplication.run(ShardingjdbcApplication.class, args);
12     }
13 }
ShardingjdbcApplication .java
注意,這裏我在啟動類上加了 @MapperScan 註解。可能是因為引用依賴的問題,.properties 配置的 mybatis 包掃描目錄不管用了,後面有時間再研究。
七、其他
除了基本的分庫分表規則以外,還有一些其他的配置,比如綁定表。這裏先不詳細解釋了,舉個簡單的例子:
現在有 order, order_detail兩張表,1 : 1的關係。
在配置的時候,應該將相同 order_id 的 order 記錄 和 order_detail 記錄 映射到相同尾號的表中,方便連接查詢。
比如 id % 2 = 1的,都插入到 order0, order_detail0 中。
如果配置了綁定關係,那麼查找 id = 1 的記錄,只會產生一次查詢 select * from order0 as o join order_detail0 as d on o.order_id = d.order_id where o.oder_id = 1。
否則會產生笛卡兒積查詢,
select * from order0 as o join order_detail0 as d on o.order_id = d.order_id where o.order_id = 1
select * from order0 as o join order_detail1 as d on o.order_id = d.order_id where o.order_id = 1
select * from order1 as o join order_detail0 as d on o.order_id = d.order_id where o.order_id = 1
select * from order1 as o join order_detail1 as d on o.order_id = d.order_id where o.order_id = 1
八、總結
項目啟動前,先創建數據庫 test0, test1, 然後分別建表 t_user0, t_user1。 可以全部在同一台機器。
項目啟動后,訪問 http://localhost:8080/user/save, id 是 偶數的都插入到了 test0 庫的 t_user0 表中, 奇數的都插入到了 test1 庫中的 t_user1 表中。
druid 的後台監控頁面地址: http://localhost:8080/druid/。
項目啟動后,sharding日誌會將配置已 yml 格式的形式打印出來,也可以省去 java 配置,將其優化到 .yml 配置文件中去,如下圖:
本文原文地址:https://www.cnblogs.com/lyosaki88/p/springboot_shardingjdbc_druid_mybatis.html
源碼下載地址:https://474b.com/file/14960372-448059323
作者QQ: 116269651
本站聲明:網站內容來源於博客園,如有侵權,請聯繫我們,我們將及時處理
【其他文章推薦】
※別再煩惱如何寫文案,掌握八大原則!
※網頁設計一頭霧水該從何著手呢? 台北網頁設計公司幫您輕鬆架站!
※超省錢租車方案
※教你寫出一流的銷售文案?
※網頁設計最專業,超強功能平台可客製化
※產品缺大量曝光嗎?你需要的是一流包裝設計!