標籤: 銷售文案

  • 使用 Prometheus-Operator 監控 Calico

    使用 Prometheus-Operator 監控 Calico

    原文鏈接:https://fuckcloudnative.io/posts/monitoring-calico-with-prometheus-operator/

    Calico 中最核心的組件就是 Felix,它負責設置路由表和 ACL 規則等,以便為該主機上的 endpoints 資源正常運行提供所需的網絡連接。同時它還負責提供有關網絡健康狀況的數據(例如,報告配置其主機時發生的錯誤和問題),這些數據會被寫入 etcd,以使其對網絡中的其他組件和操作人員可見。

    由此可見,對於我們的監控來說,監控 Calico 的核心便是監控 FelixFelix 就相當於 Calico 的大腦。本文將學習如何使用 Prometheus-Operator 來監控 Calico。

    本文不會涉及到 CalicoPrometheus-Operator 的部署細節,如果不知道如何部署,請查閱官方文檔和相關博客。

    1. 配置 Calico 以啟用指標

    默認情況下 Felix 的指標是被禁用的,必須通過命令行管理工具 calicoctl 手動更改 Felix 配置才能開啟,需要提前配置好命令行管理工具。

    本文使用的 Calico 版本是 v3.15.0,其他版本類似。先下載管理工具:

    $ wget https://github.com/projectcalico/calicoctl/releases/download/v3.15.0/calicoctl -O /usr/local/bin/calicoctl
    $ chmod +x /usr/local/bin/calicoctl
    

    接下來需要設置 calicoctl 配置文件(默認是 /etc/calico/calicoctl.cfg)。如果你的 Calico 後端存儲使用的是 Kubernetes API,那麼配置文件內容如下:

    apiVersion: projectcalico.org/v3
    kind: CalicoAPIConfig
    metadata:
    spec:
      datastoreType: "kubernetes"
      kubeconfig: "/root/.kube/config"
    

    如果 Calico 後端存儲使用的是 etcd,那麼配置文件內容如下:

    apiVersion: projectcalico.org/v3
    kind: CalicoAPIConfig
    metadata:
    spec:
      datastoreType: "etcdv3"
      etcdEndpoints: https://192.168.57.51:2379,https://192.168.57.52:2379,https://192.168.57.53:2379
      etcdKeyFile: /opt/kubernetes/ssl/server-key.pem
      etcdCertFile: /opt/kubernetes/ssl/server.pem
      etcdCACertFile: /opt/kubernetes/ssl/ca.pem
    

    你需要將其中的證書路徑換成你的 etcd 證書路徑。

    配置好了 calicoctl 之後就可以查看或修改 Calico 的配置了,先來看一下默認的 Felix 配置:

    $ calicoctl get felixConfiguration default -o yaml
    
    apiVersion: projectcalico.org/v3
    kind: FelixConfiguration
    metadata:
      creationTimestamp: "2020-06-25T14:37:28Z"
      name: default
      resourceVersion: "269031"
      uid: 52146c95-ff97-40a9-9ba7-7c3b4dd3ba57
    spec:
      bpfLogLevel: ""
      ipipEnabled: true
      logSeverityScreen: Info
      reportingInterval: 0s
    

    可以看到默認的配置中沒有啟用指標,需要手動修改配置,命令如下:

    $ calicoctl patch felixConfiguration default  --patch '{"spec":{"prometheusMetricsEnabled": true}}'
    

    Felix 暴露指標的端口是 9091,可通過檢查監聽端口來驗證是否開啟指標:

    $ ss -tulnp|grep 9091
    tcp    LISTEN     0      4096   [::]:9091               [::]:*                   users:(("calico-node",pid=13761,fd=9))
    
    $ curl -s http://localhost:9091/metrics
    # HELP felix_active_local_endpoints Number of active endpoints on this host.
    # TYPE felix_active_local_endpoints gauge
    felix_active_local_endpoints 1
    # HELP felix_active_local_policies Number of active policies on this host.
    # TYPE felix_active_local_policies gauge
    felix_active_local_policies 0
    # HELP felix_active_local_selectors Number of active selectors on this host.
    # TYPE felix_active_local_selectors gauge
    felix_active_local_selectors 0
    ...
    

    2. Prometheus 採集 Felix 指標

    啟用了 Felix 的指標后,就可以通過 Prometheus-Operator 來採集指標數據了。Prometheus-Operator 在部署時會創建 PrometheusPodMonitorServiceMonitorAlertManagerPrometheusRule 這 5 個 CRD 資源對象,然後會一直監控並維持這 5 個資源對象的狀態。其中 Prometheus 這個資源對象就是對 Prometheus Server 的抽象。而 PodMonitorServiceMonitor 就是 exporter 的各種抽象,是用來提供專門提供指標數據接口的工具,Prometheus 就是通過 PodMonitorServiceMonitor 提供的指標數據接口去 pull 數據的。

    ServiceMonitor 要求被監控的服務必須有對應的 Service,而 PodMonitor 則不需要,本文選擇使用 PodMonitor 來採集 Felix 的指標。

    PodMonitor 雖然不需要應用創建相應的 Service,但必須在 Pod 中指定指標的端口和名稱,因此需要先修改 DaemonSet calico-node 的配置,指定端口和名稱。先用以下命令打開 DaemonSet calico-node 的配置:

    $ kubectl -n kube-system edit ds calico-node
    

    然後在線修改,在 spec.template.sepc.containers 中加入以下內容:

            ports:
            - containerPort: 9091
              name: http-metrics
              protocol: TCP
    

    創建 Pod 對應的 PodMonitor

    # prometheus-podMonitorCalico.yaml
    apiVersion: monitoring.coreos.com/v1
    kind: PodMonitor
    metadata:
      labels:
        k8s-app: calico-node
      name: felix
      namespace: monitoring
    spec:
      podMetricsEndpoints:
      - interval: 15s
        path: /metrics
        port: http-metrics
      namespaceSelector:
        matchNames:
        - kube-system
      selector:
        matchLabels:
          k8s-app: calico-node
    
    $ kubectl apply -f prometheus-podMonitorCalico.yaml
    

    有幾個參數需要注意:

    • PodMonitor 的 name 最終會反應到 Prometheus 的配置中,作為 job_name

    • podMetricsEndpoints.port 需要和被監控的 Pod 中的 ports.name 相同,此處為 http-metrics

    • namespaceSelector.matchNames 需要和被監控的 Pod 所在的 namespace 相同,此處為 kube-system

    • selector.matchLabels 的標籤必須和被監控的 Pod 中能唯一標明身份的標籤對應。

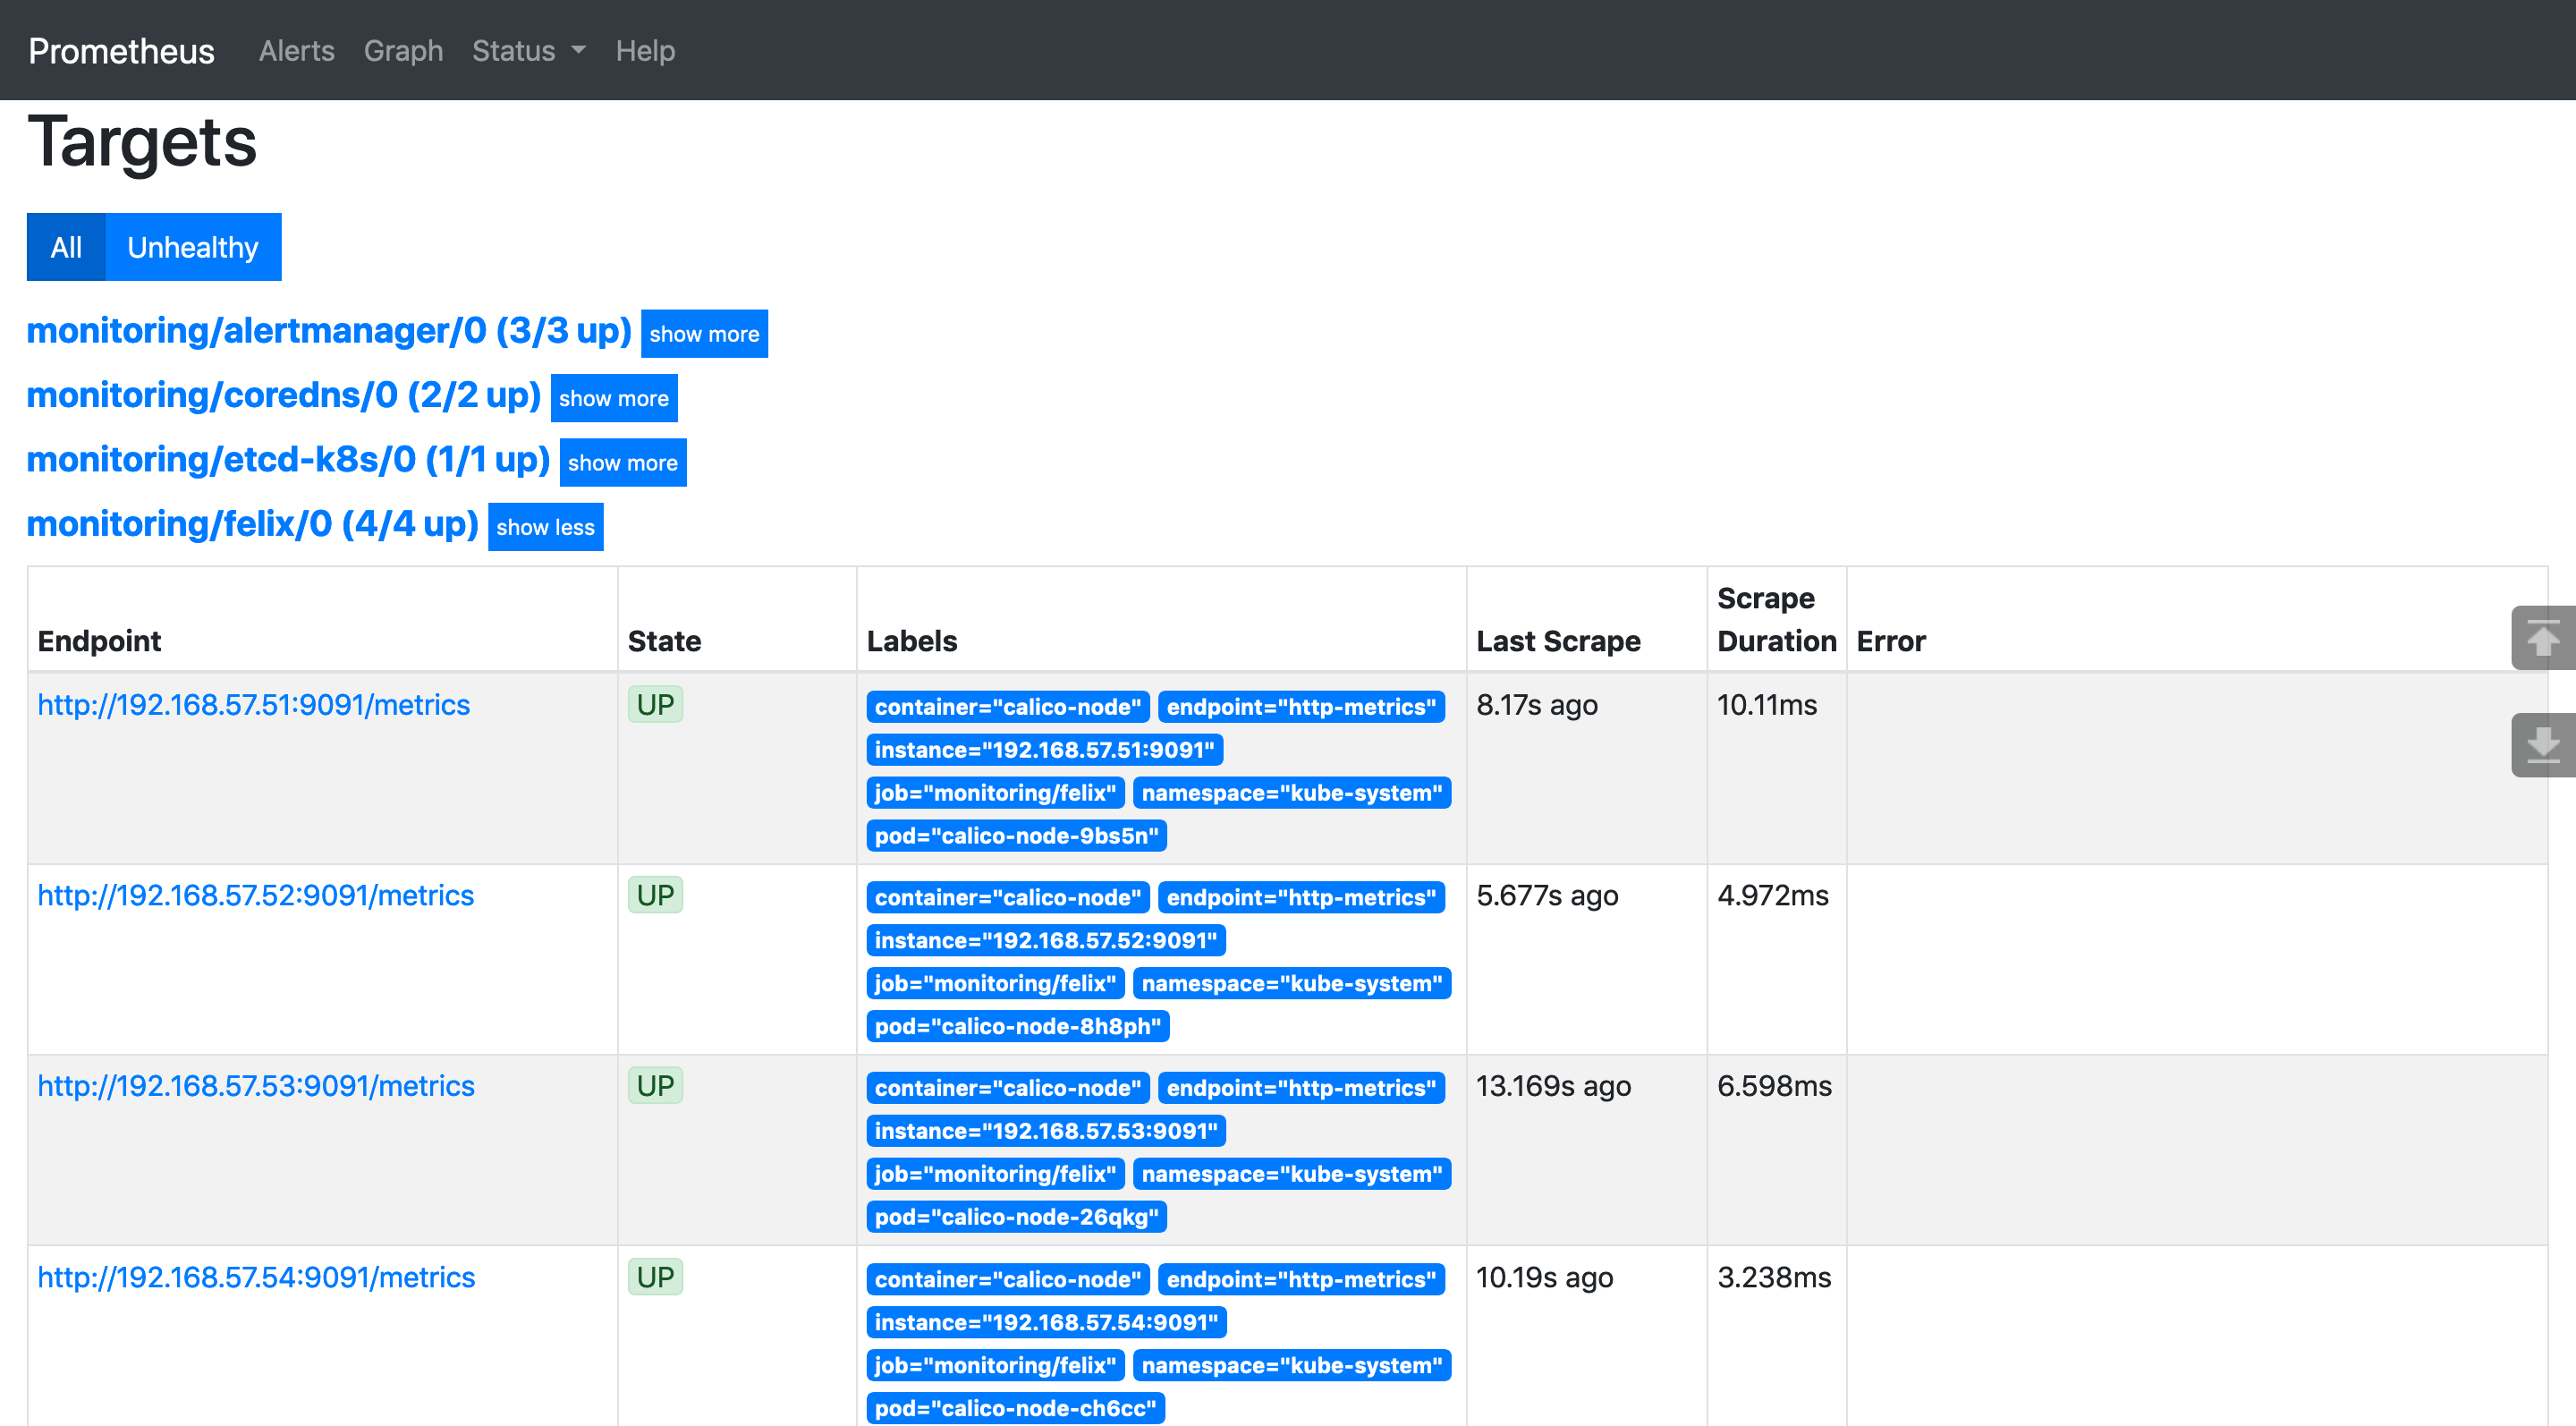
    最終 Prometheus-Operator 會根據 PodMonitor 來修改 Prometheus 的配置文件,以實現對相關的 Pod 進行監控。可以打開 Prometheus 的 UI 查看監控目標:

    注意 Labels 中有 pod="calico-node-xxx",表明監控的是 Pod。

    3. 可視化監控指標

    採集完指標之後,就可以通過 Grafana 的儀錶盤來展示監控指標了。Prometheus-Operator 中部署的 Grafana 無法實時修改儀錶盤的配置(必須提前將儀錶盤的 json 文件掛載到 Grafana Pod 中),而且也不是最新版(7.0 以上版本),所以我選擇刪除 Prometheus-Operator 自帶的 Grafana,自行部署 helm 倉庫中的 Grafana。先進入 kube-prometheus 項目的 manifests 目錄,然後將 Grafana 相關的部署清單都移到同一個目錄下,再刪除 Grafana:

    $ cd kube-prometheus/manifests
    $ mkdir grafana
    $ mv grafana-* grafana/
    $ kubectl delete -f grafana/
    

    然後通過 helm 部署最新的 Grafana:

    $ helm install grafana stable/grafana -n monitoring
    

    訪問 Grafana 的密碼保存在 Secret 中,可以通過以下命令查看:

    $ kubectl -n monitoring get secret grafana -o yaml
    
    apiVersion: v1
    data:
      admin-password: MnpoV3VaMGd1b3R3TDY5d3JwOXlIak4yZ3B2cTU1RFNKcVY0RWZsUw==
      admin-user: YWRtaW4=
      ldap-toml: ""
    kind: Secret
    metadata:
    ...
    

    對密碼進行解密:

    $ echo -n "MnpoV3VaMGd1b3R3TDY5d3JwOXlIak4yZ3B2cTU1RFNKcVY0RWZsUw=="|base64 -d
    

    解密出來的信息就是訪問密碼。用戶名是 admin。通過用戶名和密碼登錄 Grafana 的 UI:

    添加 Prometheus-Operator 的數據源:

    Calico 官方沒有單獨 dashboard json,而是將其放到了 ConfigMap 中,我們需要從中提取需要的 json,提取出 felix-dashboard.json 的內容,然後將其中的 datasource 值替換為 prometheus。你可以用 sed 替換,也可以用編輯器,大多數編輯器都有全局替換的功能。如果你實在不知道如何提取,可以使用我提取好的 json:

    修改完了之後,將 json 內容導入到 Grafana:

    最後得到的 Felix 儀錶盤如下圖所示:

    如果你對我截圖中 Grafana 的主題配色很感興趣,可以參考這篇文章:Grafana 自定義主題。

    Kubernetes 1.18.2 1.17.5 1.16.9 1.15.12離線安裝包發布地址http://store.lameleg.com ,歡迎體驗。 使用了最新的sealos v3.3.6版本。 作了主機名解析配置優化,lvscare 掛載/lib/module解決開機啟動ipvs加載問題, 修復lvscare社區netlink與3.10內核不兼容問題,sealos生成百年證書等特性。更多特性 https://github.com/fanux/sealos 。歡迎掃描下方的二維碼加入釘釘群 ,釘釘群已經集成sealos的機器人實時可以看到sealos的動態。

    本站聲明:網站內容來源於博客園,如有侵權,請聯繫我們,我們將及時處理

    【其他文章推薦】

    ※帶您來了解什麼是 USB CONNECTOR  ?

    ※自行創業 缺乏曝光? 下一步"網站設計"幫您第一時間規劃公司的門面形象

    ※如何讓商品強力曝光呢? 網頁設計公司幫您建置最吸引人的網站,提高曝光率!!

    ※綠能、環保無空污,成為電動車最新代名詞,目前市場使用率逐漸普及化

    ※廣告預算用在刀口上,網站設計公司幫您達到更多曝光效益

    ※教你寫出一流的銷售文案?

  • dubbo源碼解析之負載均衡

    dubbo源碼解析之負載均衡

    在分佈式系統中,負載均衡是必不可少的一個模塊,dubbo 中提供了五種負載均衡的實現,在閱讀這塊源碼之前,建議先學習負載均衡的基礎知識。把看源碼當做一個印證自己心中所想的過程,這樣會得到事半功倍的效果

    以下源碼分析基於 dubbo 2.77 版本

    類結構

    先來看一下這一塊的類結構圖

    大部分算法都是在權重比的基礎上進行負載均衡,RandomLoadBalance 是默認的算法

    類型 描述 是否默認 是否加權
    RandomLoadBalance 隨機 是,默認權重相同
    RoundRobinLoadBalance 輪訓 是,默認權重相同
    LeastActiveLoadBalance 最少活躍數調用 不完全是,默認權重相同,僅在活躍數相同時按照權重比隨機
    ConsistentHashLoadBalance 一致性hash
    ShortestResponseLoadBalance 最短時間調用 不完全是,默認權重相同,僅在預估調用相同時按照權重比隨機

    AbstractLoadBalance

    AbstractLoadBalance 對一些通用的操作做了處理,是一個典型的模板方法模式的實現

    select 方法只做一些簡單的範圍校驗,具體的實現有子類通過 doSelect 方法去實現

        @Override
        public <T> Invoker<T> select(List<Invoker<T>> invokers, URL url, Invocation invocation) {
            if (CollectionUtils.isEmpty(invokers)) {
                return null;
            }
            if (invokers.size() == 1) {
                return invokers.get(0);
            }
            return doSelect(invokers, url, invocation);
        }
    

    getWeight方法封裝了獲取一個調用者的權重值的方法,並加入了預熱處理

        int getWeight(Invoker<?> invoker, Invocation invocation) {
            int weight;
            URL url = invoker.getUrl();
            // Multiple registry scenario, load balance among multiple registries.
            // 註冊中心不需要預熱
            if (REGISTRY_SERVICE_REFERENCE_PATH.equals(url.getServiceInterface())) {
                weight = url.getParameter(REGISTRY_KEY + "." + WEIGHT_KEY, DEFAULT_WEIGHT);
            } else {
                // 獲取配置的權重值
                weight = url.getMethodParameter(invocation.getMethodName(), WEIGHT_KEY, DEFAULT_WEIGHT);
                if (weight > 0) {
                    // 獲取服務提供者啟動時的時間戳
                    long timestamp = invoker.getUrl().getParameter(TIMESTAMP_KEY, 0L);
                    if (timestamp > 0L) {
                        //  獲取啟動時長
                        long uptime = System.currentTimeMillis() - timestamp;
                        // 當前時間小於服務提供者啟動時間,直接給一個最小權重1
                        if (uptime < 0) {
                            return 1;
                        }
                        // 獲取預熱時間
                        int warmup = invoker.getUrl().getParameter(WARMUP_KEY, DEFAULT_WARMUP);
                        // 如果小於預熱時間,計算權重
                        if (uptime > 0 && uptime < warmup) {
                            weight = calculateWarmupWeight((int)uptime, warmup, weight);
                        }
                    }
                }
            }
            // 取與零比較的最大值,保證不會出現負值權重
            return Math.max(weight, 0);
        }
    

    calculateWarmupWeight 方法用來計算權重,保證隨着預熱時間的增加,權重逐漸達到設置的權重

        static int calculateWarmupWeight(int uptime, int warmup, int weight) {
            // 運行時間/(預熱時間/權重)
            int ww = (int) ( uptime / ((float) warmup / weight));
            // 保證計算的權重最小值是1,並且不能超過設置的權重
            return ww < 1 ? 1 : (Math.min(ww, weight));
        }
    

    RandomLoadBalance

    隨機調用是負載均衡算法中最常用的算法之一,也是 dubbo 的默認負載均衡算法,實現起來也較為簡單
    隨機調用的缺點是在調用量比較少的情況下,有可能出現不均勻的情況

    	@Override
        protected <T> Invoker<T> doSelect(List<Invoker<T>> invokers, URL url, Invocation invocation) {
            // Number of invokers
            int length = invokers.size();
            // Every invoker has the same weight?
            boolean sameWeight = true;
            // the weight of every invokers
            int[] weights = new int[length];
            // the first invoker's weight
            int firstWeight = getWeight(invokers.get(0), invocation);
            weights[0] = firstWeight;
            // The sum of weights
            int totalWeight = firstWeight;
            for (int i = 1; i < length; i++) {
                int weight = getWeight(invokers.get(i), invocation);
                // save for later use
                // 依次把權重放到數組對應的位置
                weights[i] = weight;
                // Sum
                // 累加權重
                totalWeight += weight;
                // 如果出現權重不一樣的,sameWeight 設為false
                if (sameWeight && weight != firstWeight) {
                    sameWeight = false;
                }
            }
            if (totalWeight > 0 && !sameWeight) {
                // If (not every invoker has the same weight & at least one invoker's weight>0), select randomly based on totalWeight.
                // 在總權重裏面隨機選擇一個偏移量
                int offset = ThreadLocalRandom.current().nextInt(totalWeight);
                // Return a invoker based on the random value.
                for (int i = 0; i < length; i++) {
                    offset -= weights[i];
                    // 依次用偏移量減去當前權重,小於0說明選中
                    if (offset < 0) {
                        return invokers.get(i);
                    }
                }
            }
            // If all invokers have the same weight value or totalWeight=0, return evenly.
            // 如果所有的調用者有同樣的權重或者總權重為0,則隨機選擇一個
            return invokers.get(ThreadLocalRandom.current().nextInt(length));
        }
    

    RoundRobinLoadBalance

    輪訓算法避免了隨機算法在小數據量產生的不均勻問題,我個人認為,輪訓算法可以理解為隨機算法的一種特例,在大量請求的情況下,從調用次數看,和隨機並無區別,主要區別在於短時間內的調用分配上

    加權輪訓算法給人的直觀感受,實現起來並不複雜,算出一權重總量,依次調用即可
    例如A,B,C 三個節點的權重比依次 1,200,1000,如果依次輪訓調用,就會出現先調用A 10 次,再調用B 200次,最後調用 C 1000次,不斷重複前面的過程
    但這樣有一個問題,我們可以發現C 被練習調用1000次,會對C瞬間造成很大的壓力

    dubbo的新版本採用的是平滑加權輪詢算法,輪訓的過程中節點之間穿插調用,可以避免了上面說的問題,因此這塊源碼看起來會稍有難度

    輪訓算法 在dubbo 在升級的過程中,做過多次優化,有興趣的可以去了解下該算法的優化過程,也是件很有意思的事情

    public class RoundRobinLoadBalance extends AbstractLoadBalance {
        public static final String NAME = "roundrobin";
    
        private static final int RECYCLE_PERIOD = 60000;
    
        protected static class WeightedRoundRobin {
            // 權重值
            private int weight;
            // 當前權重值
            private AtomicLong current = new AtomicLong(0);
            // 最後一次使用該對象時間
            private long lastUpdate;
    
            public int getWeight() {
                return weight;
            }
    
            public void setWeight(int weight) {
                this.weight = weight;
                current.set(0);
            }
    
            // 獲取自增權重基數的當前權重值
            public long increaseCurrent() {
                return current.addAndGet(weight);
            }
    
            public void sel(int total) {
                current.addAndGet(-1 * total);
            }
    
            public long getLastUpdate() {
                return lastUpdate;
            }
    
            // 設置最後一次更新時間戳
            public void setLastUpdate(long lastUpdate) {
                this.lastUpdate = lastUpdate;
            }
        }
    
        private ConcurrentMap<String, ConcurrentMap<String, WeightedRoundRobin>> methodWeightMap = new ConcurrentHashMap<String, ConcurrentMap<String, WeightedRoundRobin>>();
    
        /**
         * get invoker addr list cached for specified invocation
         * <p>
         * <b>for unit test only</b>
         *
         * @param invokers
         * @param invocation
         * @return
         */
        protected <T> Collection<String> getInvokerAddrList(List<Invoker<T>> invokers, Invocation invocation) {
            String key = invokers.get(0).getUrl().getServiceKey() + "." + invocation.getMethodName();
            Map<String, WeightedRoundRobin> map = methodWeightMap.get(key);
            if (map != null) {
                return map.keySet();
            }
            return null;
        }
    
        @Override
        protected <T> Invoker<T> doSelect(List<Invoker<T>> invokers, URL url, Invocation invocation) {
            // {group}/{interfaceName}:{version} + methoName 獲取當前消費者的唯一標示
            String key = invokers.get(0).getUrl().getServiceKey() + "." + invocation.getMethodName();
            // 獲取對應的 WeightedRoundRobin map,如果不存在,new 一個map放進去
            ConcurrentMap<String, WeightedRoundRobin> map = methodWeightMap.computeIfAbsent(key, k -> new ConcurrentHashMap<>());
            int totalWeight = 0;
            long maxCurrent = Long.MIN_VALUE;
            long now = System.currentTimeMillis();
            Invoker<T> selectedInvoker = null;
            WeightedRoundRobin selectedWRR = null;
            for (Invoker<T> invoker : invokers) {
                // 服務提供者在的唯一標識
                String identifyString = invoker.getUrl().toIdentityString();
                int weight = getWeight(invoker, invocation);
                WeightedRoundRobin weightedRoundRobin = map.computeIfAbsent(identifyString, k -> {
                    WeightedRoundRobin wrr = new WeightedRoundRobin();
                    wrr.setWeight(weight);
                    return wrr;
                });
                // 如果權重改變了,更新 weightedRoundRobin 裏面權重的值
                if (weight != weightedRoundRobin.getWeight()) {
                    //weight changed
                    weightedRoundRobin.setWeight(weight);
                }
                // 當前權重自增自身權重
                long cur = weightedRoundRobin.increaseCurrent();
                // 設置最後一次更新時間戳
                weightedRoundRobin.setLastUpdate(now);
                // 如果當前權重大於最大當前權重
                if (cur > maxCurrent) {
                    // 重置最大當前權重的值
                    maxCurrent = cur;
                    // 把當前提供者設為選中的提供者
                    selectedInvoker = invoker;
                    // 把當前輪訓權重實例設為選中
                    selectedWRR = weightedRoundRobin;
                }
                // 累計總權重
                totalWeight += weight;
            }
            // 提供者有變化
            if (invokers.size() != map.size()) {
                // 超過60s沒有使用,刪除掉
                map.entrySet().removeIf(item -> now - item.getValue().getLastUpdate() > RECYCLE_PERIOD);
            }
            if (selectedInvoker != null) {
                // 減去總權重
                // 關於這個地方為什麼要減去總權重,是一個很容易造成迷惑的地方
                // 我的理解:每一次調用循環 每個提供者的 當前權重 都會自增自己的權重
                // 因此在選中后(只有一個被選中),再減去總權重,正好保證了所有 WeightedRoundRobin 中當前權重之和永遠等於0
                selectedWRR.sel(totalWeight);
                return selectedInvoker;
            }
            // 理論上不會走到這個地方
            // should not happen here
            return invokers.get(0);
        }
    
    }
    

    LeastActiveLoadBalance

    最少活躍數調用算法是指在調用時判斷此時每個服務提供者此時正在處理的請求個數,選取最小的調用

    dubbo 在實現該算法時的具體邏輯如下

    1. 選取所有活躍數最少的提供者
    2. 如果只有一個,直接返回
    3. 如果權重不同,加權隨機選擇一個
    4. 如果權重相同,隨機選擇一個
        @Override
        protected <T> Invoker<T> doSelect(List<Invoker<T>> invokers, URL url, Invocation invocation) {
            // Number of invokers
            int length = invokers.size();
            // The least active value of all invokers
            // 最少活躍數量
            int leastActive = -1;
            // The number of invokers having the same least active value (leastActive)
            // 有同樣活躍值的提供者數量
            int leastCount = 0;
            // The index of invokers having the same least active value (leastActive)
            int[] leastIndexes = new int[length];
            // the weight of every invokers
            // 每一個提供者的權重
            int[] weights = new int[length];
            // The sum of the warmup weights of all the least active invokers
            // 最少活躍提供者的總權重
            int totalWeight = 0;
            // The weight of the first least active invoker
            int firstWeight = 0;
            // Every least active invoker has the same weight value?
            // 所有的最少活躍提供者是否擁有同樣的權重值
            boolean sameWeight = true;
    
    
            // Filter out all the least active invokers
            for (int i = 0; i < length; i++) {
                Invoker<T> invoker = invokers.get(i);
                // Get the active number of the invoker
                // 活躍數量
                int active = RpcStatus.getStatus(invoker.getUrl(), invocation.getMethodName()).getActive();
                // Get the weight of the invoker's configuration. The default value is 100.
                // 獲取權重值
                int afterWarmup = getWeight(invoker, invocation);
                // save for later use
                // 保存權重留着後面用
                weights[i] = afterWarmup;
                // If it is the first invoker or the active number of the invoker is less than the current least active number
                // 如果是第一個提供者,或者當前活躍數量比最少的少
                if (leastActive == -1 || active < leastActive) {
                    // Reset the active number of the current invoker to the least active number
                    // 重置最少活躍數量
                    leastActive = active;
                    // Reset the number of least active invokers
                    // 重置最少活躍提供者的數量
                    leastCount = 1;
                    // Put the first least active invoker first in leastIndexes
                    // 把最少活躍提供者的索引保存起來
                    leastIndexes[0] = i;
                    // Reset totalWeight
                    // 重置總權重
                    totalWeight = afterWarmup;
                    // Record the weight the first least active invoker
                    // 記錄第一個最少活躍提供者的權重
                    firstWeight = afterWarmup;
                    // Each invoke has the same weight (only one invoker here)
                    // 每個最少活躍提供者是否有同樣的權重???
                    sameWeight = true;
                    // If current invoker's active value equals with leaseActive, then accumulating.
                    // 如果當前活躍數量等於最少活躍數量
                } else if (active == leastActive) {
                    // Record the index of the least active invoker in leastIndexes order
                    // 最少活躍提供者的索引依次放入 leastIndexes
                    leastIndexes[leastCount++] = i;
                    // Accumulate the total weight of the least active invoker
                    // 累計最少活躍提供者的總權重
                    totalWeight += afterWarmup;
                    // If every invoker has the same weight?
                    // 如果當前權重和第一個最少活躍的權重不同,sameWeight 設為false
                    if (sameWeight && afterWarmup != firstWeight) {
                        sameWeight = false;
                    }
                }
            }
            // Choose an invoker from all the least active invokers
            // 最少活躍提供者只有一個,直接返回
            if (leastCount == 1) {
                // If we got exactly one invoker having the least active value, return this invoker directly.
                return invokers.get(leastIndexes[0]);
            }
            // 如擁有不同的權重,在權重的基礎上隨機選取一個,可以參考 RandomLoadBalance,有同樣的寫法
            if (!sameWeight && totalWeight > 0) {
                // If (not every invoker has the same weight & at least one invoker's weight>0), select randomly based on 
                // totalWeight.
                int offsetWeight = ThreadLocalRandom.current().nextInt(totalWeight);
                // Return a invoker based on the random value.
                for (int i = 0; i < leastCount; i++) {
                    int leastIndex = leastIndexes[i];
                    offsetWeight -= weights[leastIndex];
                    if (offsetWeight < 0) {
                        return invokers.get(leastIndex);
                    }
                }
            }
            // 權重相同,隨機選取一個
            // If all invokers have the same weight value or totalWeight=0, return evenly.
            return invokers.get(leastIndexes[ThreadLocalRandom.current().nextInt(leastCount)]);
        }
    

    ShortestResponseLoadBalance

    最短時間調用調用算法是指預估出來每個處理完請求的提供者所需時間,然後又選擇最少最短時間的提供者進行調用,整體處理邏輯和最少活躍數算法基本相似

    dubbo 在實現該算法時的具體邏輯如下

    1. 選取所有預估處理時間最短的提供者
    2. 如果只有一個,直接返回
    3. 如果權重不同,加權隨機選擇一個
    4. 如果權重相同,隨機選擇一個
        @Override
        protected <T> Invoker<T> doSelect(List<Invoker<T>> invokers, URL url, Invocation invocation) {
            // Number of invokers
            int length = invokers.size();
            // Estimated shortest response time of all invokers
            // 最少響應時間
            long shortestResponse = Long.MAX_VALUE;
            // The number of invokers having the same estimated shortest response time
            // 最少響應時間的提供者數量
            int shortestCount = 0;
            // The index of invokers having the same estimated shortest response time
            int[] shortestIndexes = new int[length];
            // the weight of every invokers
            int[] weights = new int[length];
            // The sum of the warmup weights of all the shortest response  invokers
            // 最少響應時間的提供者的總權重
            int totalWeight = 0;
            // The weight of the first shortest response invokers
            // 第一個最少響應時間的權重
            int firstWeight = 0;
            // Every shortest response invoker has the same weight value?
            // 所有的最少響應時間提供者是否擁有同樣的權重值
            boolean sameWeight = true;
    
            // Filter out all the shortest response invokers
            for (int i = 0; i < length; i++) {
                Invoker<T> invoker = invokers.get(i);
                RpcStatus rpcStatus = RpcStatus.getStatus(invoker.getUrl(), invocation.getMethodName());
                // Calculate the estimated response time from the product of active connections and succeeded average elapsed time.
                //  平均響應成功時間
                long succeededAverageElapsed = rpcStatus.getSucceededAverageElapsed();
                // 活躍的連接連接數量
                int active = rpcStatus.getActive();
                // 預估響應時間
                long estimateResponse = succeededAverageElapsed * active;
                // 獲取權重值
                int afterWarmup = getWeight(invoker, invocation);
                // 保存權重留着後面用
                weights[i] = afterWarmup;
                // Same as LeastActiveLoadBalance
                // 如果預估時間小於最少的響應時間
                if (estimateResponse < shortestResponse) {
                    // 重置最少響應時間
                    shortestResponse = estimateResponse;
                    // 最少響應時間的提供者數量設為1
                    shortestCount = 1;
                    // 保存提供者下標
                    shortestIndexes[0] = i;
                    // 重置最少響應時間的提供者的總權重
                    totalWeight = afterWarmup;
                    // 重置第一個最少響應時間的權重
                    firstWeight = afterWarmup;
                    sameWeight = true;
                    // 如果當前最少響應時間等於最少響應時間
                } else if (estimateResponse == shortestResponse) {
                    // 最少最少響應時間的下標依次放入 shortestIndexes
                    shortestIndexes[shortestCount++] = i;
                    // 累計最少響應時間的總權重
                    totalWeight += afterWarmup;
                    // 如果當前權重和第一個最少響應時間的權重不同,sameWeight 設為false
                    if (sameWeight && i > 0
                            && afterWarmup != firstWeight) {
                        sameWeight = false;
                    }
                }
            }
            // 最少最少響應時間只有一個,直接返回
            if (shortestCount == 1) {
                return invokers.get(shortestIndexes[0]);
            }
            // 如擁有不同的權重,在權重的基礎上隨機選取一個,可以參考 RandomLoadBalance,有同樣的寫法
            if (!sameWeight && totalWeight > 0) {
                int offsetWeight = ThreadLocalRandom.current().nextInt(totalWeight);
                for (int i = 0; i < shortestCount; i++) {
                    int shortestIndex = shortestIndexes[i];
                    offsetWeight -= weights[shortestIndex];
                    if (offsetWeight < 0) {
                        return invokers.get(shortestIndex);
                    }
                }
            }
            // 權重相同,隨機選取一個
            return invokers.get(shortestIndexes[ThreadLocalRandom.current().nextInt(shortestCount)]);
        }
    

    ConsistentHashLoadBalance

    一致性hash算法是一種廣泛應用與分佈式緩存中的算法,該算法的優勢在於新增和刪除節點后,只有少量請求發生變動,大部分請求仍舊映射到原來的節點
    為了防止節點過少,造成節點分佈不均勻,一般採用虛擬節點的方式,dubbo默認的是160個虛擬節點

    網上關於一致性hash算法的文章有很多,這裏就不再多贅述,以下是dubbo中的實現,需要說明的是, 一致性hash算法中權重配置不起作用

        @Override
        protected <T> Invoker<T> doSelect(List<Invoker<T>> invokers, URL url, Invocation invocation) {
            String methodName = RpcUtils.getMethodName(invocation);
            // {group}/{interfaceName}:{version} + methoName 獲取當前消費者的唯一標示
            String key = invokers.get(0).getUrl().getServiceKey() + "." + methodName;
            // using the hashcode of list to compute the hash only pay attention to the elements in the list
            int invokersHashCode = invokers.hashCode();
            // 獲取當前消費者的一致性hash選擇器
            ConsistentHashSelector<T> selector = (ConsistentHashSelector<T>) selectors.get(key);
            // 如果 selector 還沒初始化,或者 invokers 已經變化,重新初始化 selector
            if (selector == null || selector.identityHashCode != invokersHashCode) {
                selectors.put(key, new ConsistentHashSelector<T>(invokers, methodName, invokersHashCode));
                selector = (ConsistentHashSelector<T>) selectors.get(key);
            }
            return selector.select(invocation);
        }
        // 一致性hash選擇器
        private static final class ConsistentHashSelector<T> {
    
            // 存儲hash環的數據結構 節點 -> 提供者
            private final TreeMap<Long, Invoker<T>> virtualInvokers;
    
            // 虛擬節點數量
            private final int replicaNumber;
    
            // 用來標示所有提供者是唯一標示
            private final int identityHashCode;
            // 用來存儲計算hash值參數下標的數組,例如計算第一個和第三個參數 該數組為[0,2]
            private final int[] argumentIndex;
    
            ConsistentHashSelector(List<Invoker<T>> invokers, String methodName, int identityHashCode) {
                this.virtualInvokers = new TreeMap<Long, Invoker<T>>();
                this.identityHashCode = identityHashCode;
                URL url = invokers.get(0).getUrl();
                // 虛擬節點數量,默認 160
                this.replicaNumber = url.getMethodParameter(methodName, HASH_NODES, 160);
                // 默認只對第一個參數進行hash
                String[] index = COMMA_SPLIT_PATTERN.split(url.getMethodParameter(methodName, HASH_ARGUMENTS, "0"));
                argumentIndex = new int[index.length];
                for (int i = 0; i < index.length; i++) {
                    argumentIndex[i] = Integer.parseInt(index[i]);
                }
                for (Invoker<T> invoker : invokers) {
                    String address = invoker.getUrl().getAddress();
                    // 關於這個地方為什麼要除以4,我理解的是md5後為16字節的數組,計算hash值只需要用到四個字節,所以可以用四次
                    // 因此除以4,算是一個性能優化點
                    for (int i = 0; i < replicaNumber / 4; i++) {
                        // md5, 獲得一個長度為16的字節數組
                        byte[] digest = md5(address + i);
                        for (int h = 0; h < 4; h++) {
                            // 如果h=0,則用第0,1,2,3四個字節進行位運算,得出一個0-2^32-1的值
                            // 如果h=1,則用第4,5,6,7四個字節進行位運算,得出一個0-2^32-1的值
                            // 如果h=2,則用第8,9,10,11四個字節進行位運算,得出一個0-2^32-1的值
                            // 如果h=3,則用第12,13,14,15四個字節進行位運算,得出一個0-2^32-1的值
                            long m = hash(digest, h);
                            virtualInvokers.put(m, invoker);
                        }
                    }
                }
            }
    
            public Invoker<T> select(Invocation invocation) {
                String key = toKey(invocation.getArguments());
                byte[] digest = md5(key);
                return selectForKey(hash(digest, 0));
            }
            // 根據配置生成計算hash值的key
            private String toKey(Object[] args) {
                StringBuilder buf = new StringBuilder();
                for (int i : argumentIndex) {
                    if (i >= 0 && i < args.length) {
                        buf.append(args[i]);
                    }
                }
                return buf.toString();
            }
    
            private Invoker<T> selectForKey(long hash) {
                // 找到hash值在hash環上的位置
                // ceilingEntry 方法返回大於或者等於當前key的鍵值對
                Map.Entry<Long, Invoker<T>> entry = virtualInvokers.ceilingEntry(hash);
                // 如果返回為空,說明落在了hash環中2的32次方-1的最後,直接返回第一個
                if (entry == null) {
                    entry = virtualInvokers.firstEntry();
                }
                return entry.getValue();
            }
            // 得出一個0-2^32-1的值, 四個字節組成一個長度為32位的二進制数字並轉化為long值
            private long hash(byte[] digest, int number) {
                return (((long) (digest[3 + number * 4] & 0xFF) << 24)
                        | ((long) (digest[2 + number * 4] & 0xFF) << 16)
                        | ((long) (digest[1 + number * 4] & 0xFF) << 8)
                        | (digest[number * 4] & 0xFF))
                        & 0xFFFFFFFFL;
            }
    
            private byte[] md5(String value) {
                MessageDigest md5;
                try {
                    md5 = MessageDigest.getInstance("MD5");
                } catch (NoSuchAlgorithmException e) {
                    throw new IllegalStateException(e.getMessage(), e);
                }
                md5.reset();
                byte[] bytes = value.getBytes(StandardCharsets.UTF_8);
                md5.update(bytes);
                return md5.digest();
            }
    
        }
    

    總結

    以上就是dubbo負載均衡源碼的全部解析,如果還是不明白,可以看下官方文檔的解析  
    http://dubbo.apache.org/zh-cn/docs/source_code_guide/loadbalance.html

    dubbo的負載均衡算法總體來說並不複雜,代碼寫的也很優雅,簡潔,看起來很舒服,而且有很多細節的處理值得稱讚,例如預熱處理,輪訓算法的平滑處理等。

    我們平時使用時,可以根據自己的業務場景,選擇適合自己的算法,當然,一般情況下,默認的的隨機算法就能滿足我們的日常需求,而且隨機算法的性能足夠好。

    如果覺得dubbo提供的五種算法都不能滿足自己的需求,還可以通過dubbo的SPI機制很方便的擴展自己的負載均衡算法。

    本站聲明:網站內容來源於博客園,如有侵權,請聯繫我們,我們將及時處理

    【其他文章推薦】

    台北網頁設計公司這麼多,該如何挑選?? 網頁設計報價省錢懶人包"嚨底家"

    網頁設計公司推薦更多不同的設計風格,搶佔消費者視覺第一線

    ※想知道購買電動車哪裡補助最多?台中電動車補助資訊懶人包彙整

    南投搬家費用,距離,噸數怎麼算?達人教你簡易估價知識!

    ※教你寫出一流的銷售文案?

  • 東京奧運聖火傳遞福島起點 被查出輻射量異常

    摘錄自2019年12月4日自由時報報導

    日本東京奧運聖火明年3月底從福島縣的足球國練中心「J-VILLAGE」出發,但日本環境省今(4日)透露,「J-VILLAGE」相鄰的停車場有部分區域空間輻射量較高,當局已要求東京電力公司再次去污。

    J-VILLAGE位於福島縣濱通南部,2011年福島核災發生後,由於此處距離福島核一廠僅有20公里,被政府借用為核災事故處理的對應據點,該中心今年4月下旬才全面恢復營運,因具有災區重建的重大象徵意義,所以被選為聖火傳遞的起點。

    根據《共同社》報導,環保團體綠色和平組織10月對J-VILLAGE周圍展開調查,發現異常的輻射量,隨後將結果送交環境省。

    環境省表示,空間輻射量較高的是與J-VILLAGE相鄰的楢葉町營停車場部分區域,已要求東電對該地區未經鋪設的地面再次去污。東電3日去除了周圍約0.03立方米的土和草,調查放射性物質的種類等。

    根據東電的調查,在去污地區1公尺高的位置測得每小時1.79微西弗的輻射量,超過日本政府訂定的0.23微西弗的去污標準。地表輻射量為70.2微西弗。

    本站聲明:網站內容來源環境資訊中心https://e-info.org.tw/,如有侵權,請聯繫我們,我們將及時處理

    【其他文章推薦】

    ※帶您來了解什麼是 USB CONNECTOR  ?

    ※自行創業 缺乏曝光? 下一步"網站設計"幫您第一時間規劃公司的門面形象

    ※如何讓商品強力曝光呢? 網頁設計公司幫您建置最吸引人的網站,提高曝光率!!

    ※綠能、環保無空污,成為電動車最新代名詞,目前市場使用率逐漸普及化

    ※廣告預算用在刀口上,網站設計公司幫您達到更多曝光效益

    ※教你寫出一流的銷售文案?

  • 歐盟2020年環保目標難達陣 生物多樣性挑戰尤多

    摘錄自2019年12月4日中央社報導

    聯合國氣候變化綱要公約第25次締約方會議(COP25)2日在西班牙馬德里開議,將持續至13日。歐洲環保署在配合會議出版的報告中指出,儘管大部分原定2020年達成的環保目標勢必已無法達成,尤其是在生物多樣性領域,歐盟仍有機會實現為2030年和2050年設定的較長遠目標。

    報告強調,有鑑於生物多樣性降低的程度令人憂心、氣候變遷衍生的多方面衝擊日益嚴重,以及天然資源遭過度消耗,歐洲必須在未來10年儘速行動。

    報告指出,儘管1990至2017年期間,歐洲的溫室氣體排放量已減少22%,且再生能源的使用比例也提升,歐洲在環保領域仍有進步空間。

    根據歐洲環保署,在為2020年設定的13個生物多樣性政策目標中,只有兩個達標:劃設海洋保護區和陸地保護區。然而,物種、天然棲地、水生態系統、溼地和土壤狀況的保護,以及化學物排放與空氣和噪音的污染,仍令人擔憂。

    本站聲明:網站內容來源環境資訊中心https://e-info.org.tw/,如有侵權,請聯繫我們,我們將及時處理

    【其他文章推薦】

    台北網頁設計公司這麼多,該如何挑選?? 網頁設計報價省錢懶人包"嚨底家"

    網頁設計公司推薦更多不同的設計風格,搶佔消費者視覺第一線

    ※想知道購買電動車哪裡補助最多?台中電動車補助資訊懶人包彙整

    南投搬家費用,距離,噸數怎麼算?達人教你簡易估價知識!

    ※教你寫出一流的銷售文案?

  • 奧迪2018年量產首款純電動SUV汽車

    奧迪準備2018年在布魯塞爾量產首款純電動SUV汽車。布魯塞爾的奧迪工廠會同時製造汽車和電池,它還要向大眾其它汽車提供電池。

    在2015年舉行的法蘭克福汽車展上,奧迪展示了e-tron概念車,它預示著奧迪即將推出量產版本的SUV,汽車取名為“Q6 e-tron”。

    Q6 e-tron配有3個電動機,一個位於前軸,兩個放在後面。大型電池組安裝在前後軸之間,位於乘客座位的下方,這樣可以降低重心,提供更好的平衡性。

    Q6 e-tron安裝的電池來自韓國LG化學和三星SDI,充電一次可以行駛約500千米。資料是以歐洲測試週期作為標準的,如果用美國環境保護署(EPA)的標準測試里程會短一些。因此,Q6 e-tron充電一次的行駛距離估計為390千米,這個資料更為合理一些。

    目前布魯塞爾的奧迪工廠主要負責生產A1,奧迪會將A1生產線轉移到西班牙工廠,讓布魯塞爾負責生產Q6 e-tron。

    本站聲明:網站內容來源於EnergyTrend https://www.energytrend.com.tw/ev/,如有侵權,請聯繫我們,我們將及時處理

    【其他文章推薦】

    ※帶您來了解什麼是 USB CONNECTOR  ?

    ※自行創業 缺乏曝光? 下一步"網站設計"幫您第一時間規劃公司的門面形象

    ※如何讓商品強力曝光呢? 網頁設計公司幫您建置最吸引人的網站,提高曝光率!!

    ※綠能、環保無空污,成為電動車最新代名詞,目前市場使用率逐漸普及化

    ※廣告預算用在刀口上,網站設計公司幫您達到更多曝光效益

    ※教你寫出一流的銷售文案?

  • 德國總理許諾為汽車製造商掃除法律障礙 推動無人車、電動車研發

    德國總理安格拉•默克爾稱,自動駕駛汽車很快便能在德國進行上路測試,許諾為汽車製造商們掃除法律障礙。

    德國擁有全球最大的幾家汽車製造商。安格拉•默克爾表示,德國汽車行業應該起草一份請願書提交柏林,以加快無人駕駛汽車的研發與推出,請願書中最好附上時間規劃。

    目前,全球的汽車製造商都在致力於研發自動駕駛汽車,然而其原型至少將在2020年才能獲得推出。安格拉•默克爾12日在柏林的一次工業活動中透露,德國政府機關將於5月底舉行會議,討論下一步工作計畫,如若待辦事項均已完成,內閣便可開始推進車輛測試相關法律依據的制定工作。她告知戴姆勒集團CEO蔡澈(Dieter Zetsche)等稱,“這一話題在政府內部並不存在爭議。”

    德國政府還考慮支持電動車的研發工作,拉動消費者需求。然而德國內政部長朔伊布勒(Wolfgang Schaeuble)上月表示,政府機關會設法支援電動車研發,但可能無法滿足汽車製造商們的所有願望。

    德國工業領袖已經向政府施壓,要求推出激勵措施拉動電動車需求增長,並稱如果德國想要保持在汽車製造行業領先,那麼推出激勵措施是必需的。

    社會民主黨資深議員Hubertus Heil則對此表示,執政聯盟將在本週三的會議上就相關問題達成一致,“我相信我們能夠說服朔伊布勒。”

    本站聲明:網站內容來源於EnergyTrend https://www.energytrend.com.tw/ev/,如有侵權,請聯繫我們,我們將及時處理

    【其他文章推薦】

    台北網頁設計公司這麼多,該如何挑選?? 網頁設計報價省錢懶人包"嚨底家"

    網頁設計公司推薦更多不同的設計風格,搶佔消費者視覺第一線

    ※想知道購買電動車哪裡補助最多?台中電動車補助資訊懶人包彙整

    南投搬家費用,距離,噸數怎麼算?達人教你簡易估價知識!

    ※教你寫出一流的銷售文案?

  • FastDFS圖片服務器單機安裝步驟(修訂版)

    FastDFS圖片服務器單機安裝步驟(修訂版)

    前面已經講 ,通過此文章可以了解FastDFS組件中單機安裝流程。

    單機版架構圖

    以下為單機FastDFS安裝步驟

    一、環境準備

    CentOS 7.X

    使用的版本: libfastcommon-1.0.41.tar.gz

    使用的版本: fastdfs-6.01.tar.gz

    使用的版本:fastdfs-nginx-module-1.21.tar.gz

    使用的版本: nginx-1.16.1.tar.gz

    二、安裝過程

    1、安裝 libfastcommon-1.0.41.tar.gz

    tar -zxvf libfastcommon-1.0.41.tar.gz
    cd libfastcommon-1.0.41/
    ./make.sh
    ./make.sh install

    2、安裝 FastDFS

    tar -zxvf  fastdfs-6.01.tar.gz
    cd fastdfs-6.01/
    ./make.sh
    ./make.sh install

    準備配置文件

    cp /etc/fdfs/tracker.conf.sample /etc/fdfs/tracker.conf
    cp /etc/fdfs/storage.conf.sample /etc/fdfs/storage.conf
    cp /etc/fdfs/client.conf.sample /etc/fdfs/client.conf
    cd /opt/apps/fastdfs-6.01/conf
    cp http.conf mime.types /etc/fdfs/

    Tracker Server 配置

    vim /etc/fdfs/tracker.conf
    修改配置如下:
    #tracker server端口號
    port=22122
    #存儲日誌和數據的根目錄
    base_path=/opt/fastdfs/tracker
    #HTTP服務端口
    http.server_port=80
    開放防火牆端口

    1、打開跟蹤端口

    vim /etc/sysconfig/iptables

    2、添加以下端口行:

    -A INPUT -m state --state NEW -m tcp -p tcp --dport 22122 -j ACCEPT

    3、重啟防火牆

    service iptables restart
    啟動Tracker
    /etc/init.d/fdfs_trackerd start

    Storage Server 配置

    vim /etc/fdfs/storage.conf
    修改配置如下:
    #storage server端口號
    port=23000
    #數據和日誌文件存儲根目錄
    base_path=/opt/fastdfs/storage
    #第一個存儲目錄
    store_path0=/opt/fastdfs/storepath0
    #tracker服務器IP和端口
    tracker_server=192.168.0.1:22122
    #http訪問文件的端口(默認8888,看情況修改,和nginx中保持一致)
    http.server_port=8888
    開放防火牆端口

    1、打開跟蹤端口

    vim /etc/sysconfig/iptables

    2、添加以下端口行:

    -A INPUT -m state --state NEW -m tcp -p tcp --dport 23000 -j ACCEPT

    3、重啟防火牆

    service iptables restart
    啟動Storage
    /etc/init.d/fdfs_storaged start
    查看集群狀態
     fdfs_monitor /etc/fdfs/storage.conf list
    

    查看狀態是否正常

    Storage 1:
    id = 6.0.36.243
    ip_addr = 6.0.36.243 (anantes-651-1-49-net.w2-0.abo.wanadoo.fr) ACTIVE

    Client配置

    vim /etc/fdfs/client.conf
    
    修改配置如下:
    #
    base_path=/opt/apps/fastdfs/client
    #tracker服務器IP和端口
    tracker_server=192.168.0.1:22122 
    
    上傳一個圖片測試是否能上傳成功
     fdfs_upload_file /etc/fdfs/client.conf test.jpg
    

    test.jpg 是測試本地上傳的圖片,路徑請填寫正確

    3、安裝Nginx和 fastdfs-nginx-module

    #解壓fastdfs-nginx-module
    tar -zxvf fastdfs-nginx-module-1.21.tar.gz
    cd fastdfs-nginx-module-1.21/
    cp ./src/mod_fastdfs.conf /etc/fdfs
    #解壓nginx
    tar -zxvf nginx-1.16.1.tar.gz
    cd nginx-1.16.1/
    #安裝nginx_http_image_filter_module
    yum -y install gd-devel
    yum -y install zlib zlib-devel openssl openssl--devel pcre pcre-devel
    #添加模塊
    ./configure --add-module=../fastdfs-nginx-module-1.21/src --prefix=/usr/local/nginx --with-http_image_filter_module 
    #編譯nginx
    make
    #安裝nginx
    make install
    

    查看是否安裝成功

    /usr/local/nginx/sbin/nginx -V
    

    查看插件是否安裝成功

    [root@FastDFS nginx-1.16.1]# /usr/local/nginx/sbin/nginx -V
    nginx version: nginx/1.16.1
    built by gcc 4.8.5 20150623 (Red Hat 4.8.5-11) (GCC) 
    configure arguments: --add-module=../fastdfs-nginx-module-1.21/src --prefix=/usr/local/nginx --with-http_image_filter_module
    [root@FastDFS nginx-1.16.1]# 
    

    修改Nginx訪問

    vim /etc/fdfs/mod_fastdfs.conf

    修改配置如下:

    #
    connect_timeout=10
    #tracker服務器IP和端口
    tracker_server=192.168.0.1:22122
    #是否啟用group組名
    url_have_group_name=true
    #
    store_path0=/opt/fastdfs/storepath0

    修改Nginx配置:

    vim /usr/local/nginx/conf/nginx.conf
    

    修改配置如下:

    server {
        listen       80;
        server_name  localhost;
    
        #charset koi8-r;
    
        #access_log  logs/host.access.log  main;
    
        location / {
            root   html;
            index  index.html index.htm;
        }
        #圖片帶壓縮訪問
        location ~ /group1/M00/(.*)\.(jpg|gif|png)!format=([0-9]+)_([0-9]+) {
            alias  /home/fastdfs/storage/data/;
            ngx_fastdfs_module;
            set $w $3;
            set $h $4;
    
            rewrite group1/M00(.+)\.(jpg|gif|png)!format=([0-9]+)_([0-9]+)$ group1/M00$1.$2 break;
    
            image_filter resize $w $h;
            image_filter_buffer 5M;
        }
        #主圖訪問
        location ~ /group([0-9])/M00/(.+)\.?(.+) {
            alias /home/fastdfs/storage/data/;
            ngx_fastdfs_module;
        }
    ...
    }
    

    啟動Nginx

    #啟動
    /usr/local/nginx/sbin/nginx
    #停止
    /usr/local/nginx/sbin/nginx -s stop
    #重啟
    /usr/local/nginx/sbin/nginx -s reload

    通過以上配置完成FastDFS的搭建。

    測試圖片訪問

    圖片訪問示例:

    主圖訪問

    http://218.2.204.124:30308/group1/M00/00/03/BgAk813IvTCAIxxxAAD44NFKFPc908.png

    壓縮圖片 (主圖后加 !format=寬度_高度)訪問

    http://218.2.204.124:30308/group1/M00/00/03/BgAk813IvTCAIxxxAAD44NFKFPc908.png!format=400_10

    未解決的問題

    壓縮圖片使用主圖后?format=寬度_高度

    本文由博客一文多發平台 發布!

    再次感謝!!! 您已看完全文,歡迎關注微信公眾號猿碼 ,你的支持是我持續更新文章的動力!

    本站聲明:網站內容來源於博客園,如有侵權,請聯繫我們,我們將及時處理

    【其他文章推薦】

    ※帶您來了解什麼是 USB CONNECTOR  ?

    ※自行創業 缺乏曝光? 下一步"網站設計"幫您第一時間規劃公司的門面形象

    ※如何讓商品強力曝光呢? 網頁設計公司幫您建置最吸引人的網站,提高曝光率!!

    ※綠能、環保無空污,成為電動車最新代名詞,目前市場使用率逐漸普及化

    ※廣告預算用在刀口上,網站設計公司幫您達到更多曝光效益

    ※教你寫出一流的銷售文案?

  • PCA降維的原理、方法、以及python實現。

    PCA降維的原理、方法、以及python實現。

    參考:菜菜的sklearn教學之降維算法.pdf!!

    PCA(主成分分析法)

    1. PCA(最大化方差定義或者最小化投影誤差定義)是一種無監督算法,也就是我們不需要標籤也能對數據做降維,這就使得其應用範圍更加廣泛了。那麼PCA的核心思想是什麼呢?

    • 例如D維變量構成的數據集,PCA的目標是將數據投影到維度為K的子空間中,要求K<D且最大化投影數據的方差。這裏的K值既可以指定,也可以利用主成分的信息來確定。
    • PCA其實就是方差與協方差的運用。
    • 降維的優化目標:將一組 N 維向量降為 K 維,其目標是選擇 K 個單位正交基,使得原始數據變換到這組基上后,各變量兩兩間協方差為 0,而變量方差則盡可能大(在正交的約束下,取最大的 K 個方差)。

    2. PCA存在的問題:

    • 原來的數據中比如包括了年齡,性別,身高等指標降維后的數據既然維度變小了,那麼每一維都是什麼含義呢?這個就很難解釋了,所以PCA本質來說是無法解釋降維后的數據的物理含義,換句話說就是降維完啦計算機能更好的認識這些數據,但是咱們就很難理解了。
    • PCA對數據有兩個假設:數據必須是連續數值型;數據中沒有缺失值。
    • 過擬合:PCA 保留了主要信息,但這個主要信息只是針對訓練集的,而且這個主要信息未必是重要信息。有可能捨棄了一些看似無用的信息,但是這些看似無用的信息恰好是重要信息,只是在訓練集上沒有很大的表現,所以 PCA 也可能加劇了過擬合;

    3. PCA的作用:

    • 緩解維度災難:PCA 算法通過捨去一部分信息之後能使得樣本的採樣密度增大(因為維數降低了),這是緩解維度災難的重要手段;
    • 降噪:當數據受到噪聲影響時,最小特徵值對應的特徵向量往往與噪聲有關,將它們捨棄能在一定程度上起到降噪的效果;
    • 特徵獨立:PCA 不僅將數據壓縮到低維,它也使得降維之後的數據各特徵相互獨立

    4. 方差的作用:咱們可以想象一下,如果一群人都堆疊在一起,我們想區分他們是不是比較困難,但是如果這群人站在馬路兩側,我們就可以很清晰的判斷出來應該這是兩伙人。所以基於方差我們可以做的就是讓方差來去判斷咱們數據的擁擠程度,在這裏我們認為方差大的應該辨識度更高一些,因為分的比較開(一條馬路給隔開啦)。方差可以度量數值型數據的,數據若是想要區分開來,他那他們的離散程度就需要比較大,也就是方差比較大。

    5. 協方差的作用:

    6. 計算過程:(下圖為採用特徵值分解的計算過程,若採用SVM算法,則無需計算協方差矩陣!)

    為什麼我們需要協方差矩陣?我們最主要的目的是希望能把方差和協方差統一到一個矩陣里,方便後面的計算。

      假設我們只有 a 和 b 兩個變量,那麼我們將它們按行組成矩陣 X:(與matlab不同的是,在numpy中每一列表示每個樣本的數據,每一行表示一個變量。比如矩陣X,該矩陣表示的意義為:有m個樣本點,每個樣本點由兩個變量組成!)

      然後:


      Cov(a,a) = E[(a-E(a))(a-E(a))], Cov(b,a) = E[(b-E(b))(a-E(a))],因為E(b)=E(a)=0,所以大大簡化了計算!!!(這就體現了去中心化的作用!)

      我們可以看到這個矩陣對角線上的分別是兩個變量的方差,而其它元素是 a 和 b 的協方差。兩者被統一到了一個矩陣里。

    7. 特徵值與特徵向量的計算方法—--特徵值分解奇異值分解法(SVD)(有關特徵值與奇異值可見我的博文!)

    (1) 特徵值分解的求解過程較為簡單,以下圖為例子

    (2) 特徵值分解存在的缺點:

    • 特徵值分解中要求協方差矩陣A必須是方陣,即規模必須為n*n。
    • 後期計算最小投影維度K時,計算量過大。
    • 當樣本維度很高時,協方差矩陣計算太慢;

    (3) SVD算法(奇異值分解)的提出克服這些缺點,目前幾乎所有封裝好的PCA算法內部採用的都是SVD算法進行特徵值、特徵向量以及K值的求解。

    • 奇異值(每個矩陣都有):設A是一個mXn矩陣,稱正半定矩陣A‘A的特徵值的非負平方根為矩陣A的奇異值,其中A‘表示矩陣A的共扼轉置矩陣(實數矩陣的共軛就是轉置矩陣,複數矩陣的共軛轉置矩陣就是上面所說的行列互換后每個元素取共軛)
    • 只有方陣才有特徵值。

    (4) SVD算法的計算過程:(numpy中已經將SVD進行了封裝,所以只需要調用即可)

    可以發現,採用SVD算法無需計算協方差矩陣,這樣在數據量非常大的時候可以降低消耗。

    • A為數據矩陣,大小為M*N(2*5)
    • U是一個由與數據點之間具有最小投影誤差的方向向量所構成的矩陣,大小為M*M(2*2),假如想要將數據由M維降至K維,只需要從矩陣U中選擇前K個列向量,得到一個M*K的矩陣,記為Ureduce。按照下面的公式即可計算降維后的新數據:降維后的數據矩陣G = A.T * Ureduce. 
    • sigma為一個列向量,其包含的值為矩陣A的奇異值。
    • VT是一個大小為N*N的矩陣,具體意義我們無需了解。

    利用python實現PCA降維(採用SVD的方法):

     1 from numpy import linalg as la
     2 import numpy as np
     3 #1.矩陣A每個變量的均值都為0,所以不用進行“去平均值”處理。倘若矩陣A的每個變量的均值不為0,則首先需要對數據進行預處理
     4 #  才可以進行協方差矩陣的求解。
     5 #2.與matlab不同的是,在numpy中每一列表示每個樣本的數據,每一行表示一個變量。
     6 #  比如矩陣A,該矩陣表示的意義為:有5個樣本點,每個樣本點由兩個變量組成!
     7 #3.np.mat()函數中矩陣的乘積可以使用 * 或 .dot()函數
     8 #  array()函數中矩陣的乘積只能使用 .dot()函數。而星號乘(*)則表示矩陣對應位置元素相乘,與numpy.multiply()函數結果相同。
     9 A = np.mat([[-1, -1, 0, 2, 0], [-2, 0, 0, 1, 1]])
    10 # A = np.mat([[-1, -2], [-1, 0], [0, 0], [2, 1], [0, 1]]).T
    11 U, sigma, VT = la.svd(A)
    12 print("U:")
    13 print(U)
    14 print("sigma:")
    15 print(sigma)
    16 print("VT:")
    17 print(VT)
    18 print("-"*30)
    19 print("降維前的數據:")
    20 print(A.T)
    21 print("降維后的數據:")
    22 print(A.T * U[:,0])

    運行結果圖:與上文採用特徵值分解所得到的降維結果一致!

    8.PCA的重建

     眾所周知,PCA可以將高維數據壓縮為較少維度的數據,由於維度有所減少,所以PCA屬於有損壓縮,也就是,壓縮后的數據沒有保持原來數據的全部信息,根據壓縮數據無法重建原本的高維數據,但是可以看作原本高維數據的一種近似。

     還原的近似數據矩陣Q = 降維后的矩陣G * Ureduce.T

    9.採用sklearn封裝好的PCA實現數據降維(採用的是SVD算法):

     1 import numpy as np
     2 from sklearn.decomposition import PCA
     3 # 利用sklearn進行PCA降維處理的時候,數據矩陣A的行數表示數據的個數,數據矩陣A的列數表示每條數據的維度。這與numpy中是相反的!
     4 # A = np.mat([[-1, -1, 0, 2, 0], [-2, 0, 0, 1, 1]]).T
     5 A = np.mat([[-1, -2], [-1, 0], [0, 0], [2, 1], [0, 1]])
     6 pca = PCA(n_components = 1)
     7 pca.fit(A)
     8 # 投影后的特徵維度的方差比例
     9 print(pca.explained_variance_ratio_)
    10 # 投影后的特徵維度的方差
    11 print(pca.explained_variance_)
    12 print(pca.transform(A))

     可以發現,採用sklearn封裝的方法實現PCA與上文的方法達到的結果一致!

    10.如何確定主成分數量(針對於Sklearn封裝的PCA方法而言)

    PCA算法將D維數據降至K維,顯然K是需要選擇的參數,表示要保持信息的主成分數量。我們希望能夠找到一個K值,既能大幅降低維度,又能最大限度地保持原有數據內部的結構信息。實現的過程是通過SVD方法得到的S矩陣進行操作求解,


    11.sklearn中封裝的PCA方法的使用介紹。

    PCA的函數原型

     (1)主要參數介紹

    n_components

    • 這個參數類型有int型,float型,string型,默認為None。 它的作用是指定PCA降維后的特徵數(也就是降維后的維度)。 
    • 若取默認(None),則n_components==min(n_samples, n_features),即降維后特徵數取樣本數和原有特徵數之間較小的那個;
    • 若n_components}設置為‘mle’並且svd_solver設置為‘full’則使用MLE算法根據特徵的方差分佈自動去選擇一定數量的主成分特徵來降維; 
    • 若0<n_components<1,則n_components的值為主成分方差的閾值; 通過設置該變量,即可調整主成分數量K。
    • 若n_components≥1,則降維后的特徵數為n_components; 

    copy

    •  bool (default True) 
    • 在運行算法時,將原始訓練數據複製一份。參數為bool型,默認是True,傳給fit的原始訓練數據X不會被覆蓋;若為False,則傳給fit后,原始訓練數據X會被覆蓋。 

    whiten

    • bool, optional (default False)
    • 是否對降維后的數據的每個特徵進行歸一化。參數為bool型,默認是False。

    (2)主要方法介紹:

    fit(X,y=None) :用訓練數據X訓練模型,由於PCA是無監督降維,因此y=None。 

    transform(X,y=None) :對X進行降維。 

    fit_transform(X) :用訓練數據X訓練模型,並對X進行降維。相當於先用fit(X),再用transform(X)。 

    inverse_transform(X) :將降維后的數據轉換成原始數據。(PCA的重建)

     (3)主要屬性介紹:

    components:array, shape (n_components, n_features) ,降維后各主成分方向,並按照各主成分的方差值大小排序。 

    explained_variance:array, shape (n_components,) ,降維后各主成分的方差值,方差值越大,越主要。 

    explained_variance_ratio:array, shape (n_components,) ,降維后的各主成分的方差值佔總方差值的比例,比例越大,則越主要。 

    singular_values:array, shape (n_components,) ,奇異值分解得到的前n_components個最大的奇異值。


     二、LDA

    1. 類間距離最大,類內距離最小(核心思想)

    2. LDA的原理,公式推導見西瓜書,這裏主要講一下PCA與LDA的異同點!

    • PCA為非監督降維,LDA為有監督降維PCA希望投影后的數據方差盡可能的大(最大可分性),因為其假設方差越多,則所包含的信息越多;而LDA則希望投影后相同類別的組內方差小,而組間方差大。LDA能合理運用標籤信息,使得投影后的維度具有判別性,不同類別的數據盡可能的分開。舉個簡單的例子,在語音識別領域,如果單純用PCA降維,則可能功能僅僅是過濾掉了噪聲,還是無法很好的區別人聲,但如果有標籤識別,用LDA進行降維,則降維后的數據會使得每個人的聲音都具有可分性,同樣的原理也適用於臉部特徵識別。
    • 所以,可以歸納總結為有標籤就盡可能的利用標籤的數據(LDA),而對於純粹的非監督任務,則還是得用PCA進行數據降維。
    • LDA降維最低可以降維到(類別數-1),而PCA沒有限制


    參考資料:https://zhuanlan.zhihu.com/p/77151308?utm_source=qq&utm_medium=social&utm_oi=1095998405318430720

    本站聲明:網站內容來源於博客園,如有侵權,請聯繫我們,我們將及時處理

    【其他文章推薦】

    台北網頁設計公司這麼多,該如何挑選?? 網頁設計報價省錢懶人包"嚨底家"

    網頁設計公司推薦更多不同的設計風格,搶佔消費者視覺第一線

    ※想知道購買電動車哪裡補助最多?台中電動車補助資訊懶人包彙整

    南投搬家費用,距離,噸數怎麼算?達人教你簡易估價知識!

    ※教你寫出一流的銷售文案?

  • Spring Boot 2.X(十六):應用監控之 Spring Boot Actuator 使用及配置

    Spring Boot 2.X(十六):應用監控之 Spring Boot Actuator 使用及配置

    Actuator 簡介

    Actuator 是 Spring Boot 提供的對應用系統的自省和監控功能。通過 Actuator,可以使用數據化的指標去度量應用的運行情況,比如查看服務器的磁盤、內存、CPU等信息,系統的線程、gc、運行狀態等等。

    Actuator 通常通過使用 HTTP 和 JMX 來管理和監控應用,大多數情況使用 HTTP 的方式。

    Actuator 端點說明

    端點 描述
    auditevents 獲取當前應用暴露的審計事件信息
    beans 獲取應用中所有的 Spring Beans 的完整關係列表
    caches 獲取公開可以用的緩存
    conditions 獲取自動配置條件信息,記錄哪些自動配置條件通過和沒通過的原因
    configprops 獲取所有配置屬性,包括默認配置,显示一個所有 @ConfigurationProperties 的整理列版本
    env 獲取所有環境變量
    flyway 獲取已應用的所有Flyway數據庫遷移信息,需要一個或多個 Flyway Bean
    liquibase 獲取已應用的所有Liquibase數據庫遷移。需要一個或多個 Liquibase Bean
    health 獲取應用程序健康指標(運行狀況信息)
    httptrace 獲取HTTP跟蹤信息(默認情況下,最近100個HTTP請求-響應交換)。需要 HttpTraceRepository Bean
    info 獲取應用程序信息
    integrationgraph 显示 Spring Integration 圖。需要依賴 spring-integration-core
    loggers 显示和修改應用程序中日誌的配置
    logfile 返回日誌文件的內容(如果已設置logging.file.name或logging.file.path屬性)
    metrics 獲取系統度量指標信息
    mappings 显示所有@RequestMapping路徑的整理列表
    scheduledtasks 显示應用程序中的計劃任務
    sessions 允許從Spring Session支持的會話存儲中檢索和刪除用戶會話。需要使用Spring Session的基於Servlet的Web應用程序
    shutdown 關閉應用,要求endpoints.shutdown.enabled設置為true,默認為 false
    threaddump 獲取系統線程轉儲信息
    heapdump 返回hprof堆轉儲文件
    jolokia 通過HTTP公開JMX bean(當Jolokia在類路徑上時,不適用於WebFlux)。需要依賴 jolokia-core
    prometheus 以Prometheus服務器可以抓取的格式公開指標。需要依賴 micrometer-registry-prometheus

    Actuator 使用及配置

    快速使用

    項目依賴

    <dependencies>
            <dependency>
                <groupId>org.springframework.boot</groupId>
                <artifactId>spring-boot-starter-web</artifactId>
            </dependency>
            <!-- actuator -->
            <dependency>
                <groupId>org.springframework.boot</groupId>
                <artifactId>spring-boot-starter-actuator</artifactId>
            </dependency>
    </dependencies>

    配置文件

    management.endpoints.enabled-by-default=true
    #啟動所有端點
    management.endpoints.web.exposure.include=*
    #自定義管理端點路徑
    #management.endpoints.web.base-path=/manage

    Spring Boot 2.X 中,Actuator 默認只開放 health 和 info 兩個端點。

    添加management.endpoints.web.exposure.include=*配置后啟動應用,訪問 http://127.0.0.1:8080/actuator 我們可以看到所有的 Actuator 端點列表。

    如果將management.endpoints.enabled-by-default設置為false,則禁用所有端點,如需啟用則如下:

    management.endpoints.enabled-by-default=false
    management.endpoint.info.enabled=true

    禁用的端點將從應用程序上下文中完全刪除。如果只想更改公開端點,使用include和exclude屬性。使用如下:

    management.endpoints.web.exposure.include=*
    management.endpoints.web.exposure.exclude=env,beans

    management.endpoints.web.base-path=/manage 配置表示將 /actuator 路徑重定義為 /manage。

    常用端點詳解

    health

    主要用來檢測應用的運行狀況,是使用最多的一個監控點。監控軟件通常使用該接口實時監測應用運行狀況,在系統出現故障時把報警信息推送給相關人員,如磁盤空間使用情況、數據庫和緩存等的一些健康指標。
    默認情況下 health 端點是開放的,訪問 http://127.0.0.1:8080/actuator/health 即可看到應用運行狀態。

    {"status":"UP"}

    如果需要看到詳細信息,則需要做添加配置:

    management.endpoint.health.show-details=always

    訪問返回信息如下:

    {"status":"UP","details":{"diskSpace":{"status":"UP","details":{"total":180002725888,"free":8687988736,"threshold":10485760}}}}

    info

    查看應用信息是否在 application.properties 中配置。如我們在項目中配置是:

    info.app.name=Spring Boot Actuator Demo
    info.app.version=v1.0.0
    info.app.description=Spring Boot Actuator Demo

    啟動項目,訪問 http://127.0.0.1:8080/actuator/info 返回信息如下:

    {"app":{"name":"Spring Boot Actuator Demo","version":"v1.0.0","description":"Spring Boot Actuator Demo"}}

    env

    通過 env 可以獲取到所有關於當前 Spring Boot 應用程序的運行環境信息,如:操作系統信息(systemProperties)、環境變量信息、JDK 版本及 ClassPath 信息、當前啟用的配置文件(activeProfiles)、propertySources、應用程序配置信息(applicationConfig)等。

    可以通過 http://127.0.0.1:8080/actuator/env/{name} ,name表示想要查看的信息,可以獨立显示。

    beans

    訪問 http://127.0.0.1:8080/actuator/beans 返回部分信息如下:

    {
        "contexts": {
            "Spring Boot Actuator Demo": {
                "beans": {
                    "endpointCachingOperationInvokerAdvisor": {
                        "aliases": [
                        ],
                        "scope": "singleton",
                        "type": "org.springframework.boot.actuate.endpoint.invoker.cache.CachingOperationInvokerAdvisor",
                        "resource": "class path resource [org/springframework/boot/actuate/autoconfigure/endpoint/EndpointAutoConfiguration.class]",
                        "dependencies": [
                            "environment"
                        ]
                    },
                    "defaultServletHandlerMapping": {
                        "aliases": [
                        ],
                        "scope": "singleton",
                        "type": "org.springframework.web.servlet.HandlerMapping",
                        "resource": "class path resource [org/springframework/boot/autoconfigure/web/servlet/WebMvcAutoConfiguration$EnableWebMvcConfiguration.class]",
                        "dependencies": [
                        ]
                    },
                    ...
                }
            }
        }
    }

    從返回的信息中我們可以看出主要展示了 bean 的別名、類型、是否單例、類的地址、依賴等信息。

    conditions

    通過 conditions 可以在應用運行時查看代碼了某個配置在什麼條件下生效,或者某個自動配置為什麼沒有生效。

    訪問 http://127.0.0.1:8080/actuator/conditions 返回部分信息如下:

    {
        "contexts": {
            "Spring Boot Actuator Demo": {
                "positiveMatches": {
                    "SpringBootAdminClientAutoConfiguration": [
                        {
                            "condition": "OnWebApplicationCondition",
                            "message": "@ConditionalOnWebApplication (required) found 'session' scope"
                        },
                        {
                            "condition": "SpringBootAdminClientEnabledCondition",
                            "message": "matched"
                        }
                    ],
                    "SpringBootAdminClientAutoConfiguration#metadataContributor": [
                        {
                            "condition": "OnBeanCondition",
                            "message": "@ConditionalOnMissingBean (types: de.codecentric.boot.admin.client.registration.metadata.CompositeMetadataContributor; SearchStrategy: all) did not find any beans"
                        }
                    ],
                    ...
                }
            }
        }
    }

    loggers

    獲取系統的日誌信息。

    訪問 http://127.0.0.1:8080/actuator/loggers 返回部分信息如下:

    {
        "levels": [
            "OFF",
            "ERROR",
            "WARN",
            "INFO",
            "DEBUG",
            "TRACE"
        ],
        "loggers": {
            "ROOT": {
                "configuredLevel": "INFO",
                "effectiveLevel": "INFO"
            },
            "cn": {
                "configuredLevel": null,
                "effectiveLevel": "INFO"
            },
            "cn.zwqh": {
                "configuredLevel": null,
                "effectiveLevel": "INFO"
            },
            "cn.zwqh.springboot": {
                "configuredLevel": null,
                "effectiveLevel": "INFO"
            },
            ...
        }
    }

    mappings

    查看所有 URL 映射,即所有 @RequestMapping 路徑的整理列表。

    訪問 http://127.0.0.1:8080/actuator/mappings 返回部分信息如下:

    {
        "contexts": {
            "Spring Boot Actuator Demo": {
                "mappings": {
                    "dispatcherServlets": {
                        "dispatcherServlet": [
                            {
                                "handler": "ResourceHttpRequestHandler [class path resource [META-INF/resources/], class path resource [resources/], class path resource [static/], class path resource [public/], ServletContext resource [/], class path resource []]",
                                "predicate": "/**/favicon.ico",
                                "details": null
                            },
                            ...
                        ]
                    }
                }
            }
        }
    }

    heapdump

    訪問:http://127.0.0.1:8080/actuator/heapdump會自動生成一個 GZip 壓縮的 Jvm 的堆文件 heapdump,我們可以使用 JDK 自帶的 Jvm 監控工具 VisualVM 打開此文件查看。如圖:

    VisualVM下載:https://visualvm.github.io/download.html

    threaddump

    獲取系統線程的轉儲信息,主要展示了線程名、線程ID、線程的狀態、是否等待鎖資源等信息。在工作中,我們可以通過查看線程的情況來排查相關問題。

    訪問 http://127.0.0.1:8080/actuator/threaddump 返回部分信息如下:

    {
        "threads": [
            {
                "threadName": "DestroyJavaVM",
                "threadId": 40,
                "blockedTime": -1,
                "blockedCount": 0,
                "waitedTime": -1,
                "waitedCount": 0,
                "lockName": null,
                "lockOwnerId": -1,
                "lockOwnerName": null,
                "inNative": false,
                "suspended": false,
                "threadState": "RUNNABLE",
                "stackTrace": [
                ],
                "lockedMonitors": [
                ],
                "lockedSynchronizers": [
                ],
                "lockInfo": null
            },
            ...
        ]
    }

    shutdown

    開啟可以接口關閉 Spring Boot 應用,要使用這個功能需要做如下配置:

    management.endpoint.shutdown.enabled=true

    可以通過 post(僅支持 post) 請求訪問 http://127.0.0.1:8080/actuator/shutdown 關閉應用。

    metrics

    訪問 http://127.0.0.1:8080/actuator/metrics 可以獲取系統度量指標信息項如下:

    {
        "names": [
            "jvm.memory.max",
            "jvm.threads.states",
            "jvm.gc.pause",
            "http.server.requests",
            "process.files.max",
            "jvm.gc.memory.promoted",
            "system.load.average.1m",
            "jvm.memory.used",
            "jvm.gc.max.data.size",
            "jvm.memory.committed",
            "system.cpu.count",
            "logback.events",
            "tomcat.global.sent",
            "jvm.buffer.memory.used",
            "tomcat.sessions.created",
            "jvm.threads.daemon",
            "system.cpu.usage",
            "jvm.gc.memory.allocated",
            "tomcat.global.request.max",
            "tomcat.global.request",
            "tomcat.sessions.expired",
            "jvm.threads.live",
            "jvm.threads.peak",
            "tomcat.global.received",
            "process.uptime",
            "tomcat.sessions.rejected",
            "process.cpu.usage",
            "tomcat.threads.config.max",
            "jvm.classes.loaded",
            "jvm.classes.unloaded",
            "tomcat.global.error",
            "tomcat.sessions.active.current",
            "tomcat.sessions.alive.max",
            "jvm.gc.live.data.size",
            "tomcat.threads.current",
            "process.files.open",
            "jvm.buffer.count",
            "jvm.buffer.total.capacity",
            "tomcat.sessions.active.max",
            "tomcat.threads.busy",
            "process.start.time"
        ]
    }

    對應訪問 names 中的指標,可以查看具體的指標信息。如訪問 http://127.0.0.1:8080/actuator/metrics/jvm.memory.used 返回信息如下:

    {
        "name": "jvm.memory.used",
        "description": "The amount of used memory",
        "baseUnit": "bytes",
        "measurements": [
            {
                "statistic": "VALUE",
                "value": 1.16828136E8
            }
        ],
        "availableTags": [
            {
                "tag": "area",
                "values": [
                    "heap",
                    "nonheap"
                ]
            },
            {
                "tag": "id",
                "values": [
                    "Compressed Class Space",
                    "PS Survivor Space",
                    "PS Old Gen",
                    "Metaspace",
                    "PS Eden Space",
                    "Code Cache"
                ]
            }
        ]
    }

    示例代碼

    參考文檔

    https://docs.spring.io/spring-boot/docs/2.2.1.RELEASE/reference/html/production-ready-features.html

    非特殊說明,本文版權歸 所有,轉載請註明出處.

    原文標題:Spring Boot 2.X(十六):應用監控之 Spring Boot Actuator 使用及配置

    原文地址:

    如果文章對您有幫助,請掃碼關注下我的公眾號,文章持續更新中…

    本站聲明:網站內容來源於博客園,如有侵權,請聯繫我們,我們將及時處理

    【其他文章推薦】

    ※帶您來了解什麼是 USB CONNECTOR  ?

    ※自行創業 缺乏曝光? 下一步"網站設計"幫您第一時間規劃公司的門面形象

    ※如何讓商品強力曝光呢? 網頁設計公司幫您建置最吸引人的網站,提高曝光率!!

    ※綠能、環保無空污,成為電動車最新代名詞,目前市場使用率逐漸普及化

    ※廣告預算用在刀口上,網站設計公司幫您達到更多曝光效益

    ※教你寫出一流的銷售文案?

  • HtmlSpanner 使用小結 — 安卓解析html

    HtmlSpanner 使用小結 — 安卓解析html

    如何利用 HtmlSpanner解析 HTML格式 的字符串:

    1. GitHub 下載HtmlSpanner項目 https://github.com/NightWhistler/HtmlSpanner

    2. 最好是直接放在java目錄下在,這樣不需要改引用的包路徑

    3.  引入需要的依賴包

        implementation 'net.sourceforge.htmlcleaner:htmlcleaner:2.21'
        implementation 'com.osbcp:cssparser:1.7'
    

      4. 使用方法:

     // 頁面上用於展示 html格式的文本布局
     TextView textView = findViewById(R.id.htmlSpanner);
     // 直接 new一個 HtmlSpanner對象
     HtmlSpanner htmlSpanner = new HtmlSpanner(); // 格式化
     // 解析 html得到 spannable對象
     Spannable spannable1 = htmlSpanner.fromHtml("<span style='color:red'>html格式的文字1</span>");
     // 显示到 TextView上
     textView.setText(spannable1);
    

     5. 在使用中遇到的問題——當富文本中顏色格式是rgb格式,解析失敗


     解決思路:

      1. 首先我們解析的是style=’color:rgb(0,255,255)’ 這種格式,於是看源碼覺得 CSSCompiler 這個類很有問題

      2. 找與顏色相關的於是就找到了 parseCSSColor( String colorString ) 這個方法,看起來就是轉換顏色用的

      3. 源碼的寫法如下:(是沒有對於rgb格式的算法,所以不能解析就很合理啦)


       4. 想法修改:( 遇到 0rgb格式就先處理成我們的 hex格式,這樣不就完美了嘛 )

      5. 工具類代碼如下:

    package com.xxx.xxx.xxx;
    
    public class ColorUtil {
    
         /**
         * rgb 格式的顏色轉 hex格式顏色
         * @param rgb
         * @return
         */
        public static String rgb2hex(String rgb) {
            int r = 0;
            int g = 0;
            int b = 0;
            int left = rgb.indexOf("(");
            int right = rgb.indexOf(")");
            if (left > -1 && right > -1 && right > left) {
                String substring = rgb.substring(left + 1, right);
                String[] split = substring.split(",");
                if (split.length == 3){
                    r = Integer.valueOf(split[0].trim());
                    g = Integer.valueOf(split[1].trim());
                    b = Integer.valueOf(split[2].trim());
                }
            }
            String rFString, rSString, gFString, gSString,
                    bFString, bSString, result;
            int red, green, blue;
            int rred, rgreen, rblue;
            red = r / 16;
            rred = r % 16;
            if (red == 10) rFString = "A";
            else if (red == 11) rFString = "B";
            else if (red == 12) rFString = "C";
            else if (red == 13) rFString = "D";
            else if (red == 14) rFString = "E";
            else if (red == 15) rFString = "F";
            else rFString = String.valueOf(red);
    
            if (rred == 10) rSString = "A";
            else if (rred == 11) rSString = "B";
            else if (rred == 12) rSString = "C";
            else if (rred == 13) rSString = "D";
            else if (rred == 14) rSString = "E";
            else if (rred == 15) rSString = "F";
            else rSString = String.valueOf(rred);
    
            rFString = rFString + rSString;
    
            green = g / 16;
            rgreen = g % 16;
    
            if (green == 10) gFString = "A";
            else if (green == 11) gFString = "B";
            else if (green == 12) gFString = "C";
            else if (green == 13) gFString = "D";
            else if (green == 14) gFString = "E";
            else if (green == 15) gFString = "F";
            else gFString = String.valueOf(green);
    
            if (rgreen == 10) gSString = "A";
            else if (rgreen == 11) gSString = "B";
            else if (rgreen == 12) gSString = "C";
            else if (rgreen == 13) gSString = "D";
            else if (rgreen == 14) gSString = "E";
            else if (rgreen == 15) gSString = "F";
            else gSString = String.valueOf(rgreen);
    
            gFString = gFString + gSString;
    
            blue = b / 16;
            rblue = b % 16;
    
            if (blue == 10) bFString = "A";
            else if (blue == 11) bFString = "B";
            else if (blue == 12) bFString = "C";
            else if (blue == 13) bFString = "D";
            else if (blue == 14) bFString = "E";
            else if (blue == 15) bFString = "F";
            else bFString = String.valueOf(blue);
    
            if (rblue == 10) bSString = "A";
            else if (rblue == 11) bSString = "B";
            else if (rblue == 12) bSString = "C";
            else if (rblue == 13) bSString = "D";
            else if (rblue == 14) bSString = "E";
            else if (rblue == 15) bSString = "F";
            else bSString = String.valueOf(rblue);
            bFString = bFString + bSString;
            result = "#" + rFString + gFString + bFString;
            return result;
        }
    }


    本站聲明:網站內容來源於博客園,如有侵權,請聯繫我們,我們將及時處理

    【其他文章推薦】

    台北網頁設計公司這麼多,該如何挑選?? 網頁設計報價省錢懶人包"嚨底家"

    網頁設計公司推薦更多不同的設計風格,搶佔消費者視覺第一線

    ※想知道購買電動車哪裡補助最多?台中電動車補助資訊懶人包彙整

    南投搬家費用,距離,噸數怎麼算?達人教你簡易估價知識!

    ※教你寫出一流的銷售文案?