環境資訊中心綜合外電;姜唯 編譯;林大利 審校
本站聲明:網站內容來源環境資訊中心https://e-info.org.tw/,如有侵權,請聯繫我們,我們將及時處理
【其他文章推薦】
※為什麼 USB CONNECTOR 是電子產業重要的元件?
※網頁設計一頭霧水??該從何著手呢? 找到專業技術的網頁設計公司,幫您輕鬆架站!
※想要讓你的商品成為最夯、最多人討論的話題?網頁設計公司讓你強力曝光
※想知道最厲害的台北網頁設計公司推薦、台中網頁設計公司推薦專業設計師”嚨底家”!!
環境資訊中心綜合外電;姜唯 編譯;林大利 審校
本站聲明:網站內容來源環境資訊中心https://e-info.org.tw/,如有侵權,請聯繫我們,我們將及時處理
【其他文章推薦】
※為什麼 USB CONNECTOR 是電子產業重要的元件?
※網頁設計一頭霧水??該從何著手呢? 找到專業技術的網頁設計公司,幫您輕鬆架站!
※想要讓你的商品成為最夯、最多人討論的話題?網頁設計公司讓你強力曝光
※想知道最厲害的台北網頁設計公司推薦、台中網頁設計公司推薦專業設計師”嚨底家”!!

和諧富騰互聯網加智慧電動汽車公司(以下簡稱“和諧富騰”)日前宣佈旗下“互聯網+智慧電動汽車”企業負責人,畢福康博士(Dr. Carsten Breitfeld)將擔任該企業首席執行官,戴雷博士(Dr. Daniel Kirchert)將擔任首席運營官。兩位管理層到任後將即刻啟動企業的運營。畢福康博士和戴雷博士亦將是該企業的事業合夥人和公司董事會成員。

左:畢福康博士(Dr. Carsten Breitfeld);右:戴雷博士(Dr. Daniel Kirchert)
和諧富騰是由中國和諧新能源汽車控股有限公司、鴻海集團與騰訊集團透過各自附屬實體聯合創立的創新投資平臺,“互聯網+智慧電動汽車”是該平臺旗下核心戰略專案和獨立企業,旨在開發面向未來的個人出行解決方案,塑造源自中國、佈局世界的高端品牌,為消費者提供智慧、愉悅、生態友好的駕乘體驗。
畢福康博士擁有機械工程學博士學位,是全球電動汽車研發領域的一流專家。畢福康博士此前在寶馬集團總部工作20年,擔任過底盤開發、傳動系統開發及產品戰略等方面的多個高級管理崗位,2010年起擔任寶馬集團新一代電動超級跑車i8項目總監,成為這一世界汽車行業劃時代旗艦車型的研發主腦。通過引入革命性的開發流程,畢福康博士帶領團隊實現了i8車型于2014年成功面世,在產品性能、材料、技術革新及研發速度等各個方面顯著優於傳統汽車產品,創下了全球汽車行業新的標杆。在畢福康博士的推動下,i8車型還引進了創新的銷售和客戶體驗機制。
戴雷博士是中國豪華汽車領域擁有最豐富銷售、運營和品牌塑造經驗的高層主管之一,也是業內公認的“中國通”。戴雷博士此前曾擔任東風英菲尼迪汽車有限公司總經理和華晨寶馬汽車有限公司行銷高級副總裁,相關品牌在其任內均創下豪華車市場的銷售增長紀錄,在品牌塑造和市場行銷方面也創造了若干標杆性的案例。戴雷博士在產品戰略、銷售網路發展和合資企業組建運營方面也擁有深厚的經驗。
畢福康博士和戴雷博士將在就任後與傳媒見面,並就“互聯網+智慧電動汽車”的戰略規劃和企業具體運營資訊與傳媒和公眾溝通。
本站聲明:網站內容來源於EnergyTrend https://www.energytrend.com.tw/ev/,如有侵權,請聯繫我們,我們將及時處理
【其他文章推薦】
※為什麼 USB CONNECTOR 是電子產業重要的元件?
※網頁設計一頭霧水??該從何著手呢? 找到專業技術的網頁設計公司,幫您輕鬆架站!
※想要讓你的商品成為最夯、最多人討論的話題?網頁設計公司讓你強力曝光
※想知道最厲害的台北網頁設計公司推薦、台中網頁設計公司推薦專業設計師”嚨底家”!!

4月16日,中國汽車之家創始人李想在微信朋友圈發文表示,目前個人精力110%投入在車和家上,並首次透露具體的產品計畫:車和家將打造兩款車型來滿足90%的城市需求,一款小而美的SEV,一款大而強的SUV。
3月底,李想的電動車創業項目「車和家」完成A輪融資,並且申報造車資質。李想預計在四年時間裡,打造小而美電動車大概需要2億美元的投入。車和家已經準備好了1億美元,另外的1億美元將通過融資獲得。
李想強調,車和家不是互聯網造車,也不玩互聯網概念,而是標準的新生代汽車品牌。一是自主研發,研發與製造工程師團隊平均汽車行業從業15年以上;二是自主生產,自建常州武進750畝的30萬產能的全鋁工廠,以及配套的BMS與電池廠;三是自己提供銷售與服務,打破4S店高價、低質、效率低的現狀。車和家的目標是像蘋果一樣去創新產品與商業模式,像華為一樣扎扎實實搞研發,並放眼全球市場。
以下為李想微信朋友圈全文(簡體中文,截圖):

本站聲明:網站內容來源於EnergyTrend https://www.energytrend.com.tw/ev/,如有侵權,請聯繫我們,我們將及時處理
【其他文章推薦】
※如何讓商品強力曝光呢? 網頁設計公司幫您建置最吸引人的網站,提高曝光率!!
※網頁設計一頭霧水??該從何著手呢? 找到專業技術的網頁設計公司,幫您輕鬆架站!
※想知道最厲害的台北網頁設計公司推薦、台中網頁設計公司推薦專業設計師”嚨底家”!!
合格的web後端程序員,在開發之外,必須給IIS、Nginx、各種原生web服務器上配置Https,不然你就僅僅是個碼農,本博最近將專題記錄
如何為IIS,Nginx配置Https
如何申請適用於生產的免費SSL證書
本博客小試牛刀,先實操在Nginx for Docker上添加自簽名SSL證書
為啥先倒騰自簽名SSL證書,申請公網SSL證書需要公網可識別的域名或者公網IP;
如果有實際SSL證書, 按照本文替換即可。
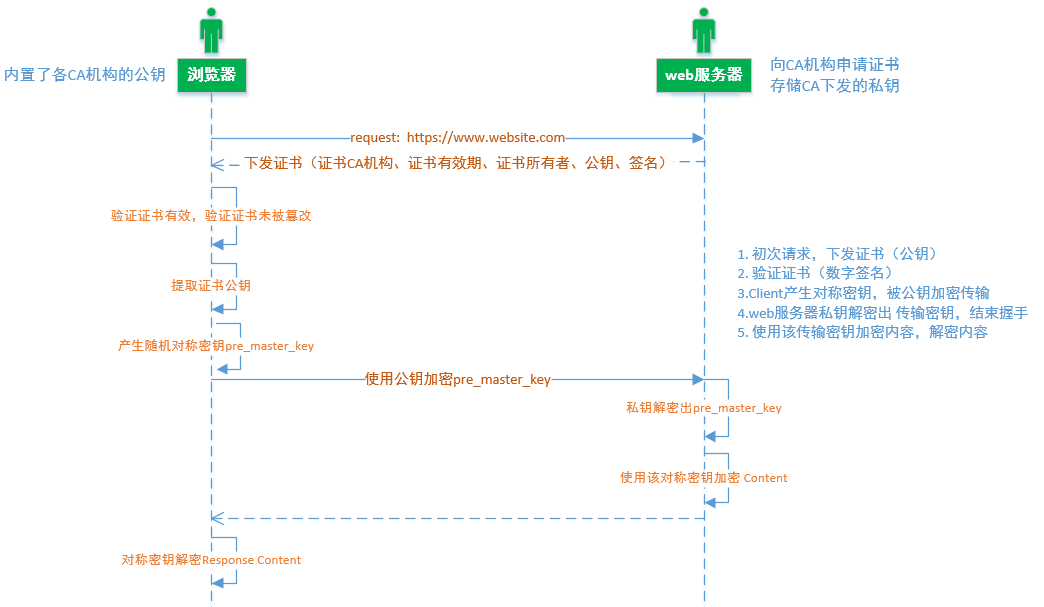
長話短說: 目前常見的Http請求明文傳輸, 報文可被截取並篡改,請求可被偽造;
因此基於常見HTTP(HTTP-TCP-IP)協議棧引入SSL/TSL(Transport Secure Layer) ,HTTPS在進行加密傳輸之前會進行一次握手,確定傳輸密鑰。
流程解讀:
① 傳輸密鑰是對稱密鑰,用於雙方對傳輸數據的加解密
② 怎麼在傳輸之前確立傳輸密鑰呢? 針對普遍的多客戶端訪問受信web服務器的場景, 提出非對稱密鑰(公鑰存於客戶端,私鑰存於web服務器),雙方能互相加解密,說明中間數據(傳輸密鑰)沒被篡改。
③ 再拋出疑問,怎麼認定下發的公鑰是這個web服務器匹配的密鑰?怎麼確定這個公鑰下發過程沒被截取篡改? 這就是追溯到握手階段的下發證書過程,瀏覽器內置的CA機構認定該證書是其有效下發,並通過簽名認定該證書沒被篡改,最終認定該 證書下發的公鑰是受信web服務器準確下發。
④ 如果面向面試記憶Https原理,恐怕有些難度,所以個人用一種 【雞生蛋還是蛋生雞】的方式向上追溯流程, 方便大家知其然更知其所以然。
> CentOS機器上安裝Docker、 Docker-Compose
> 常規操作構建 Nginx for Docker網站, 項目結構如下:
ssl-docker-nginx
    ├── docker-compose.yml
    ├── nginx
    │      └── nginx.conf
    └── site
           └── index.html
該項目將會使用 nginx/nginx.conf、site/index.html替換Nginx鏡像默認配置文件和默認啟動頁,docker-compose.yml 如下:
version: '2'
services:
  server:
    image: nginx:latest
    volumes:
      - ./nginx/nginx.conf:/etc/nginx/nginx.conf
      - ./site:/usr/share/nginx/html
    ports:
    - "8080:80"
docker-compose up -d 啟動Nginx容器,還是那樣熟悉的味道: 【chrome默認將http連接認定為不安全】
很明顯: web服務器需要存儲證書(內置了公鑰)和私鑰
① 創建自簽名證書 (什麼叫自簽名,就是自己給自己頒發 SSL證書)
[nodotnet@gs-server-5809 ssl-docker-nginx]$ openssl req -newkey rsa:2048 -nodes -keyout nginx/my-site.com.key -x509 -days 365 –out nginx/my-site.com.crt
req是證書請求的子命令,-newkey rsa:2048 -keyout nginx/my-site.com.key表示生成私鑰(PKCS8格式),
-nodes 表示私鑰不加密,
-x509表示輸出證書,-days365 為有效期,此後根據提示輸入證書擁有者信息;
之後會在nginx目錄下生產2個文件, 分別是私鑰、證書
② 將證書和密鑰掛載到Nginx Image, 修改docker-compose.yml
version: '2'
services:
  server:
    image: nginx:latest
    volumes:
      - ./nginx/nginx.conf:/etc/nginx/nginx.conf
      - ./site:/usr/share/nginx/html
      - ./nginx/my-site.com.crt:/etc/nginx/my-site.com.crt    #新行 - ./nginx/my-site.com.key:/etc/nginx/my-site.com.key    #新行
    ports:
    - "8080:80"
    - "443:443"        // 容器開啟HTTPS默認的443端口
③ 修改nginx/nginx.conf,接受Https請求
events {
  worker_connections  4096;  ## Default: 1024
}

http {
    server {
        listen 80;
        root         /usr/share/nginx/html/;
    }

    server {            # 新Server接受來自443端口的Https請求
        listen              443 ssl;
        ssl_certificate     /etc/nginx/my-site.com.crt;
        ssl_certificate_key /etc/nginx/my-site.com.key;
        root        /usr/share/nginx/html;
    }
}
執行docker-compose down && docker-compose up -d 發起https://10.201.80.126:443請求,當前自簽名證書頒發機構不在瀏覽器內置的CA機構,所以該證書目前被瀏覽器認為是無效。
理論上將 該自簽名證書導出,之後在 【chrome瀏覽器】-【高級設置】-【管理證書】中導入該證書,即可讓 chrome接受自簽名SSL證書。
That‘s All, Https作為以後web的主流配置,碼農進階資深必須掌握;後續會記錄Https & HSTS, 申請免費SSL證書,盡請關注。
本站聲明:網站內容來源於博客園,如有侵權,請聯繫我們,我們將及時處理
【其他文章推薦】
※為什麼 USB CONNECTOR 是電子產業重要的元件?
※網頁設計一頭霧水??該從何著手呢? 找到專業技術的網頁設計公司,幫您輕鬆架站!
※想要讓你的商品成為最夯、最多人討論的話題?網頁設計公司讓你強力曝光
※想知道最厲害的台北網頁設計公司推薦、台中網頁設計公司推薦專業設計師”嚨底家”!!
君子知夫不全不粹之不足以為美也,
故誦數以貫之,
思索以通之,
為其人以處之,
除其害者以持養之;
出自荀子《勸學篇》
終於OTA的升級過程的詳解來了,之前的兩篇文章與主要是鋪墊,
OTA升級的一些基礎知識,那這邊文章就開始揭開OTA-recovery模式升級過程的神秘面紗,需要說明的是
以下重點梳理了本人認為的關鍵、核心的流程,其他如ui部分、簽名校驗部分我並未花筆墨去描述,主要
還是講升級的核心,其他都是枝枝恭弘=叶 恭弘恭弘=叶 恭弘。Android 10 recovery源碼分析,代碼來源路徑:
https://www.androidos.net.cn/android/10.0.0_r6/xref
本文所講的流程代碼路徑為:bootable/recovery/
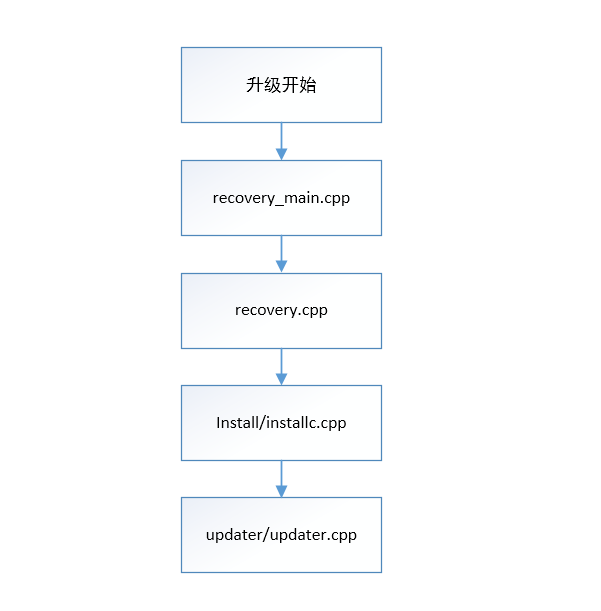
首先從文件層面說下升級功能的調用流程,說明如下:
recovery-main.cpp 升級的主入口
recovery.cpp 開始recovery升級的處理流程
install/install.cpp 執行升級的處理流程(調用updater)
updater/updater.cpp 完成升級的核心流程
1 主入口代碼為:recovery-main.cpp,main入口
1.1 日誌相關的工作準備
 1 // We don't have logcat yet under recovery; so we'll print error on screen and log to stdout
 2 // (which is redirected to recovery.log) as we used to do.
 3 android::base::InitLogging(argv, &UiLogger);
 4
 5 // Take last pmsg contents and rewrite it to the current pmsg session.
 6 static constexpr const char filter[] = "recovery/";
 7 // Do we need to rotate?
 8 bool do_rotate = false;
 9
10 __android_log_pmsg_file_read(LOG_ID_SYSTEM, ANDROID_LOG_INFO, filter, logbasename, &do_rotate);
11 // Take action to refresh pmsg contents
12 __android_log_pmsg_file_read(LOG_ID_SYSTEM, ANDROID_LOG_INFO, filter, logrotate, &do_rotate);
13
14 time_t start = time(nullptr);
15
16 // redirect_stdio should be called only in non-sideload mode. Otherwise we may have two logger
17 // instances with different timestamps.
18 redirect_stdio(Paths::Get().temporary_log_file().c_str());
1.2 load_volume_table(); 加載系統分區信息,注意這裏並明白掛載分區
.mount_point = “/tmp”, .fs_type = “ramdisk”, .blk_device = “ramdisk”, .length = 0
mount_point — 掛載點 fs_type — 分區類型
blk_device — 設備塊名 length — 分區大小
1.3 掛載/cache分區,我們的升級命令都放在這個分區下
1 has_cache = volume_for_mount_point(CACHE_ROOT) != nullptr;
1.4 獲取升級的參數並寫BCB塊信息
std::vector<std::string> args = get_args(argc, argv);

if (!update_bootloader_message(options, &err)) {
    LOG(ERROR) << "Failed to set BCB message: " << err;
}
a、讀取misc分區分區,並將recovery模式升級的標記寫到misc分區中,這樣做的目的是斷電續升,
升級中掉電之後,如果下次開機重啟,在bootloader中會讀取此標記,並重新進入到recovery模式中
update_bootloader_message函數完成此功能。
b、從/cache/recovery/command 中讀取升級參數,這裏recovery啟動進程是未帶入參數時,command
文件的接口其實有很詳細的解釋
 * The arguments which may be supplied in the recovery.command file:
 *   --update_package=path - verify install an OTA package file
 *   --wipe_data - erase user data (and cache), then reboot
 *   --prompt_and_wipe_data - prompt the user that data is corrupt, with their consent erase user
 *       data (and cache), then reboot
 *   --wipe_cache - wipe cache (but not user data), then reboot
 *   --show_text - show the recovery text menu, used by some bootloader (e.g. http://b/36872519).
 *   --set_encrypted_filesystem=on|off - enables / diasables encrypted fs
 *   --just_exit - do nothing; exit and reboot
1.5 加載recovery_ui_ext.so,完成升級中與屏幕信息的显示,升級進度,升級結果等。這裏就不多說了。
static constexpr const char* kDefaultLibRecoveryUIExt = "librecovery_ui_ext.so";
  // Intentionally not calling dlclose(3) to avoid potential gotchas (e.g. `make_device` may have
  // handed out pointers to code or static [or thread-local] data and doesn't collect them all back
  // in on dlclose).
  void* librecovery_ui_ext = dlopen(kDefaultLibRecoveryUIExt, RTLD_NOW);

  using MakeDeviceType = decltype(&make_device);
  MakeDeviceType make_device_func = nullptr;
  if (librecovery_ui_ext == nullptr) {
    printf("Failed to dlopen %s: %s\n", kDefaultLibRecoveryUIExt, dlerror());
  } else {
    reinterpret_cast<void*&>(make_device_func) = dlsym(librecovery_ui_ext, "make_device");
    if (make_device_func == nullptr) {
      printf("Failed to dlsym make_device: %s\n", dlerror());
    }
  }
1.6 非fastboot模式升級就開始了recovery模式升級,start_recovery
ret = fastboot ? StartFastboot(device, args) : start_recovery(device, args);
2 進入 recovery.cpp
2.1 參數解析,這些參數其實就是來源於/cache/recovery/command, 上面已經通過get_arg,
讀取到了args中
2.2 界面的各種ui信息显示,點事電量的檢查等待輔助動作。
2.3 函數名為安裝升級包,其實還未真正開始進行升級包的安裝
1 status = install_package(update_package, should_wipe_cache, true, retry_count, ui);
2.4 安裝結束之後由finish_recovery()完成收尾工作,保存日誌、清除BCB中的標記,設備重啟。
 1 static void finish_recovery() {
 2   std::string locale = ui->GetLocale();
 3   // Save the locale to cache, so if recovery is next started up without a '--locale' argument
 4   // (e.g., directly from the bootloader) it will use the last-known locale.
 5   if (!locale.empty() && has_cache) {
 6     LOG(INFO) << "Saving locale \"" << locale << "\"";
 7     if (ensure_path_mounted(LOCALE_FILE) != 0) {
 8       LOG(ERROR) << "Failed to mount " << LOCALE_FILE;
 9     } else if (!android::base::WriteStringToFile(locale, LOCALE_FILE)) {
10       PLOG(ERROR) << "Failed to save locale to " << LOCALE_FILE;
11     }
12   }
13
14   copy_logs(save_current_log, has_cache, sehandle);
15
16   // Reset to normal system boot so recovery won't cycle indefinitely.
17   std::string err;
18   if (!clear_bootloader_message(&err)) {
19     LOG(ERROR) << "Failed to clear BCB message: " << err;
20   }
21
22   // Remove the command file, so recovery won't repeat indefinitely.
23   if (has_cache) {
24     if (ensure_path_mounted(COMMAND_FILE) != 0 || (unlink(COMMAND_FILE) && errno != ENOENT)) {
25       LOG(WARNING) << "Can't unlink " << COMMAND_FILE;
26     }
27     ensure_path_unmounted(CACHE_ROOT);
28   }
29
30   sync();  // For good measure.
31 }
3 install/install.cpp
3.1 install.cpp其實就進入了安裝升級包的準備動作,剛上的install_package,是假的,這裏才是
really_install_package
1 really_install_package(path, &updater_wipe_cache, needs_mount, &log_buffer,
2                                     retry_count, &max_temperature, ui);
3.2 really_install_package 關鍵地方已加註釋
 1 static int really_install_package(const std::string& path, bool* wipe_cache, bool needs_mount,
 2                                   std::vector<std::string>* log_buffer, int retry_count,
 3                                   int* max_temperature, RecoveryUI* ui) {
 4   ui->SetBackground(RecoveryUI::INSTALLING_UPDATE);
 5   ui->Print("Finding update package...\n");
 6   // Give verification half the progress bar...
 7   ui->SetProgressType(RecoveryUI::DETERMINATE);
 8   ui->ShowProgress(VERIFICATION_PROGRESS_FRACTION, VERIFICATION_PROGRESS_TIME);
 9   LOG(INFO) << "Update location: " << path;
10
11   // Map the update package into memory.
12   ui->Print("Opening update package...\n");
13
14   if (needs_mount) {
15     if (path[0] == '@') {
16       ensure_path_mounted(path.substr(1));
17     } else {
18       ensure_path_mounted(path);
19     }
20   }
21
22   /* 將zip映射到內存中 */
23   auto package = Package::CreateMemoryPackage(
24       path, std::bind(&RecoveryUI::SetProgress, ui, std::placeholders::_1));
25   if (!package) {
26     log_buffer->push_back(android::base::StringPrintf("error: %d", kMapFileFailure));
27     return INSTALL_CORRUPT;
28   }
29
30   // Verify package.進行zip包進行簽名校驗
31   if (!verify_package(package.get(), ui)) {
32     log_buffer->push_back(android::base::StringPrintf("error: %d", kZipVerificationFailure));
33     return INSTALL_CORRUPT;
34   }
35
36   // Try to open the package.打開zip包
37   ZipArchiveHandle zip = package->GetZipArchiveHandle();
38   if (!zip) {
39     log_buffer->push_back(android::base::StringPrintf("error: %d", kZipOpenFailure));
40     return INSTALL_CORRUPT;
41   }
42
43   // Additionally verify the compatibility of the package if it's a fresh install.
44   if (retry_count == 0 && !verify_package_compatibility(zip)) {
45     log_buffer->push_back(android::base::StringPrintf("error: %d", kPackageCompatibilityFailure));
46     return INSTALL_CORRUPT;
47   }
48
49   // Verify and install the contents of the package.
50   ui->Print("Installing update...\n");
51   if (retry_count > 0) {
52     ui->Print("Retry attempt: %d\n", retry_count);
53   }
54   ui->SetEnableReboot(false);
55   int result =
56       /* 執行升級updater進程進行升級 */
57       try_update_binary(path, zip, wipe_cache, log_buffer, retry_count, max_temperature, ui);
58   ui->SetEnableReboot(true);
59   ui->Print("\n");
60
61   return result;
62 }
3.3 try_update_binary
從升級包中讀取元數據信息
1 ReadMetadataFromPackage(zip, &metadata)
3.4 從升級包中讀取updater進程
 1 int SetUpNonAbUpdateCommands(const std::string& package, ZipArchiveHandle zip, int retry_count,
 2                              int status_fd, std::vector<std::string>* cmd) {
 3   CHECK(cmd != nullptr);
 4
 5   // In non-A/B updates we extract the update binary from the package.
 6   static constexpr const char* UPDATE_BINARY_NAME = "META-INF/com/google/android/update-binary";
 7   ZipString binary_name(UPDATE_BINARY_NAME);
 8   ZipEntry binary_entry;
 9   if (FindEntry(zip, binary_name, &binary_entry) != 0) {
10     LOG(ERROR) << "Failed to find update binary " << UPDATE_BINARY_NAME;
11     return INSTALL_CORRUPT;
12   }
13
14   const std::string binary_path = Paths::Get().temporary_update_binary();
15   unlink(binary_path.c_str());
16   android::base::unique_fd fd(
17       open(binary_path.c_str(), O_CREAT | O_WRONLY | O_TRUNC | O_CLOEXEC, 0755));
18   if (fd == -1) {
19     PLOG(ERROR) << "Failed to create " << binary_path;
20     return INSTALL_ERROR;
21   }
22
23   int32_t error = ExtractEntryToFile(zip, &binary_entry, fd);
24   if (error != 0) {
25     LOG(ERROR) << "Failed to extract " << UPDATE_BINARY_NAME << ": " << ErrorCodeString(error);
26     return INSTALL_ERROR;
27   }
28
29   // When executing the update binary contained in the package, the arguments passed are:
30   //   - the version number for this interface
31   //   - an FD to which the program can write in order to update the progress bar.
32   //   - the name of the package zip file.
33   //   - an optional argument "retry" if this update is a retry of a failed update attempt.
34   *cmd = {
35     binary_path,
36     std::to_string(kRecoveryApiVersion),
37     std::to_string(status_fd),
38     package,
39   };
40   if (retry_count > 0) {
41     cmd->push_back("retry");
42   }
43   return 0;
44 }
3.5 創建管道,這裏子進程關閉了讀端,父進程關閉了寫端,這樣就是保證從單向的信息通信,從
子進程傳入信息到父進程中。
1 android::base::Pipe(&pipe_read, &pipe_write, 0)
3.6 創建子進程,在子進程中運行update-binary進程
 1 if (pid == 0) {
 2     umask(022);
 3     pipe_read.reset();
 4
 5     // Convert the std::string vector to a NULL-terminated char* vector suitable for execv.
 6     auto chr_args = StringVectorToNullTerminatedArray(args);
 7     /* chr_args[0] 其實就是升級包中的 META-INF/com/google/android/update-binary */
 8     execv(chr_args[0], chr_args.data());
 9     // We shouldn't use LOG/PLOG in the forked process, since they may cause the child process to
10     // hang. This deadlock results from an improperly copied mutex in the ui functions.
11     // (Bug: 34769056)
12     fprintf(stdout, "E:Can't run %s (%s)\n", chr_args[0], strerror(errno));
13     _exit(EXIT_FAILURE);
14   }
3.7 recovery獲取子進程的信息並显示,進度、ui_print 等等。
1 FILE* from_child = android::base::Fdopen(std::move(pipe_read), "r");
2 while (fgets(buffer, sizeof(buffer), from_child) != nullptr)
4 execv執行升級進程之後,工作在updater/updater.cpp中完成。
4.1 這裏的主要核心就是構造腳本解析器對updater-script中的命令進行執行,至於這個腳本解析器
是如何構造的,如何執行的, 其實我也搞的不是很清楚。
4.2 安裝升級包的核心程序就是Configure edify’s functions. 中的那些註冊回調函數
  1 int main(int argc, char** argv) {
  2 // Various things log information to stdout or stderr more or less
  3 // at random (though we've tried to standardize on stdout).  The
  4 // log file makes more sense if buffering is turned off so things
  5 // appear in the right order.
  6   setbuf(stdout, nullptr);
  7   setbuf(stderr, nullptr);
  8 // We don't have logcat yet under recovery. Update logs will always be written to stdout
  9 // (which is redirected to recovery.log).
 10   android::base::InitLogging(argv, &UpdaterLogger);
 11 if (argc != 4 && argc != 5) {
 12     LOG(ERROR) << "unexpected number of arguments: " << argc;
 13 return 1;
 14   }
 15 /* 支持的版本檢查 */
 16 char* version = argv[1];
 17 if ((version[0] != '1' && version[0] != '2' && version[0] != '3') || version[1] != '\0') {
 18 // We support version 1, 2, or 3.
 19     LOG(ERROR) << "wrong updater binary API; expected 1, 2, or 3; got " << argv[1];
 20 return 2;
 21   }
 22 // Set up the pipe for sending commands back to the parent process.
 23 int fd = atoi(argv[2]);
 24   FILE* cmd_pipe = fdopen(fd, "wb");
 25   setlinebuf(cmd_pipe);
 26 // Extract the script from the package.
 27 /* 從包中提取腳本 */
 28 const char* package_filename = argv[3];
 29   MemMapping map;
 30 if (!map.MapFile(package_filename)) {
 31     LOG(ERROR) << "failed to map package " << argv[3];
 32 return 3;
 33   }
 34   ZipArchiveHandle za;
 35 int open_err = OpenArchiveFromMemory(map.addr, map.length, argv[3], &za);
 36 if (open_err != 0) {
 37     LOG(ERROR) << "failed to open package " << argv[3] << ": " << ErrorCodeString(open_err);
 38     CloseArchive(za);
 39 return 3;
 40   }
 41 ZipString script_name(SCRIPT_NAME);
 42   ZipEntry script_entry;
 43 int find_err = FindEntry(za, script_name, &script_entry);
 44 if (find_err != 0) {
 45     LOG(ERROR) << "failed to find " << SCRIPT_NAME << " in " << package_filename << ": "
 46                << ErrorCodeString(find_err);
 47     CloseArchive(za);
 48 return 4;
 49   }
 50 std::string script;
 51   script.resize(script_entry.uncompressed_length);
 52 int extract_err = ExtractToMemory(za, &script_entry, reinterpret_cast<uint8_t*>(&script[0]),
 53                                     script_entry.uncompressed_length);
 54 if (extract_err != 0) {
 55     LOG(ERROR) << "failed to read script from package: " << ErrorCodeString(extract_err);
 56     CloseArchive(za);
 57 return 5;
 58   }
 59 // Configure edify's functions.
 60 /* 註冊updater-script中的回調函數 這裏主要是一些斷言函數 abort assert*/
 61   RegisterBuiltins();
 62 /* 這裏主要是一些安裝升級包的函數 主要是對有文件系統的分區來說*/
 63   RegisterInstallFunctions();
 64 /* 這裏主要註冊對裸分區進行升級的函數 */
 65   RegisterBlockImageFunctions();
 66   RegisterDynamicPartitionsFunctions();
 67   RegisterDeviceExtensions();
 68 // Parse the script.
 69 std::unique_ptr<Expr> root;
 70 int error_count = 0;
 71 int error = ParseString(script, &root, &error_count);
 72 if (error != 0 || error_count > 0) {
 73     LOG(ERROR) << error_count << " parse errors";
 74     CloseArchive(za);
 75 return 6;
 76   }
 77   sehandle = selinux_android_file_context_handle();
 78   selinux_android_set_sehandle(sehandle);
 79 if (!sehandle) {
 80 fprintf(cmd_pipe, "ui_print Warning: No file_contexts\n");
 81   }
 82 // Evaluate the parsed script.
 83   UpdaterInfo updater_info;
 84   updater_info.cmd_pipe = cmd_pipe;
 85   updater_info.package_zip = za;
 86   updater_info.version = atoi(version);
 87   updater_info.package_zip_addr = map.addr;
 88   updater_info.package_zip_len = map.length;
 89 State state(script, &updater_info);
 90 if (argc == 5) {
 91 if (strcmp(argv[4], "retry") == 0) {
 92       state.is_retry = true;
 93     } else {
 94 printf("unexpected argument: %s", argv[4]);
 95     }
 96   }
 97 std::string result;
 98 bool status = Evaluate(&state, root, &result);
 99 if (!status) {
100 if (state.errmsg.empty()) {
101       LOG(ERROR) << "script aborted (no error message)";
102 fprintf(cmd_pipe, "ui_print script aborted (no error message)\n");
103     } else {
104       LOG(ERROR) << "script aborted: " << state.errmsg;
105 const std::vector<std::string> lines = android::base::Split(state.errmsg, "\n");
106 for (const std::string& line : lines) {
107 // Parse the error code in abort message.
108 // Example: "E30: This package is for bullhead devices."
109 if (!line.empty() && line[0] == 'E') {
110 if (sscanf(line.c_str(), "E%d: ", &state.error_code) != 1) {
111             LOG(ERROR) << "Failed to parse error code: [" << line << "]";
112           }
113         }
114 fprintf(cmd_pipe, "ui_print %s\n", line.c_str());
115       }
116     }
117 // Installation has been aborted. Set the error code to kScriptExecutionFailure unless
118 // a more specific code has been set in errmsg.
119 if (state.error_code == kNoError) {
120       state.error_code = kScriptExecutionFailure;
121     }
122 fprintf(cmd_pipe, "log error: %d\n", state.error_code);
123 // Cause code should provide additional information about the abort.
124 if (state.cause_code != kNoCause) {
125 fprintf(cmd_pipe, "log cause: %d\n", state.cause_code);
126 if (state.cause_code == kPatchApplicationFailure) {
127         LOG(INFO) << "Patch application failed, retry update.";
128 fprintf(cmd_pipe, "retry_update\n");
129       } else if (state.cause_code == kEioFailure) {
130         LOG(INFO) << "Update failed due to EIO, retry update.";
131 fprintf(cmd_pipe, "retry_update\n");
132       }
133     }
134 if (updater_info.package_zip) {
135       CloseArchive(updater_info.package_zip);
136     }
137 return 7;
138   } else {
139 fprintf(cmd_pipe, "ui_print script succeeded: result was [%s]\n", result.c_str());
140   }
141 if (updater_info.package_zip) {
142     CloseArchive(updater_info.package_zip);
143   }
144 return 0;
145 }
以上就是基於Android的OTA的Recovery模式升級流程。我這裏主要是梳理整個升級流程的主要,
很多地方還是寫的不夠細,望讀者理解,我認為比較核心與關鍵的地方有以下幾點吧
長按二維碼關注【嵌入式C部落】,獲取更多編程資料及精華文章
本站聲明:網站內容來源於博客園,如有侵權,請聯繫我們,我們將及時處理
【其他文章推薦】
※如何讓商品強力曝光呢? 網頁設計公司幫您建置最吸引人的網站,提高曝光率!!
※網頁設計一頭霧水??該從何著手呢? 找到專業技術的網頁設計公司,幫您輕鬆架站!
※想知道最厲害的台北網頁設計公司推薦、台中網頁設計公司推薦專業設計師”嚨底家”!!
目錄
@(本節目錄)
ACL是access control list的簡稱,俗稱訪問控制列表。訪問控制,基本上會涉及到用戶、資源、權限、角色等概念,那在RocketMQ中上述會對應哪些對象呢?
另外,RocketMQ還支持按照客戶端IP進行白名單設置。
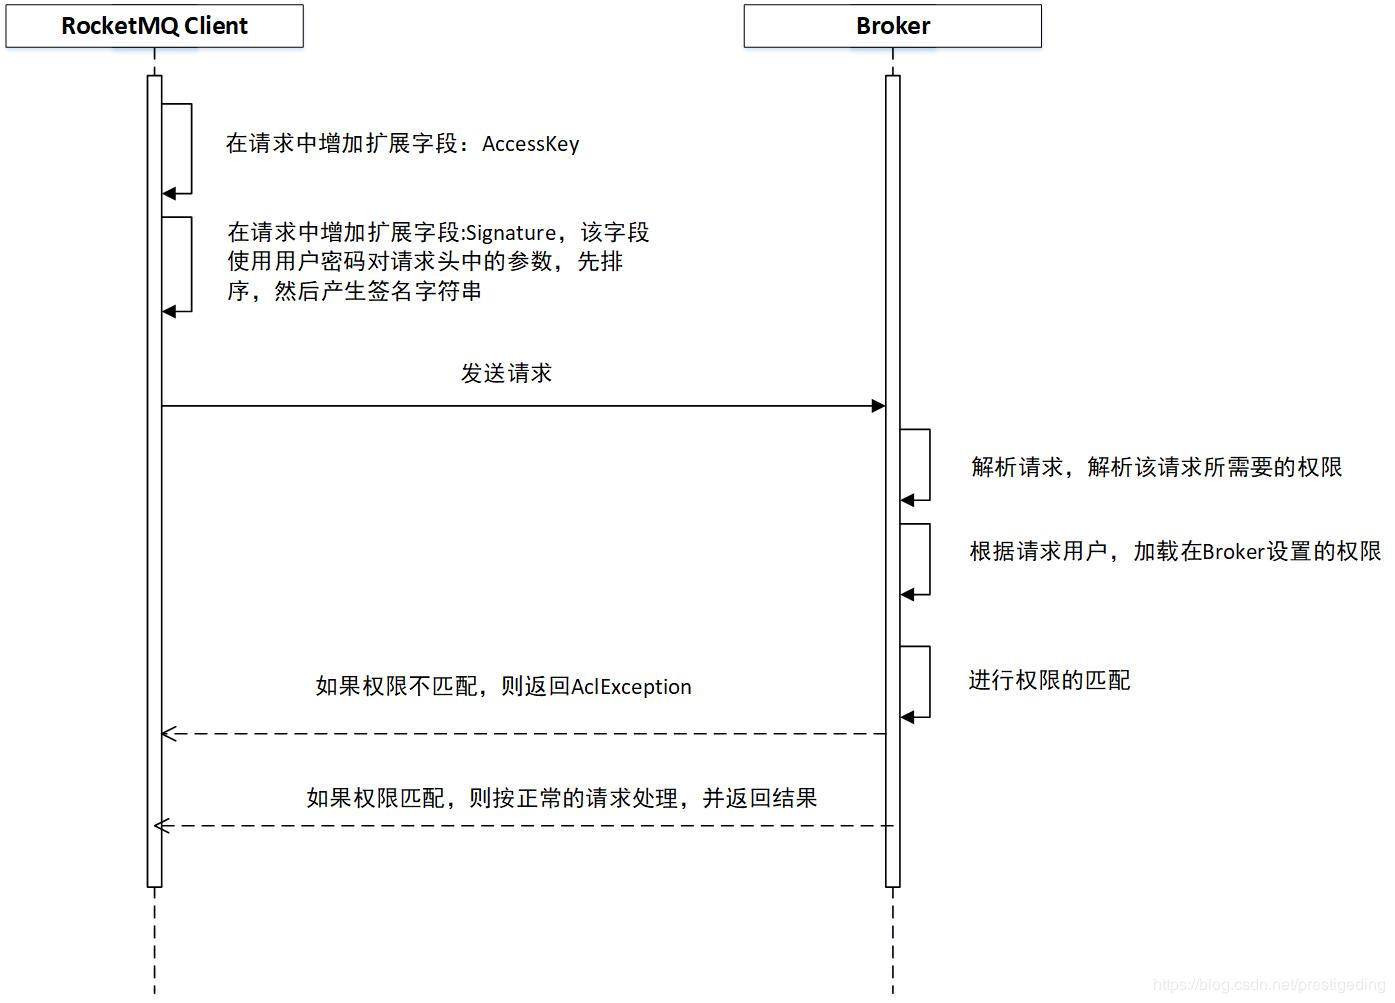
在講解如何使用ACL之前,我們先簡單看一下RocketMQ ACL的請求流程:
對於上述具體的實現,將在後續文章中重點講解,本文的目的只是希望給讀者一個大概的了解。
acl默認的配置文件名:plain_acl.yml,需要放在${ROCKETMQ_HOME}/store/config目錄下。下面對其配置項一一介紹。
全局白名單,其類型為數組,即支持多個配置。其支持的配置格式如下:
配置用戶信息,該類型為數組類型。擁有accessKey、secretKey、whiteRemoteAddress、admin、defaultTopicPerm、defaultGroupPerm、topicPerms、groupPerms子元素。
登錄用戶名,長度必須大於6個字符。
登錄密碼。長度必須大於6個字符。
用戶級別的IP地址白名單。其類型為一個字符串,其配置規則與globalWhiteRemoteAddresses,但只能配置一條規則。
boolean類型,設置是否是admin。如下權限只有admin=true時才有權限執行。
默認topic權限。該值默認為DENY(拒絕)。
默認消費組權限,該值默認為DENY(拒絕),建議值為SUB。
設置topic的權限。其類型為數組,其可選擇值在下節介紹。
設置消費組的權限。其類型為數組,其可選擇值在下節介紹。可以為每一消費組配置不一樣的權限。
上面定義了全局白名單、用戶級別的白名單,用戶級別的權限,為了更好的配置ACL權限規則,下面給出權限匹配邏輯。
首先,需要在broker.conf文件中,增加參數aclEnable=true。並拷貝distribution/conf/plain_acl.yml文件到${ROCKETMQ_HOME}/conf目錄。
broker.conf的配置文件如下:
brokerClusterName = DefaultCluster
brokerName = broker-b
brokerId = 0
deleteWhen = 04
fileReservedTime = 48
brokerRole = ASYNC_MASTER
flushDiskType = ASYNC_FLUSH
listenPort=10915
storePathRootDir=E:/SH2019/tmp/rocketmq_home/rocketmq4.5MB/store
storePathCommitLog=E:/SH2019/tmp/rocketmq_home/rocketmq4.5MB/store/commitlog
namesrvAddr=127.0.0.1:9876
autoCreateTopicEnable=false
aclEnable=true
plain_acl.yml文件內容如下:
globalWhiteRemoteAddresses:

accounts:
- accessKey: RocketMQ
  secretKey: 12345678
  whiteRemoteAddress:
  admin: false
  defaultTopicPerm: DENY
  defaultGroupPerm: SUB
  topicPerms:
  - TopicTest=PUB
  groupPerms:
  # the group should convert to retry topic
  - oms_consumer_group=DENY

- accessKey: admin
  secretKey: 12345678
  whiteRemoteAddress:
  # if it is admin, it could access all resources
  admin: true
從上面的配置可知,用戶RocketMQ只能發送TopicTest的消息,其他topic無權限發送;拒絕oms_consumer_group消費組的消息消費,其他消費組默認可消費。
public class AclProducer {
    public static void main(String[] args) throws MQClientException, InterruptedException {
        DefaultMQProducer producer = new DefaultMQProducer("please_rename_unique_group_name", getAclRPCHook());
        producer.setNamesrvAddr("127.0.0.1:9876");
        producer.start();
        for (int i = 0; i < 1; i++) {
            try {
                Message msg = new Message("TopicTest3" ,"TagA" , ("Hello RocketMQ " + i).getBytes(RemotingHelper.DEFAULT_CHARSET));
                SendResult sendResult = producer.send(msg);
                System.out.printf("%s%n", sendResult);
            } catch (Exception e) {
                e.printStackTrace();
                Thread.sleep(1000);
            }
        }
        producer.shutdown();
    }

    static RPCHook getAclRPCHook() {
        return new AclClientRPCHook(new SessionCredentials("rocketmq","12345678"));
    }
}
運行效果如圖所示:
public class AclConsumer {

    public static void main(String[] args) throws InterruptedException, MQClientException {
        DefaultMQPushConsumer consumer = new DefaultMQPushConsumer("please_rename_unique_group_name_4", getAclRPCHook(),new AllocateMessageQueueAveragely());
        consumer.setConsumeFromWhere(ConsumeFromWhere.CONSUME_FROM_FIRST_OFFSET);
        consumer.subscribe("TopicTest", "*");
        consumer.setNamesrvAddr("127.0.0.1:9876");
        consumer.registerMessageListener(new MessageListenerConcurrently() {
            @Override
            public ConsumeConcurrentlyStatus consumeMessage(List<MessageExt> msgs,
                ConsumeConcurrentlyContext context) {
                System.out.printf("%s Receive New Messages: %s %n", Thread.currentThread().getName(), msgs);
                return ConsumeConcurrentlyStatus.CONSUME_SUCCESS;
            }
        });
        consumer.start();
        System.out.printf("Consumer Started.%n");
    }

    static RPCHook getAclRPCHook() {
        return new AclClientRPCHook(new SessionCredentials("rocketmq","12345678"));
    }
}
發現並不沒有消費消息,符合預期。
關於RocketMQ ACL的使用就介紹到這裏了,下一篇將介紹RocketMQ ACL實現原理。
推薦閱讀:
1、
2、
3、
4、
作者介紹:
丁威,《RocketMQ技術內幕》作者,RocketMQ 社區佈道師,公眾號: 維護者,目前已陸續發表源碼分析Java集合、Java 併發包(JUC)、Netty、Mycat、Dubbo、RocketMQ、Mybatis等源碼專欄。
本站聲明:網站內容來源於博客園,如有侵權,請聯繫我們,我們將及時處理
【其他文章推薦】
※為什麼 USB CONNECTOR 是電子產業重要的元件?
※網頁設計一頭霧水??該從何著手呢? 找到專業技術的網頁設計公司,幫您輕鬆架站!
※想要讓你的商品成為最夯、最多人討論的話題?網頁設計公司讓你強力曝光
※想知道最厲害的台北網頁設計公司推薦、台中網頁設計公司推薦專業設計師”嚨底家”!!

上一篇我們介紹了canvas繪製工作流的大概步驟,接下來會有系列文章細緻的介紹怎麼用canvas繪製工作流;這篇文章主要介紹用canvas繪製流程節點。
繪製前我們需要先準備一張節點圖片,例如:;好了,正題開始:
<canvas id="canvasId" width = "800" height="600" style="border:1px solid black; margin-left: 1px;"></canvas>
這裏要注意設置canvas標籤的寬度跟高度,也就是要設置畫布的寬度跟高度。
var _canvas= document.getElementById(“canvasId”);

var _height = _canvas.height;//獲取畫布高度

var _width = _canvas.width;//獲取畫布寬度

Var ctx =_canvas.getContext('2d');

//畫個畫布大小的長方形,目的是為了有個好看的小邊框框
ctx.clearRect(0, 0, _width, _height);

/*繪製畫布的背景線*/
//設置線寬
ctx.lineWidth  = 0.1;
//繪製縱向背景線
for(var i = 1; i < _width / 15; i++) {
  ctx.beginPath();
  ctx.moveTo(i * 15, 0);
  ctx.lineTo(i * 15, _height);
  ctx.stroke();
}
//繪製橫向背景線
for(var i = 1; i < _ height / 15; i++) {
  ctx.beginPath();
  ctx.moveTo(0, i * 15);
  ctx.lineTo(_width, i * 15);
  ctx.stroke();
}
繪製完效果如圖:
 //創建新的圖片對象

 var _img = new Image();

  //指定圖片的URL

 _img.src="node.png";
我這裏為了舉個例子直接創建圖片對象,實際繪製過程中可以直接獲取圖片對象,因為動態創建圖片對象是有個圖片加載的時間。
ctx.drawImage(_img,_x,_y,_imgWidth, _imgHeight);
這裏_img是上面獲取到的圖片對象,_x是圖片要繪製在畫布中的x坐標,_y是圖片要繪製在畫布中的_y坐標,_imgWidth是要將圖片繪製的寬度,_imgHeight是要將 圖片繪製的寬度。
實際應用過程中,一般都會當去鼠標的位置當做x坐標跟y坐標,具體的後面文章會介紹到。
繪製的效果圖:
節點下面的文字後面文章會詳細講到怎麼繪製。
每天get一點點,每天成長一點點,好了,今天就到這裏。
本站聲明:網站內容來源於博客園,如有侵權,請聯繫我們,我們將及時處理
【其他文章推薦】
※為什麼 USB CONNECTOR 是電子產業重要的元件?
※網頁設計一頭霧水??該從何著手呢? 找到專業技術的網頁設計公司,幫您輕鬆架站!
※想要讓你的商品成為最夯、最多人討論的話題?網頁設計公司讓你強力曝光
※想知道最厲害的台北網頁設計公司推薦、台中網頁設計公司推薦專業設計師”嚨底家”!!

相應的充足資源的Linux服務器;
設置相應的主機名,參考命令:
1 hostnamectl set-hostname k8smaster
Mac及UUID唯一;
若未關閉防火牆則建議放通相應端口,如下:
Master節點——
|
規則 |
方向 |
端口範圍 |
作用 |
使用者 |
|
TCP |
Inbound |
6443* |
Kubernetes API server |
All |
|
TCP |
Inbound |
2379-2380 |
etcd server client API |
kube-apiserver, etcd |
|
TCP |
Inbound |
10250 |
Kubelet API |
Self, Control plane |
|
TCP |
Inbound |
10251 |
kube-scheduler |
Self |
|
TCP |
Inbound |
10252 |
kube-controller-manager |
Self |
Worker 節點——
|
規則 |
方向 |
端口範圍 |
作用 |
使用者 |
|
TCP |
Inbound |
10250 |
Kubelet API |
Self, Control plane |
|
TCP |
Inbound |
30000-32767 |
NodePort Services** |
All |
其他更多前置準備見:
延伸1:對master節點服務組件的理解:
Master節點上面主要由四個模塊組成:APIServer,schedule,controller-manager,etcd。
APIServer: APIServer負責對外提供RESTful的kubernetes API的服務,它是系統管理指令的統一接口,任何對資源的增刪該查都要交給APIServer處理后再交給etcd,如架構圖中所示,kubectl(Kubernetes提供的客戶端工具,該工具內部就是對Kubernetes API的調用)是直接和APIServer交互的。
schedule: schedule負責調度Pod到合適的Node上,如果把scheduler看成一個黑匣子,那麼它的輸入是pod和由多個Node組成的列表,輸出是Pod和一個Node的綁定,即將這個pod部署到這個Node上。Kubernetes目前提供了調度算法,但是同樣也保留了接口,用戶可以根據自己的需求定義自己的調度算法。
controller manager: 如果APIServer做的是前台的工作的話,那麼controller manager就是負責後台的。每一個資源都對應一個控制器。而control manager就是負責管理這些控制器的,比如我們通過APIServer創建了一個Pod,當這個Pod創建成功后,APIServer的任務就算完成了。而後面保證Pod的狀態始終和我們預期的一樣的重任就由controller manager去保證了。
etcd:etcd是一個高可用的鍵值存儲系統,kubernetes使用它來存儲各個資源的狀態,從而實現了Restful的API。
延伸2:對master節點服務組件的理解:
每個Node節點主要由三個模板組成:kubelet、kube-proxy、runtime。
runtime:runtime指的是容器運行環境,目前Kubernetes支持docker和rkt兩種容器。
kube-proxy: 該模塊實現了kubernetes中的服務發現和反向代理功能。kube-proxy支持TCP和UDP連接轉發,默認基於Round Robin算法將客戶端流量轉發到與service對應的一組後端pod。服務發現方面,kube-proxy使用etcd的watch機制,監控集群中service和endpoint對象數據的動態變化,並且維護一個service到endpoint的映射關係,從而保證了後端pod的IP變化不會對訪問者造成影響。另外,kube-proxy還支持session affinity。
kublet:kublet是Master在每個Node節點上面的agent,是Node節點上面最重要的模塊,它負責維護和管理該Node上的所有容器,但是如果容器不是通過kubernetes創建的,它並不會管理。本質上,它負責使Pod的運行狀態與期望的狀態一致。
提示:本實驗使用三節點master部署,從而實現master的高可用。
kube-apiserver:
kube-controller-manager:
kube-scheduler:
kubelet:
kube-proxy:
集群插件:
注意:以下4.1至4.7步驟可通過如下腳本快速實現:
  1 [root@k8smaster01 ~]# vi k8sinit.sh
  2 # Modify Author: xhy
  3 # Modify Date: 2019-06-23 22:19
  4 # Version:
  5 #***************************************************************#
  6 # Initialize the machine. This needs to be executed on every machine.
  7
  8 # Add host domain name.
  9 cat >> /etc/hosts << EOF
 10 172.24.8.71 k8smaster01
 11 172.24.8.72 k8smaster02
 12 172.24.8.73 k8smaster03
 13 172.24.8.74 k8snode01
 14 172.24.8.75 k8snode02
 15 EOF
 16
 17 # Add docker user
 18 useradd -m docker
 19
 20 # Disable the SELinux.
 21 sed -i 's/^SELINUX=.*/SELINUX=disabled/' /etc/selinux/config
 22
 23 # Turn off and disable the firewalld.
 24 systemctl stop firewalld
 25 systemctl disable firewalld
 26
 27 # Modify related kernel parameters & Disable the swap.
 28 cat > /etc/sysctl.d/k8s.conf << EOF
 29 net.ipv4.ip_forward = 1
 30 net.bridge.bridge-nf-call-ip6tables = 1
 31 net.bridge.bridge-nf-call-iptables = 1
 32 net.ipv4.tcp_tw_recycle = 0
 33 vm.swappiness = 0
 34 vm.overcommit_memory = 1
 35 vm.panic_on_oom = 0
 36 net.ipv6.conf.all.disable_ipv6 = 1
 37 EOF
 38 sysctl -p /etc/sysctl.d/k8s.conf >&/dev/null
 39 swapoff -a
 40 sed -i '/ swap / s/^\(.*\)$/#\1/g' /etc/fstab
 41 modprobe br_netfilter
 42
 43 # Add ipvs modules
 44 cat > /etc/sysconfig/modules/ipvs.modules <<EOF
 45 #!/bin/bash
 46 modprobe -- ip_vs
 47 modprobe -- ip_vs_rr
 48 modprobe -- ip_vs_wrr
 49 modprobe -- ip_vs_sh
 50 modprobe -- nf_conntrack_ipv4
 51 EOF
 52 chmod 755 /etc/sysconfig/modules/ipvs.modules
 53 bash /etc/sysconfig/modules/ipvs.modules
 54
 55 # Install rpm
 56 yum install -y conntrack ntpdate ntp ipvsadm ipset jq iptables curl sysstat libseccomp wget
 57
 58 # Create k8s directory $$ Add system PATH
 59 mkdir -p  /opt/k8s/{bin,work} /etc/{kubernetes,etcd}/cert
 60 echo 'PATH=/opt/k8s/bin:$PATH' >>/root/.bashrc
 61 source /root/.bashrc
 62
 63 # Reboot the machine.
 64 reboot
  1 [root@k8smaster01 ~]# cat <<EOF >> /etc/hosts
  2 172.24.8.71 k8smaster01
  3 172.24.8.72 k8smaster02
  4 172.24.8.73 k8smaster03
  5 172.24.8.74 k8snode01
  6 172.24.8.75 k8snode02
  7 EOF
提示:所有節點均建議如上操作。
1 [root@k8smaster01 ~]# useradd -m docker
提示:所有節點均建議如上操作。
  1 [root@k8smaster01 ~]# setenforce 0
  2 [root@k8smaster01 ~]# sed -i 's/^SELINUX=.*/SELINUX=disabled/' /etc/selinux/config
  1 [root@k8smaster01 ~]# systemctl stop firewalld
  2 [root@k8smaster01 ~]# systemctl disable firewalld			#關閉防火牆
  3 [root@k8smaster01 ~]# cat <<EOF >> /etc/sysctl.d/k8s.conf
  4 net.bridge.bridge-nf-call-ip6tables = 1
  5 net.bridge.bridge-nf-call-iptables = 1
  6 net.ipv4.ip_forward = 1
  7 EOF
  8 [root@k8smaster01 ~]# modprobe br_netfilter
  9 [root@k8smaster01 ~]# sysctl -p /etc/sysctl.d/k8s.conf
提示:所有節點均建議如上操作。
  1 [root@k8smaster01 ~]# sed -i '/ swap / s/^\(.*\)$/#\1/g' /etc/fstab
  2 [root@k8smaster01 ~]# echo "vm.swappiness = 0" >> /etc/sysctl.d/k8s.conf	#禁止使用 swap 空間,只有當系統 OOM 時才允許使用它
  3 [root@k8smaster01 ~]# sysctl -p /etc/sysctl.d/k8s.conf
  1 [root@k8smaster01 ~]# cat <<EOF >> /etc/sysctl.d/k8s.conf
  2 vm.overcommit_memory = 1						# 不檢查物理內存是否夠用
  3 vm.panic_on_oom = 0							# 開啟 OOM
  4 net.ipv6.conf.all.disable_ipv6 = 1					# 關閉 IPV6
  5 EOF
  6 [root@k8smaster01 ~]# sysctl -p /etc/sysctl.d/k8s.conf
  7 [root@k8smaster01 ~]# mkdir -p  /opt/k8s/{bin,work} /etc/{kubernetes,etcd}/cert	#創建相應目錄
  8 [root@k8smaster01 ~]# yum install -y conntrack ntpdate ntp ipvsadm ipset jq iptables curl sysstat libseccomp wget
提示:必須關閉 tcp_tw_recycle,否則和 NAT 衝突,會導致服務不通;
關閉 IPV6,防止觸發 docker BUG。
pod的負載均衡是用kube-proxy來實現的,實現方式有兩種,一種是默認的iptables,一種是ipvs,相對iptables,ipvs有更好的性能。且當前ipvs已經加入到了內核的主幹。
為kube-proxy開啟ipvs的前提需要加載以下的內核模塊:
  1 [root@k8smaster01 ~]# cat > /etc/sysconfig/modules/ipvs.modules <<EOF
  2 #!/bin/bash
  3 modprobe -- ip_vs
  4 modprobe -- ip_vs_rr
  5 modprobe -- ip_vs_wrr
  6 modprobe -- ip_vs_sh
  7 modprobe -- nf_conntrack_ipv4
  8 EOF
  9 [root@k8smaster01 ~]# chmod 755 /etc/sysconfig/modules/ipvs.modules
 10 [root@k8smaster01 ~]# bash /etc/sysconfig/modules/ipvs.modules
 11 [root@k8smaster01 ~]# lsmod | grep -e ip_vs -e nf_conntrack_ipv4
 12 [root@k8smaster01 ~]# yum -y install ipvsadm
提示:所有節點均建議如上操作。
為了更好的管理和查看ipvs,可安裝相應的管理工具《002.LVS管理工具的安裝與使用》。
為了更方便遠程分發文件和執行命令,本實驗配置master節點到其它節點的 ssh 信任關係。
  1 [root@k8smaster01 ~]# ssh-keygen -f ~/.ssh/id_rsa -N ''
  2 [root@k8smaster01 ~]# ssh-copy-id -i ~/.ssh/id_rsa.pub root@k8smaster01
  3 [root@k8smaster01 ~]# ssh-copy-id -i ~/.ssh/id_rsa.pub root@k8smaster02
  4 [root@k8smaster01 ~]# ssh-copy-id -i ~/.ssh/id_rsa.pub root@k8smaster03
  5 [root@k8smaster01 ~]# ssh-copy-id -i ~/.ssh/id_rsa.pub root@k8snode01
  6 [root@k8smaster01 ~]# ssh-copy-id -i ~/.ssh/id_rsa.pub root@k8snode02
提示:此操作僅需要在master節點操作。
後續使用的環境變量都定義在文件 environment.sh 中,同時拷貝到所有節點的 /opt/k8s/bin 目錄:
  1 #!/usr/bin/bash
  2
  3 # 生成 EncryptionConfig 所需的加密 key
  4 export ENCRYPTION_KEY=$(head -c 32 /dev/urandom | base64)
  5
  6 # 集群 MASTER 機器 IP 數組
  7 export MASTER_IPS=(172.24.8.71 172.24.8.72 172.24.8.73)
  8
  9 # 集群 MASTER IP 對應的主機名數組
 10 export MASTER_NAMES=(k8smaster01 k8smaster02 k8smaster03)
 11
 12 # 集群 NODE 機器 IP 數組
 13 export NODE_IPS=(172.24.8.74 172.24.8.75)
 14
 15 # 集群 NODE IP 對應的主機名數組
 16 export NODE_NAMES=(k8snode01 k8snode02)
 17
 18 # 集群所有機器 IP 數組
 19 export ALL_IPS=(172.24.8.71 172.24.8.72 172.24.8.73 172.24.8.74 172.24.8.75)
 20
 21 # 集群所有IP 對應的主機名數組
 22 export ALL_NAMES=(k8smaster01 k8smaster02 k8smaster03 k8snode01 k8snode02)
 23
 24 # etcd 集群服務地址列表
 25 export ETCD_ENDPOINTS="https://172.24.8.71:2379,https://172.24.8.72:2379,https://172.24.8.73:2379"
 26
 27 # etcd 集群間通信的 IP 和端口
 28 export ETCD_NODES="k8smaster01=https://172.24.8.71:2380,k8smaster02=https://172.24.8.72:2380,k8smaster03=https://172.24.8.73:2380"
 29
 30 # kube-apiserver 的反向代理(kube-nginx)地址端口
 31 export KUBE_APISERVER="https://127.0.0.1:8443"
 32
 33 # 節點間互聯網絡接口名稱
 34 export IFACE="eth0"
 35
 36 # etcd 數據目錄
 37 export ETCD_DATA_DIR="/data/k8s/etcd/data"
 38
 39 # etcd WAL 目錄,建議是 SSD 磁盤分區,或者和 ETCD_DATA_DIR 不同的磁盤分區
 40 export ETCD_WAL_DIR="/data/k8s/etcd/wal"
 41
 42 # k8s 各組件數據目錄
 43 export K8S_DIR="/data/k8s/k8s"
 44
 45 # docker 數據目錄
 46 export DOCKER_DIR="/data/k8s/docker"
 47
 48 ## 以下參數一般不需要修改
 49
 50 # TLS Bootstrapping 使用的 Token,可以使用命令 head -c 16 /dev/urandom | od -An -t x | tr -d ' ' 生成
 51 BOOTSTRAP_TOKEN="41f7e4ba8b7be874fcff18bf5cf41a7c"
 52
 53 # 最好使用 當前未用的網段 來定義服務網段和 Pod 網段
 54
 55 # 服務網段,部署前路由不可達,部署後集群內路由可達(kube-proxy 保證)
 56 SERVICE_CIDR="10.254.0.0/16"
 57
 58 # Pod 網段,建議 /16 段地址,部署前路由不可達,部署後集群內路由可達(flanneld 保證)
 59 CLUSTER_CIDR="172.30.0.0/16"
 60
 61 # 服務端口範圍 (NodePort Range)
 62 export NODE_PORT_RANGE="30000-32767"
 63
 64 # flanneld 網絡配置前綴
 65 export FLANNEL_ETCD_PREFIX="/kubernetes/network"
 66
 67 # kubernetes 服務 IP (一般是 SERVICE_CIDR 中第一個IP)
 68 export CLUSTER_KUBERNETES_SVC_IP="10.254.0.1"
 69
 70 # 集群 DNS 服務 IP (從 SERVICE_CIDR 中預分配)
 71 export CLUSTER_DNS_SVC_IP="10.254.0.2"
 72
 73 # 集群 DNS 域名(末尾不帶點號)
 74 export CLUSTER_DNS_DOMAIN="cluster.local"
 75
 76 # 將二進制目錄 /opt/k8s/bin 加到 PATH 中
 77 export PATH=/opt/k8s/bin:$PATH
  1 [root@k8smaster01 ~]# source environment.sh
  2 [root@k8smaster01 ~]# for all_ip in ${ALL_IPS[@]}
  3   do
  4     echo ">>> ${all_ip}"
  5     scp environment.sh root@${all_ip}:/opt/k8s/bin/
  6     ssh root@${all_ip} "chmod +x /opt/k8s/bin/*"
  7   done
本站聲明:網站內容來源於博客園,如有侵權,請聯繫我們,我們將及時處理
【其他文章推薦】
※如何讓商品強力曝光呢? 網頁設計公司幫您建置最吸引人的網站,提高曝光率!!
※網頁設計一頭霧水??該從何著手呢? 找到專業技術的網頁設計公司,幫您輕鬆架站!
※想知道最厲害的台北網頁設計公司推薦、台中網頁設計公司推薦專業設計師”嚨底家”!!
摘錄自2019年12月30日中央通訊社報導
澳洲野火肆虐,重創當地生態環境及空氣品質,已逾26萬人連署,建議取消知名的雪梨跨年煙火秀,以免助長空氣污染,把錢省下來幫助受災農民及消防員等,不過,雪梨市長克洛弗.摩爾(Clover Moore)已煙火秀照舊,且據報導,高達10萬支煙火都已裝船開運,其中有8成來自中國。
綜合媒體報導,雪梨是全球最早迎接新年的大城市之一,跨年煙火秀更是全球慶祝跨年的重點戲之一,去(2018)年就花了580萬澳元(約1.2億元台幣),今年打算花650萬澳元(約1.36億台幣)來辦跨年煙火秀,但今年正值澳洲發生數十年來最嚴重的野火災難,致農損嚴重,截至目前並未撲滅,致使澳洲民眾在網上連署,建議當局取消今年跨年煙火秀。
不過當局並不打算取消,女市長摩爾並表示,若是取消,可能重創雪梨商家們,也會毀了數以萬計前來雪梨參加跨年活動人們的計劃。
即使如此,這場煙火秀是否在最後喊停,還在未定之天,因為,澳洲野火未停,仍有接近100個火場火勢仍未撲滅,雪梨所屬的新南威爾斯省的災情最嚴重,且位於雪梨西南面的巴爾莫勒爾鎮幾乎全毀,許多公路仍然封閉;且產生的空氣污染已經形成有毒煙霧,籠罩雪梨及其他主要城市。
由於East Gippsland的森林火災不斷升級,加上熱浪來襲,預計今天氣溫可能升高到44度,維多利亞州當局已在昨天(29日)下令,全面撤離Goongerah和Martins Creek地區居民,今天更將全州實行禁火令,嚴禁人們在戶外用火。
本站聲明:網站內容來源環境資訊中心https://e-info.org.tw/,如有侵權,請聯繫我們,我們將及時處理
【其他文章推薦】
※為什麼 USB CONNECTOR 是電子產業重要的元件?
※網頁設計一頭霧水??該從何著手呢? 找到專業技術的網頁設計公司,幫您輕鬆架站!
※想要讓你的商品成為最夯、最多人討論的話題?網頁設計公司讓你強力曝光
※想知道最厲害的台北網頁設計公司推薦、台中網頁設計公司推薦專業設計師”嚨底家”!!
環境資訊中心綜合外電;姜唯 編譯;林大利 審校
本站聲明:網站內容來源環境資訊中心https://e-info.org.tw/,如有侵權,請聯繫我們,我們將及時處理
【其他文章推薦】
※如何讓商品強力曝光呢? 網頁設計公司幫您建置最吸引人的網站,提高曝光率!!
※網頁設計一頭霧水??該從何著手呢? 找到專業技術的網頁設計公司,幫您輕鬆架站!
※想知道最厲害的台北網頁設計公司推薦、台中網頁設計公司推薦專業設計師”嚨底家”!!